
Last month I started writing about the DevOps pipeline that I built out for a PHP project. Today I plan on filling it out a bit more. What I described last week is what many people consider a full CI Pipeline, executing unit tests, code coverage, and static analysis. I threw in a little more with some dependency checking of third party tools. At Coveros, our SecureAgileTM process encourages us to do more before we hand the code over to QA. We want to smoke and acceptance test the application, along with run a brief security scan. This post will cover how I accomplished these tasks for our PHP application.
Like many applications, in order to execute any real Smoke or Acceptance tests, the application has to be deployed somewhere. I decided to use AWS and Chef to manage our deploys, mainly because it was so simple.
Deploy To DevInt
I chose to go with AWS and Chef, because of the excellent support that AWS has built in for launching instances, and executing chef recipes. I configured a special user on AWS with permissions to launch and terminate a new machine within ec2. I installed knife ec2 and aws cli onto our SecureCITM server, which Rich Mills went over in a previous post. I used the knife ec2 server command to launch an AMI with the specifics that I desired, and to install the chef recipes I wanted. I had previously setup a chef instance, and so I needed the Jenkins user to be connected to this server, and have those credentials installed in [jenkins-home]/.chef/knife.rb. This exercise is left up to you as the user.
To launch a new instance for our DevInt tests I executed the simple command that is below
knife ec2 server create \
    --config ~/.chef/knife.rb \
    --ssh-key jenkins-client \
    -i ~/.chef/jenkins-client.pem \
    --image $ami \
    --flavor $size \
    --winrm-user $user \
    --node-name $taggedName \
    --subnet subnet-b28a9e99 \
    --associate-public-ip \
    --ebs-size $Drive_Size \
    --security-group-ids sg-f6a59890 \
    --run-list $Run_List \
    --json-attributes $JSON \
    --tags "Jenkins Build Number"=$BUILD_NUMBER,"Jenkins Build Id"=$BUILD_ID,"Name"=$taggedName
You’ll notice there are several values being pulled in as variables, such as the size of the machine, what run-list (chef cookbooks/recipes to install), and special attribute). For our application in DevInt, I installed a few applications, including PHP, NGINX, and MySQL, and our actual application. The chef recipe for our application reached out to Jenkins to obtain the packaged file, as I described hosting it in our previous post. Our next post will talk a bit more about installations on different environments. We also used encrypted databags with a recipe to install users for each of our developers onto the system, including their public key for access.
Once this machine was launched, I waited until was running, and obtained some key information about the system.
private_ip=`aws ec2 describe-instances --filters "Name=tag-key,Values=Name" "Name=tag-value,Values=$taggedName" | grep PRIVATEIPADDRESSES | cut -f4`
public_ip=`aws ec2 describe-instances --filters "Name=tag-key,Values=Name" "Name=tag-value,Values=$taggedName" | grep ASSOCIATION | head -1 | cut -f4`
instance_id=`aws ec2 describe-instances --filters "Name=tag-key,Values=Name" "Name=tag-value,Values=$taggedName" | grep INSTANCES | cut -f8`
while [ -z "$private_ip" ]; do
  private_ip=`aws ec2 describe-instances --filters "Name=tag-key,Values=Name" "Name=tag-value,Values=$taggedName" | grep PRIVATEIPADDRESSES | cut -f4`
  public_ip=`aws ec2 describe-instances --filters "Name=tag-key,Values=Name" "Name=tag-value,Values=$taggedName" | grep ASSOCIATION | head -1 | cut -f4`
  instance_id=`aws ec2 describe-instances --filters "Name=tag-key,Values=Name" "Name=tag-value,Values=$taggedName" | grep INSTANCES | cut -f8`
done
This information was needed to pass to our future steps, so that we could access the machine, and eventually shut it down as well. I wrote this information out to a file, and passed this file to the downstream job as the paramters.
rm -rf latest_machine
echo "Private_IP=${private_ip}" >> "latest_machine"
echo "Public_IP=${public_ip}" >> "latest_machine"
echo "Instance_ID=${instance_id}" >> "latest_machine"
echo "Tag_Name=${taggedName}" >> "latest_machine"
Smoke Tests
I wanted some smoke tests that would run quickly for our application, and something that would give us some confidence that our application is up and ready to attempt some simple acceptance tests. I decided to go with exercising our API tests for this. We have about a dozen APIs for the system, which I decided to write some tests for. These tests were mostly non-destructive, and the ones that were destructive, I left out of the smoke test, as I wanted to leave the system in a good/clean state for additional testing. I decided to write these testing using the SecureCITM Testing Framework (expect an update to the framework shortly, with an accompanying post). I ended up with just shy of 100 tests that examined the system from a high level, and ensure that some basic functionality should be present.
In order to kick these tests off, I just ran a simple command gradle smoketest. This gradle command was tied to an ant task, that is defined with the included build.xml with the SecureCITM Testing Framework. Rather than simply kick the tests off, I wanted to ensure that Jenkins was ready with the proper/latest system setup. So my entire job looked like this (substituting gradle for the ant command).
#!/bin/bash

#get our framework if needed
if [ ! -f stf-1.4.0.tgz ]; then
  wget https://secureci.reprophet/nexus/service/local/repositories/thirdparty/content/coveros/stf/1.4.0/stf-1.4.0.tgz >/dev/null 2>&1
  tar zxf stf-1.4.0.tgz
  mv stf-1.4.0/* .
  rm -rf stf-1.4.0
fi

#reset our data
[SOME CUSTOM COMMAND]

#execute our tests
ant clean run replace junit-report -k -DappURL=https://${Private_IP} -Dtest-suite=api.xml

#link to results
echo ""
echo ""
echo "Tests are complete, view detailed reports at ${JOB_URL}/ws/test-output/index.html"
That private IP was the one he had provided from our previous Jenkins job to deploy the system. We are using private IPs, as we are working within a private VPC on AWS, and we are keeping all of our machine private from the world. These tests ran in under 1 minute, with the majority of that time (executing tests was under 15 seconds) actually going to converting our TestNG results to JUnit so that the Jenkins pipeline tool could nicely display them. When our tests completed, the results looked something like this.
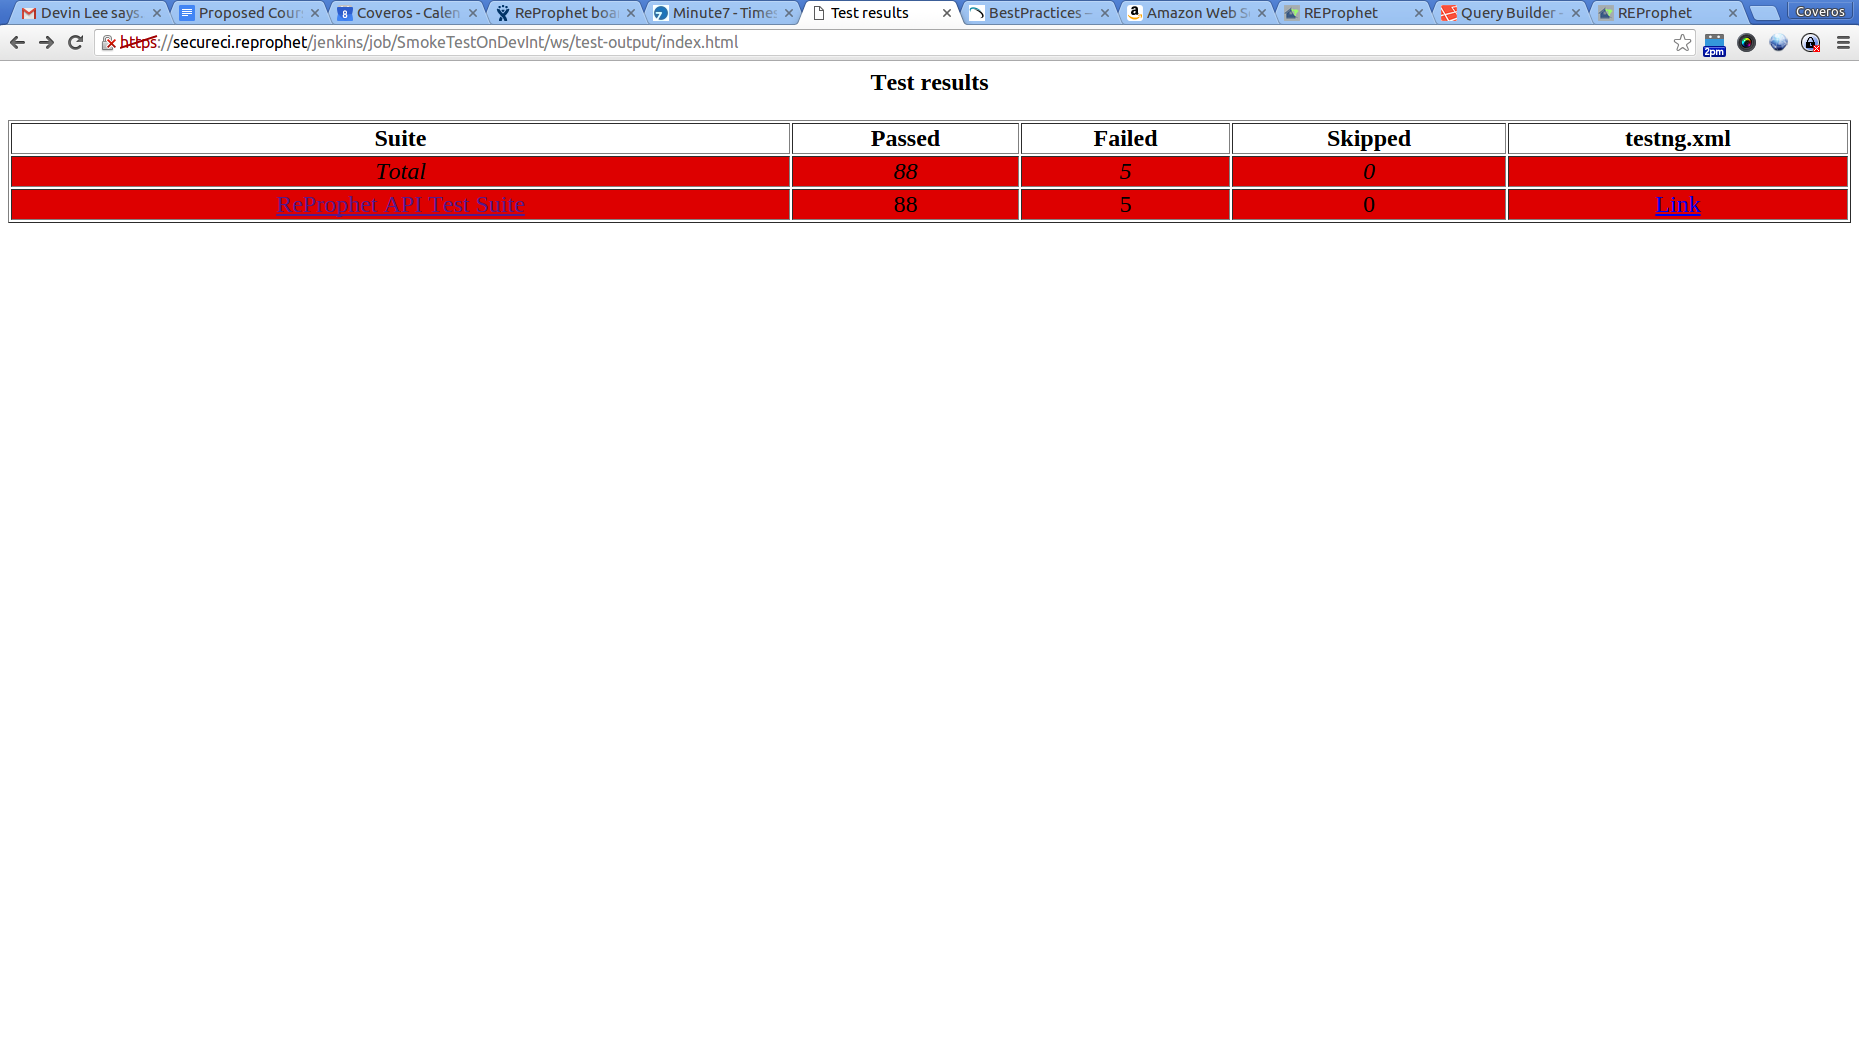
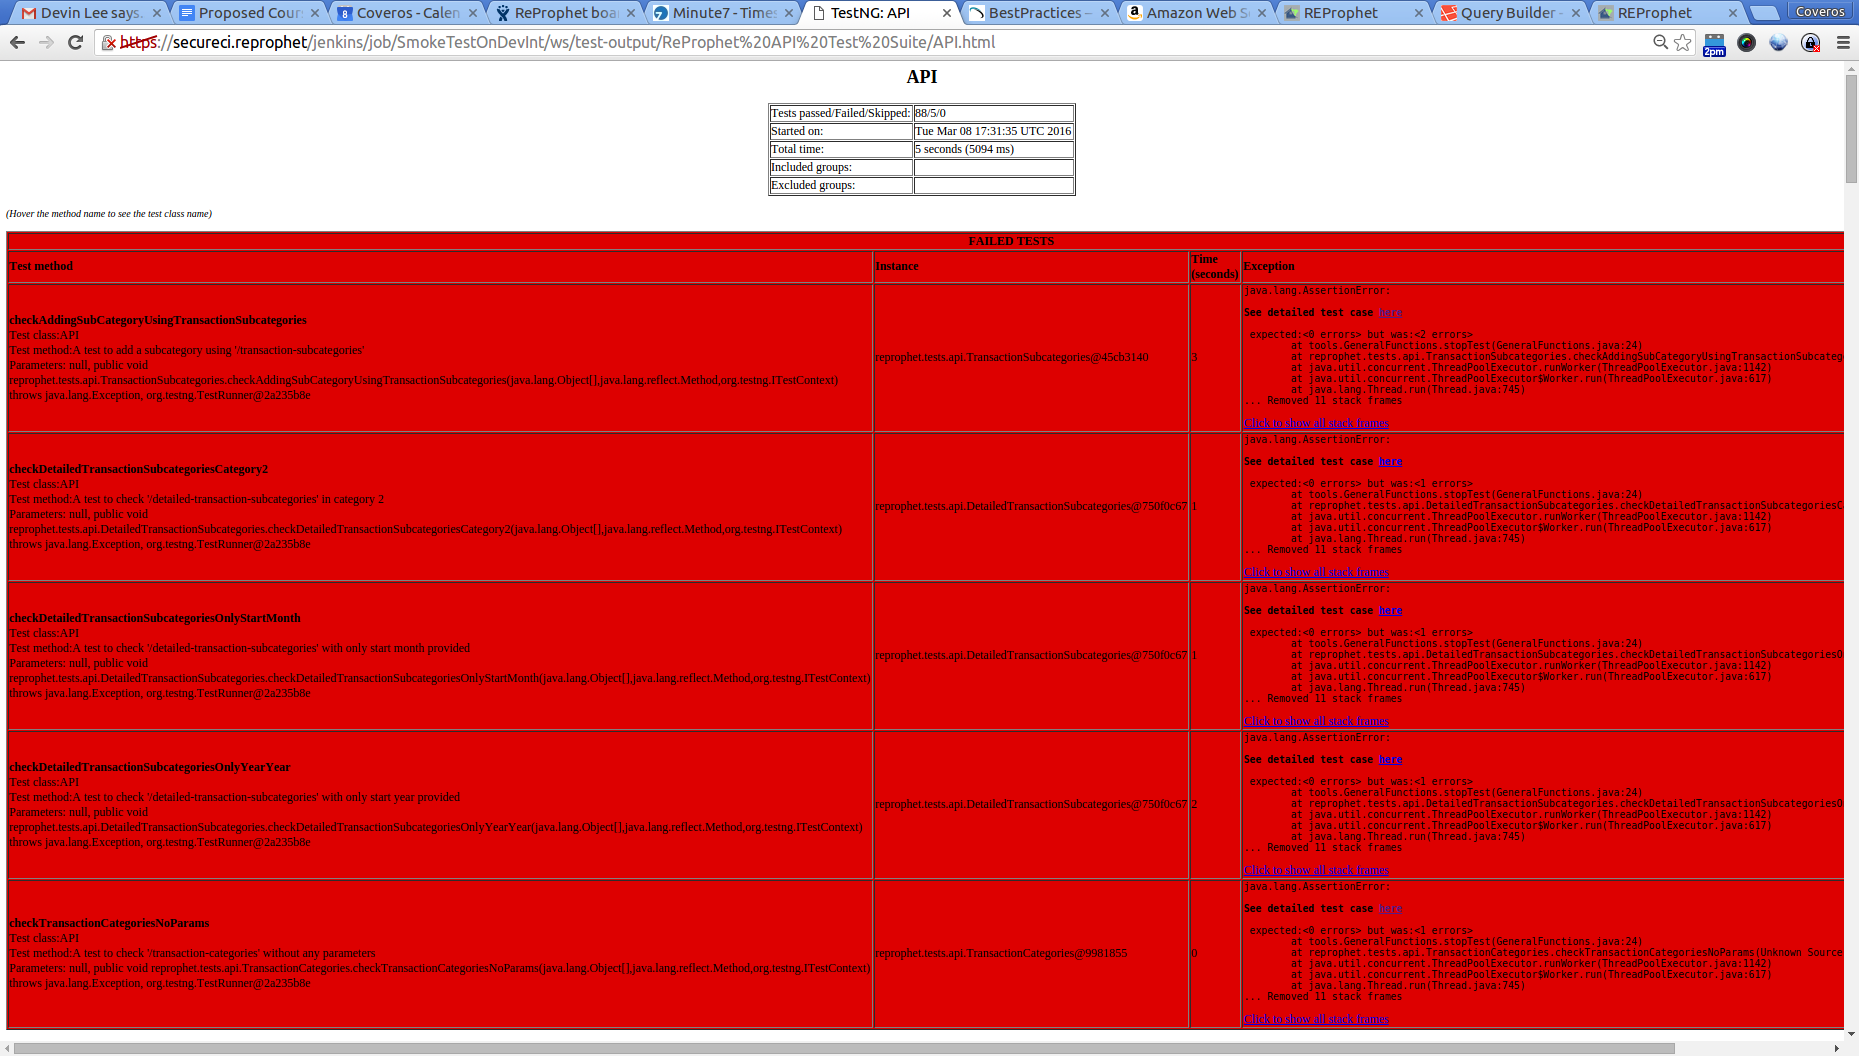
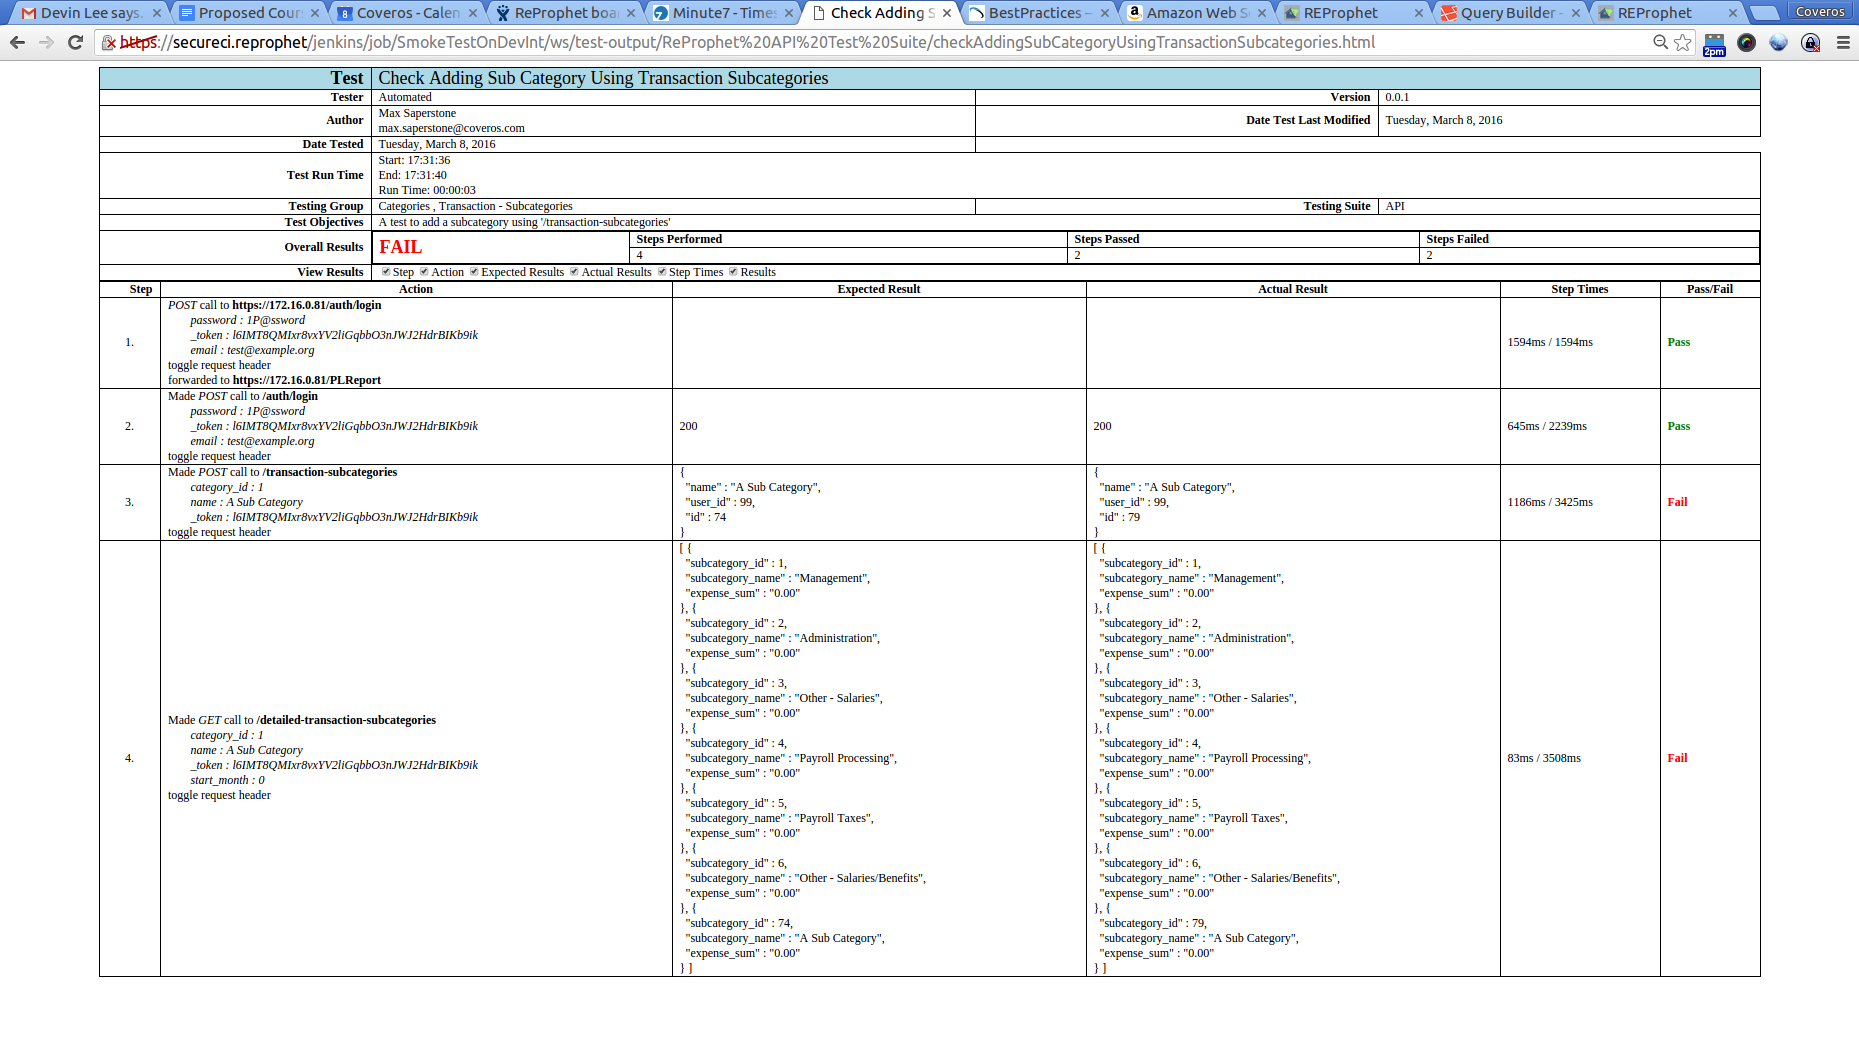
While I should have all passing tests, you can see I have some passing ones, and some failing ones in this situation, so these need to get cleaned up.
Acceptance Tests
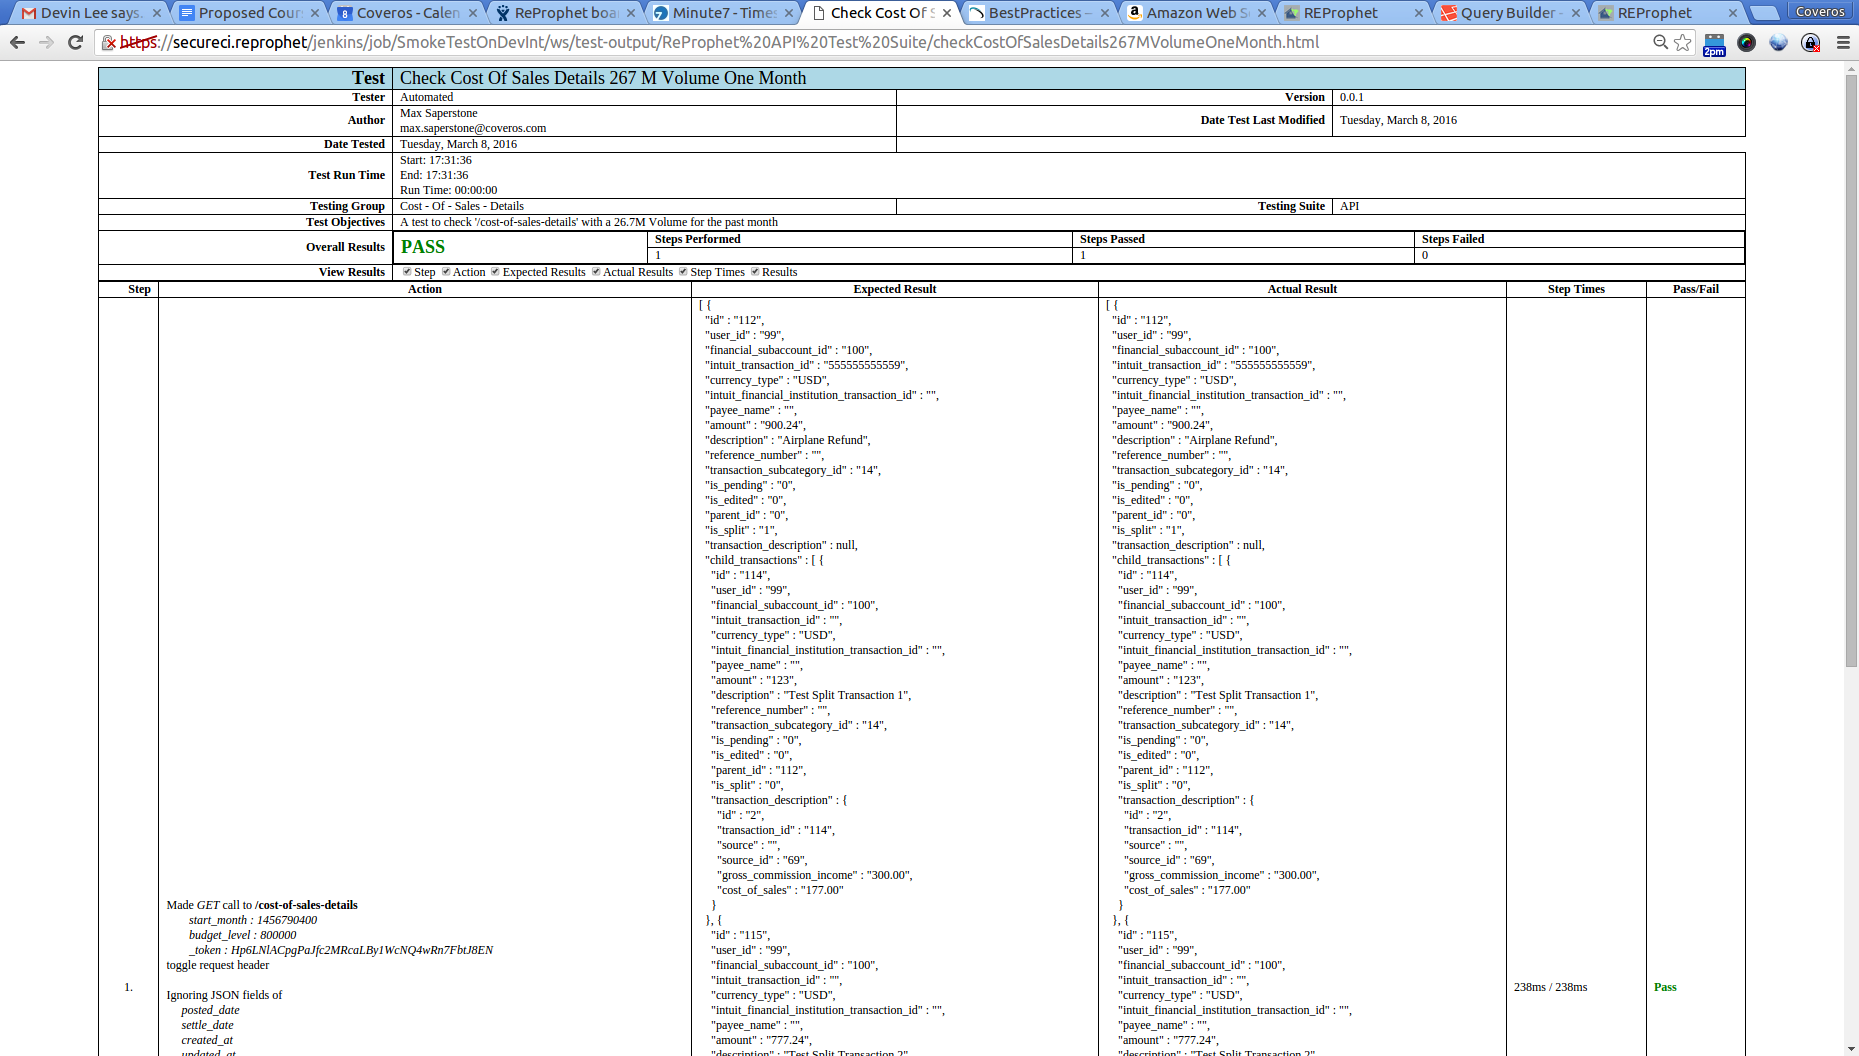
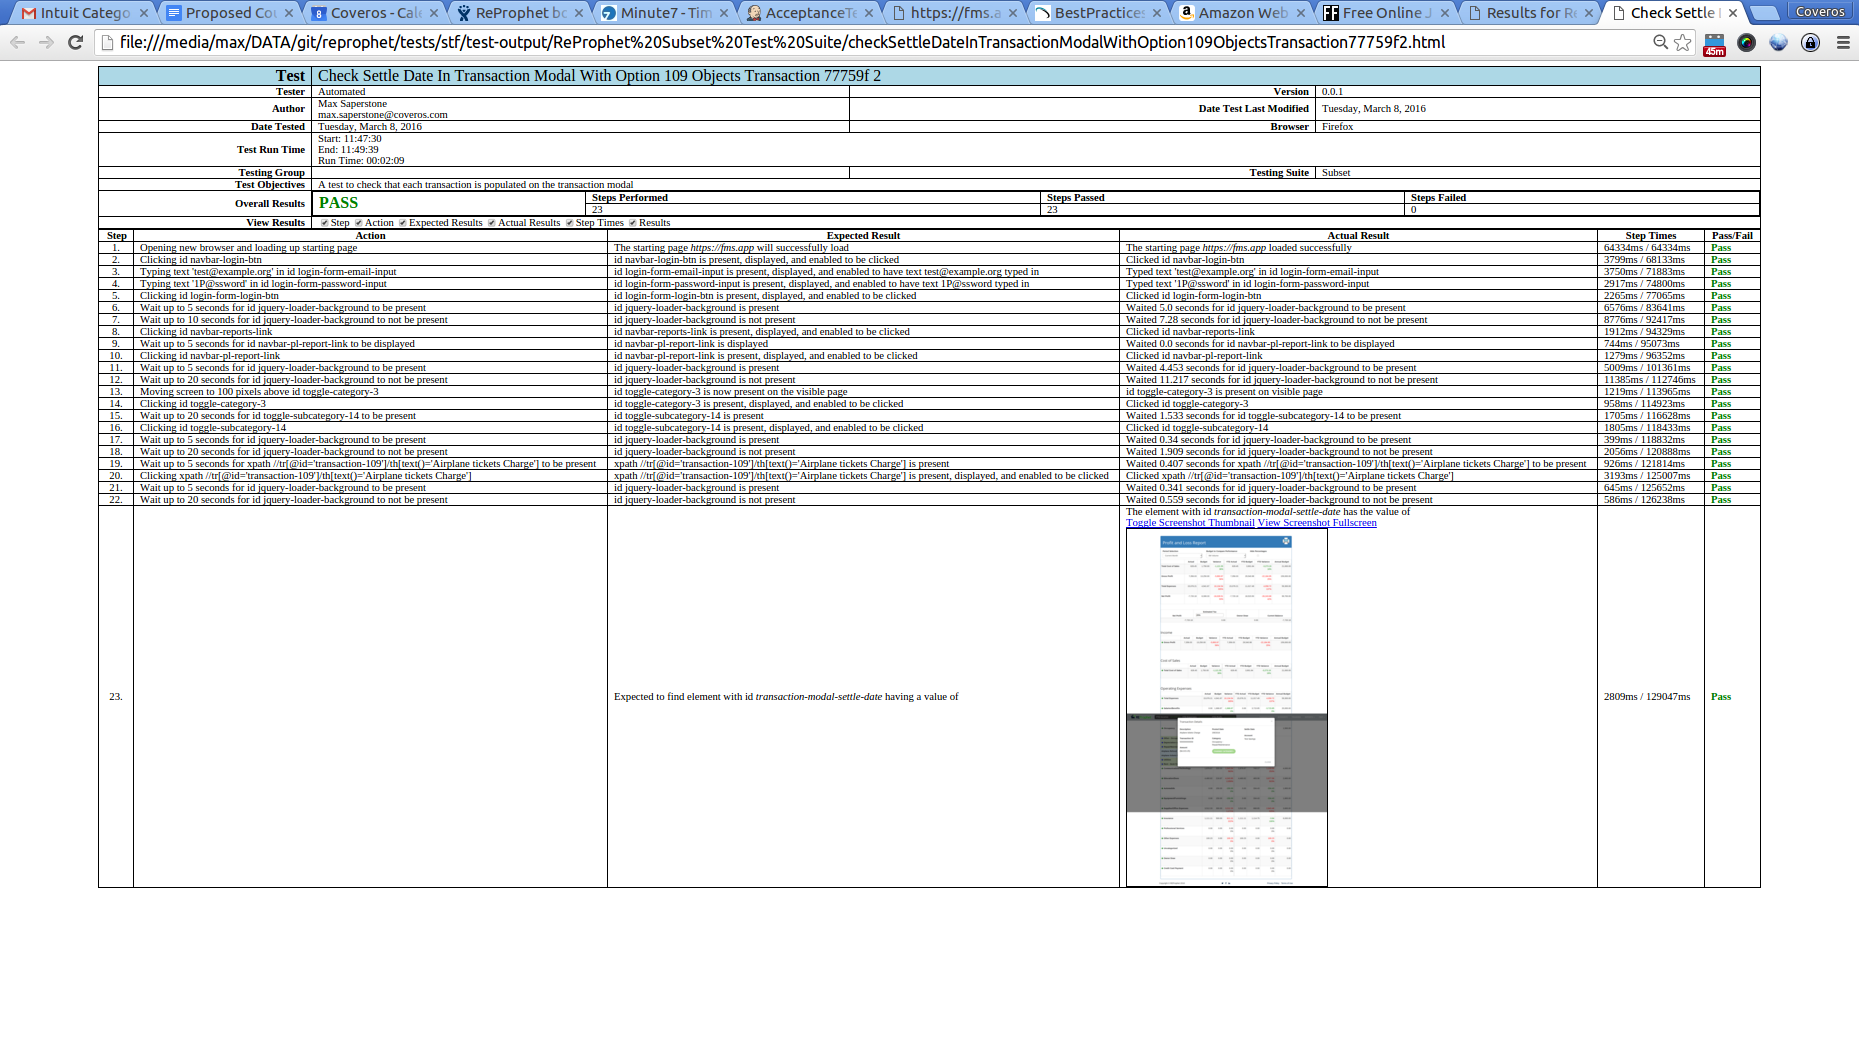
For our acceptance tests I decided to execute some basic Selenium tests. As these can be much slower, I broke up our Selenium tests into two groups: Acceptance and Regression. Our Acceptance tests were quick ones, that just looked at the happy path for each story/bug I was implementing/fixing, with full exercising of the story getting placed in the regression group. I setup groups and tags for each of these tests, again using the SecureCITM Testing Framework. Our results looked similar, and were executed similarly to the above, except instead of executing the api.xml test suite, I used the selenium.xml suite. These tests were also checked to be non-destructive, so that we would have a good system left after they were done. A sample test output file looks something like this.
These tests ran in about 6 minutes, which is a little longer than I wanted, but with 75 Selenium tests, it’s not to bad.
Quick Security Scan
For our last set of tests on DevInt, I wanted to run a quick security scan. I used OWASP’s Zed Attack Proxy, to setup a quick un-authenticated scan of our system. Because this was a quick scan, I simply started ZAP in cmd mode, and pointed it towards our application. The commands looks like below.
    #!/bin/bash

    #cleanup old results
    #rm -rf zapScan.log zapReport.jsp

    #execute the scan
    echo ""
    echo ""
    /opt/zap/zap.sh -cmd -quickurl https://${Private_IP} -quickout $WORKSPACE/zapScan.xml -port 9090 -quickprogress

    #format the results
    sed -i 's/<?xml version="1.0"?>/<?xml version="1.0"?>\n<?xml-stylesheet type="text\/xsl" href="report_html.xsl"?>\n/' $WORKSPACE/zapScan.xml

    #display the results
    echo ""
    echo ""
    echo "Results can be viewed at {JOB_URL}/ws/zapScan.xml"
You can see I are once again passing in the private IP of our app, otherwise everything is strictly out of the basic ZAP instructions. I also formatted the report using an xsl which is available at github. This gives us something nice/pretty to look at in Jenkins.

This scan takes just over a minute to execute, which isn’t too bad for timing.
Destroy DevInt
Once all of these tests have completed, we want to destroy our AWS instance. This is accomplished very simply using the aws cli commands, and again, we want to provide the parameters I had generated from the Deploy to DevInt job.
    knife ec2 server delete ${Instance_ID} \
        --config ~/.chef/knife.rb \
        --purge \
        --node-name ${Tag_Name} \
        --yes
Simple, right? The other thing that I did in this CI pipeline was actually change some of the job dependencies based on the outcome of the tests. If the Smoke test failed, I skipped all subsequent tests, and immediately destroyed the machine, as there wasn’t any point in running additional tests on a broken system. Similarly for the Acceptance tests.
Package A Release Candidate
Finally, if all of our tests worked, I want to push this packaged application out to Nexus, instead of keeping it in Jenkins. While I have a high degree of confidence that everything is working, I want to double check that the code on our development branch (remember that from last time?) can get properly merged into our master branch. So, I used the Jenkins plugin to merge our development code into the master. If this didn’t cause any problems, I re-ran our unit tests, code coverage, and static analysis, to ensure I didn’t miss anything. If all of these results came back the same as the results from the Developer Tests job then I know I have a good build. If any of the results are different, then I have a problem. This means someone checked in something directly to master, which I can’t have, so the build stops and fails. If I have a success, then I go ahead and publish our artifact to Nexus. I have another gradle command for this.
    apply plugin: "distribution"
    apply plugin: "maven"

    def nexusUser = System.getenv("USER") ?: ""
    def nexusPass = System.getenv("PASS") ?: ""

    artifacts {
      archives file(tarfile + ".tgz")
    }
    uploadArchives {
      repositories {
        mavenDeployer {
          repository(url: "https://secureci/nexus/content/repositories/snapshots") {
            authentication(userName: nexusUser, password: nexusPass)
          }
          pom.version = version
        }
      }
    }
Note that the Nexus username and password are stored in system variables, which I set/injected via Jenkins.
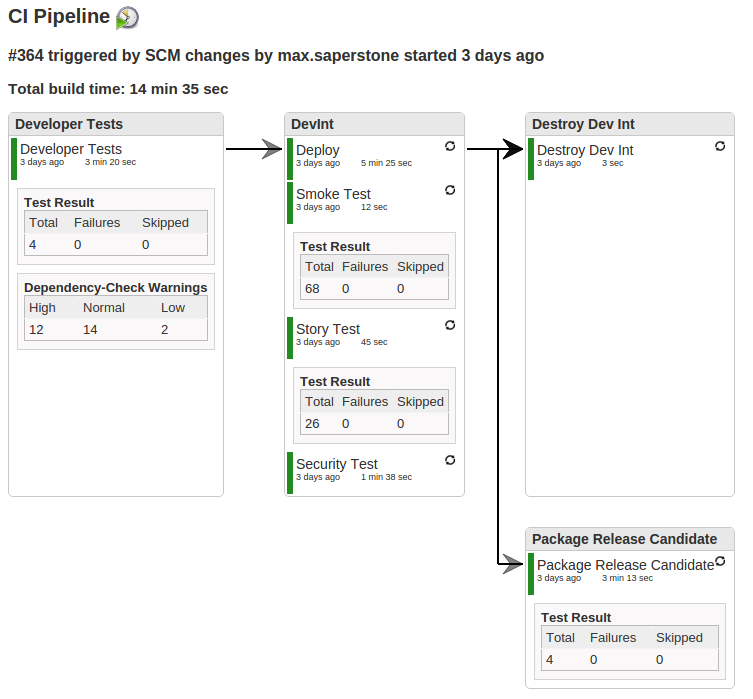
And that is it. This will fully test our application within our CI pipeline. And a final view of this looks like the below:
As a final note, I made certain that every task/job I run within this CI job is in a our gradle build script. This ensures that every developer can execute the exact same steps as the pipeline does, which means that none of the results should be a surprise to them.
Good luck coding, and stay tuned for the last step of this process, setting up the full CD portion of this pipeline.


One thought to “Filling out your CI Pipeline for Your PHP Project”
Pingback: Completing your CD Pipeline for your PHP Project