I recently was put on a project where we are doing development for a website. There was already a large code, and we went in to add features in order to complete the site, and perform code refactoring when necessary. In order to accomplish this successfully, we decided to follow the SecureAgileTM, which involves ensuring the application is following all security best practices, and adding testing; unit, smoke, acceptance, feature, load, and performance. None of this testing was previously in place, and to ensure the refactoring doesn’t break anything, this testing became critical for us. This blog post will be part one of a three part post. This one will discuss setting up the first stage of the CI Pipeline, specific to PHP, with the second one discussing how to complete the CI process. A final post will go over setting up the CD Pipeline.
SecureCITM
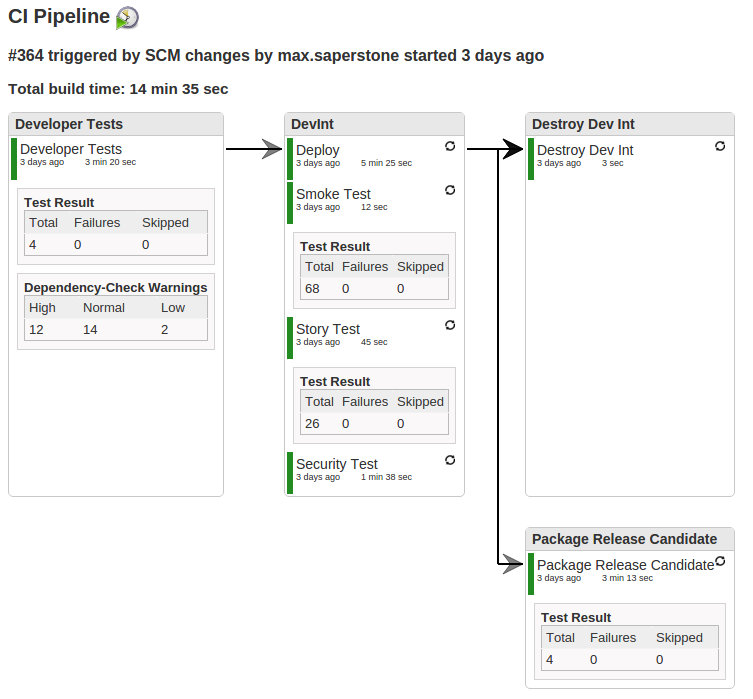
We decided to setup SecureCITH as our build tool, and as it already had the majority of the tools required for our CI work. We decided our CI would encompass a few things: Developer Testing – reproducing all of the local testing a developer should be doing, Developer Integration Testing – smoke testing, acceptance testing, and a quick security scan, and Packaging – declaring the application ready as a potential release candidate, and making it available for further testing.
Developer Testing
Using the tools in SecureCITM we setup a Jenkins job to act as our build tool. We created a repository in Git (via GitBlit) and added a post-receive notification to alert Jenkins each time a push was made to the code. We decided to go with the typical git branching and merging strategy, where the master branch is never touched, and a development branch is branched from to create feature branches. Once work is completed on the feature branch, it will be tested, then merged back into the development branch, re-tested to ensure no one else’s changes impacted anything, and then finally pushed.
- get to ‘development’ branch
git status git checkout development git pull - create a new branch for your code/feature
git checkout -b feature-123 - make your changes
- add your changes and commit
git add file123 git commit -m "My changes" - run your tests
- merge in from development
git rebase development - re-run tests
- rebase into development
git checkout development git pull git rebase featrue-123 git push
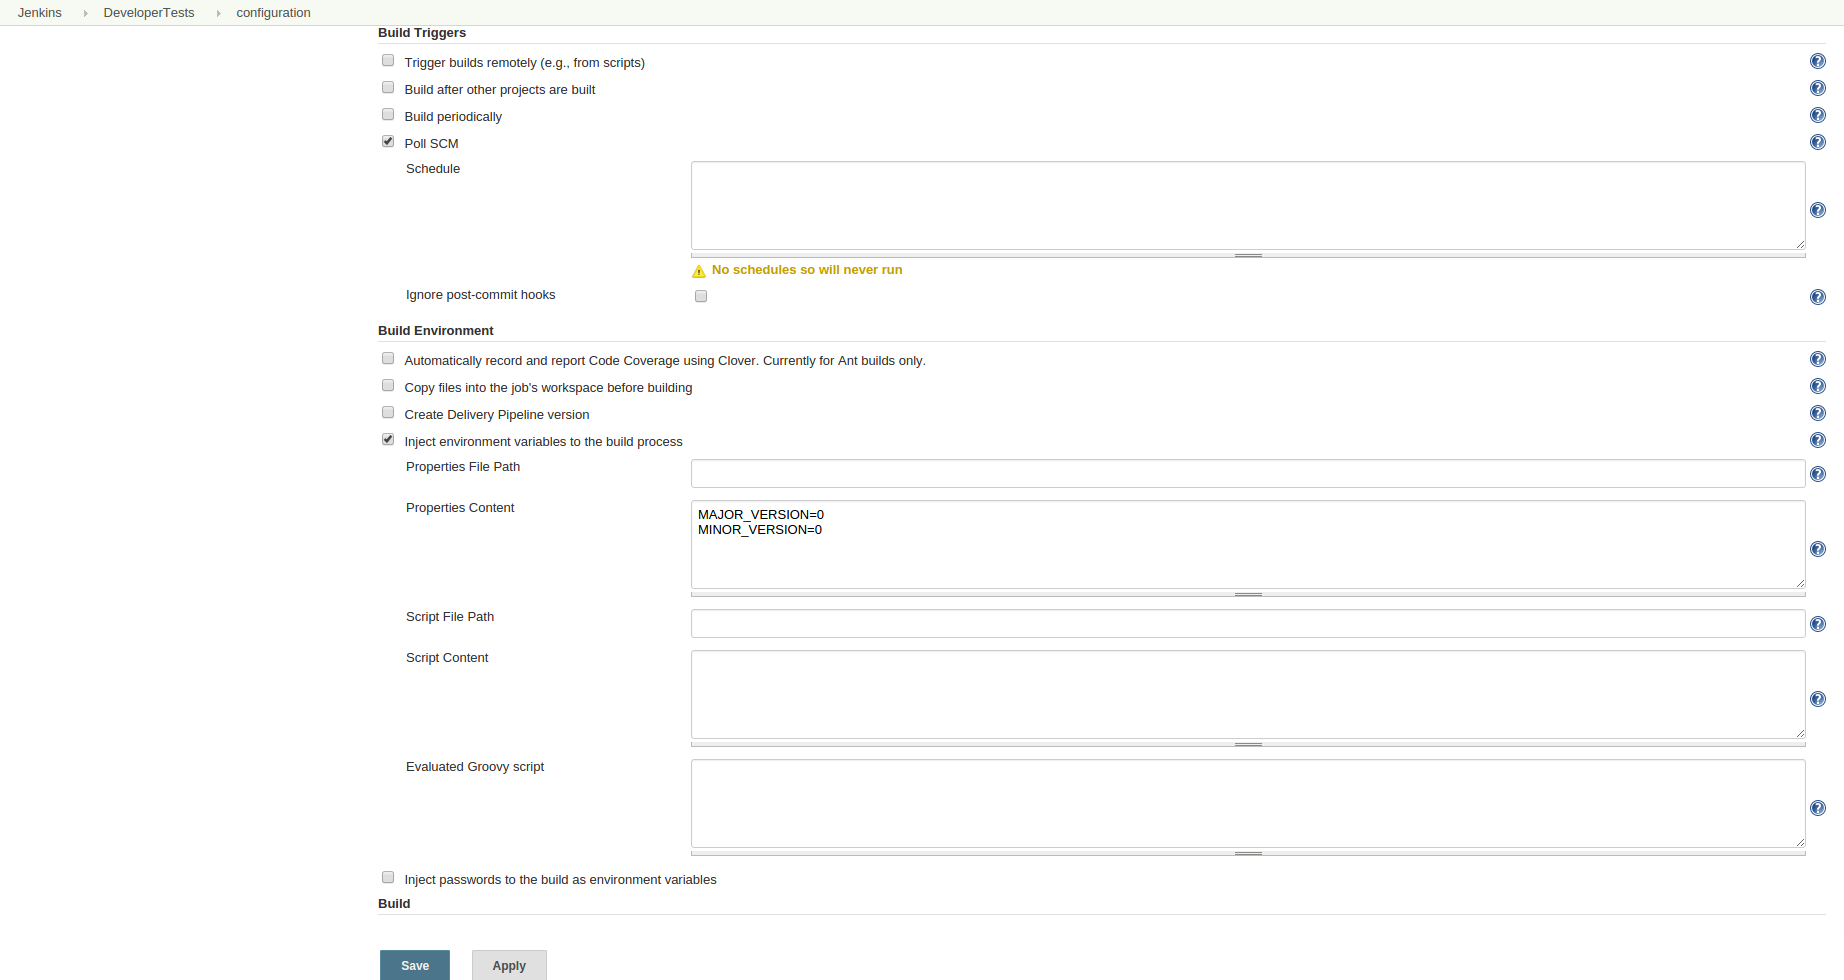
Our Jenkins job would then kick off to start running our developer tests, once we set it to poll (and left the polling schedule blank). Despite PHP not needing to be compiled in order to run, we chose a build tool to automate all of the actions being performed on the Developer Tests job, so that the full script could be kept in source control. This provided an additional bonus of allowing the developers access to this script, so that they could run the exact same steps locally, to save time and effort, and also allow them to gain confidence that their commits would not break the pipeline. We chose gradle as our build tool, mainly because of it’s flexibility, and plugins that worked with the tools we were interested in. Because out of the box, SecureCITM did not come with gradle, I needed to install gradle on the machine, as well as the gradle plugin into Jenkins.
The first task we ran in gradle was to cleanup the system. I wrote a ‘purge’ task, which was run each time before any tests, to ensure any old build artifacts were removed, and wouldn’t interfere with out tests. The PHP project was built with laravel, and we were using Composer to manage the dependencies. This meant that for a completely fresh instance, we would need to delete, then re-install the composer.phar file. We created a composer.json file to keep track of required files.
task purge << {
  //println 'Cleaning up old files'
  delete 'vendor', 'logs', 'build', 'composer.phar'
}
The next step was to re-install composer, as we had just deleted the old installation.
task composer(type:Exec) {
  //println 'Setting up dependencies'
  executable 'sh'
  args '-c', 'php -r "readfile(\'https://getcomposer.org/installer\');" | php'
  standardOutput = new ByteArrayOutputStream()
  ext.output = { return standardOutput.toString() }
}
task vendor(type:Exec) {
  //println 'Installing dependencies'
  executable 'sh'
  args '-c', 'php composer.phar install'
  standardOutput = new ByteArrayOutputStream()
  ext.output = { return standardOutput.toString() }
}
We had some custom artisan commands that we ran next to setup our application, which I won’t be including here, as they were very specific to our application.
Despite PHP not needing to be compiled in order to run, we were using Javascript and CSS for client side actions and styling. While these languages also don’t need to be compiled, they also have their own dependencies that need to be managed, and should be compressed for optimum load times. We decided to use NPM to manage our JS and CSS dependencies, which meant creating a package.json file to keep track of these. Additionally, we wrote a gulp.js file which compressed our files, and even handled cache-busting. The next two gradle steps handled these.
task gulp(type:Exec) {
  //println 'Performing gulp packaging tasks;
  executable 'sh'
  args '-c', "gulp"
}
task npmInstall(type:Exec) {
  //println 'Performing NPM installation tasks
  executable 'sh'
  args '-c', "npm install font-awesome; npm install"
}
While there are some good gradle plugins for running these tools, I had mixed success with them, and so defaulted back on executing the steps directly from the command line.
Finally, we could get into some of the good meat of our application: the testing. We wrote some PHPUnit tests, and some QUnit tests. The initial ‘legacy’ code we started working with was monstrous, without much option for unit testing. As we made changes to the code, and refactored, broke the code into proper functional areas, and starting writing unit tests. I wrote two tasks for executing PHPUnit tests, one that just ran the tests, and one that ran the tests along with the coverage. We only ran the coverage task during the build job, but my thought was developers might find the other task handy when looking at things locally.
task test(type:Exec) {
  //println 'Executing tests'
  executable 'sh'
  args '-c', "php \
    -d 'date.timezone=\'America/Chicago\'' \
    'vendor/phpunit/phpunit/phpunit' \
    --log-junit='./logs/unitreport.xml'"
}
task coverage(type:Exec) {
  //println 'Executing code coverage via executing tests with instrumented code'
  executable 'sh'
  args '-c', "php \
    -d 'date.timezone=\'America/Chicago\'' \
    'vendor/phpunit/phpunit/phpunit' \
    --log-junit='./logs/unitreport.xml' \
    --coverage-clover='./logs/clover.xml' \
    --coverage-html='./logs/coverage_html'"
}
Similarly to our compiling steps, while there are some gradle plugins for executing testing and determining code coverage, I had little success with them, so I feel back on commandline actions.
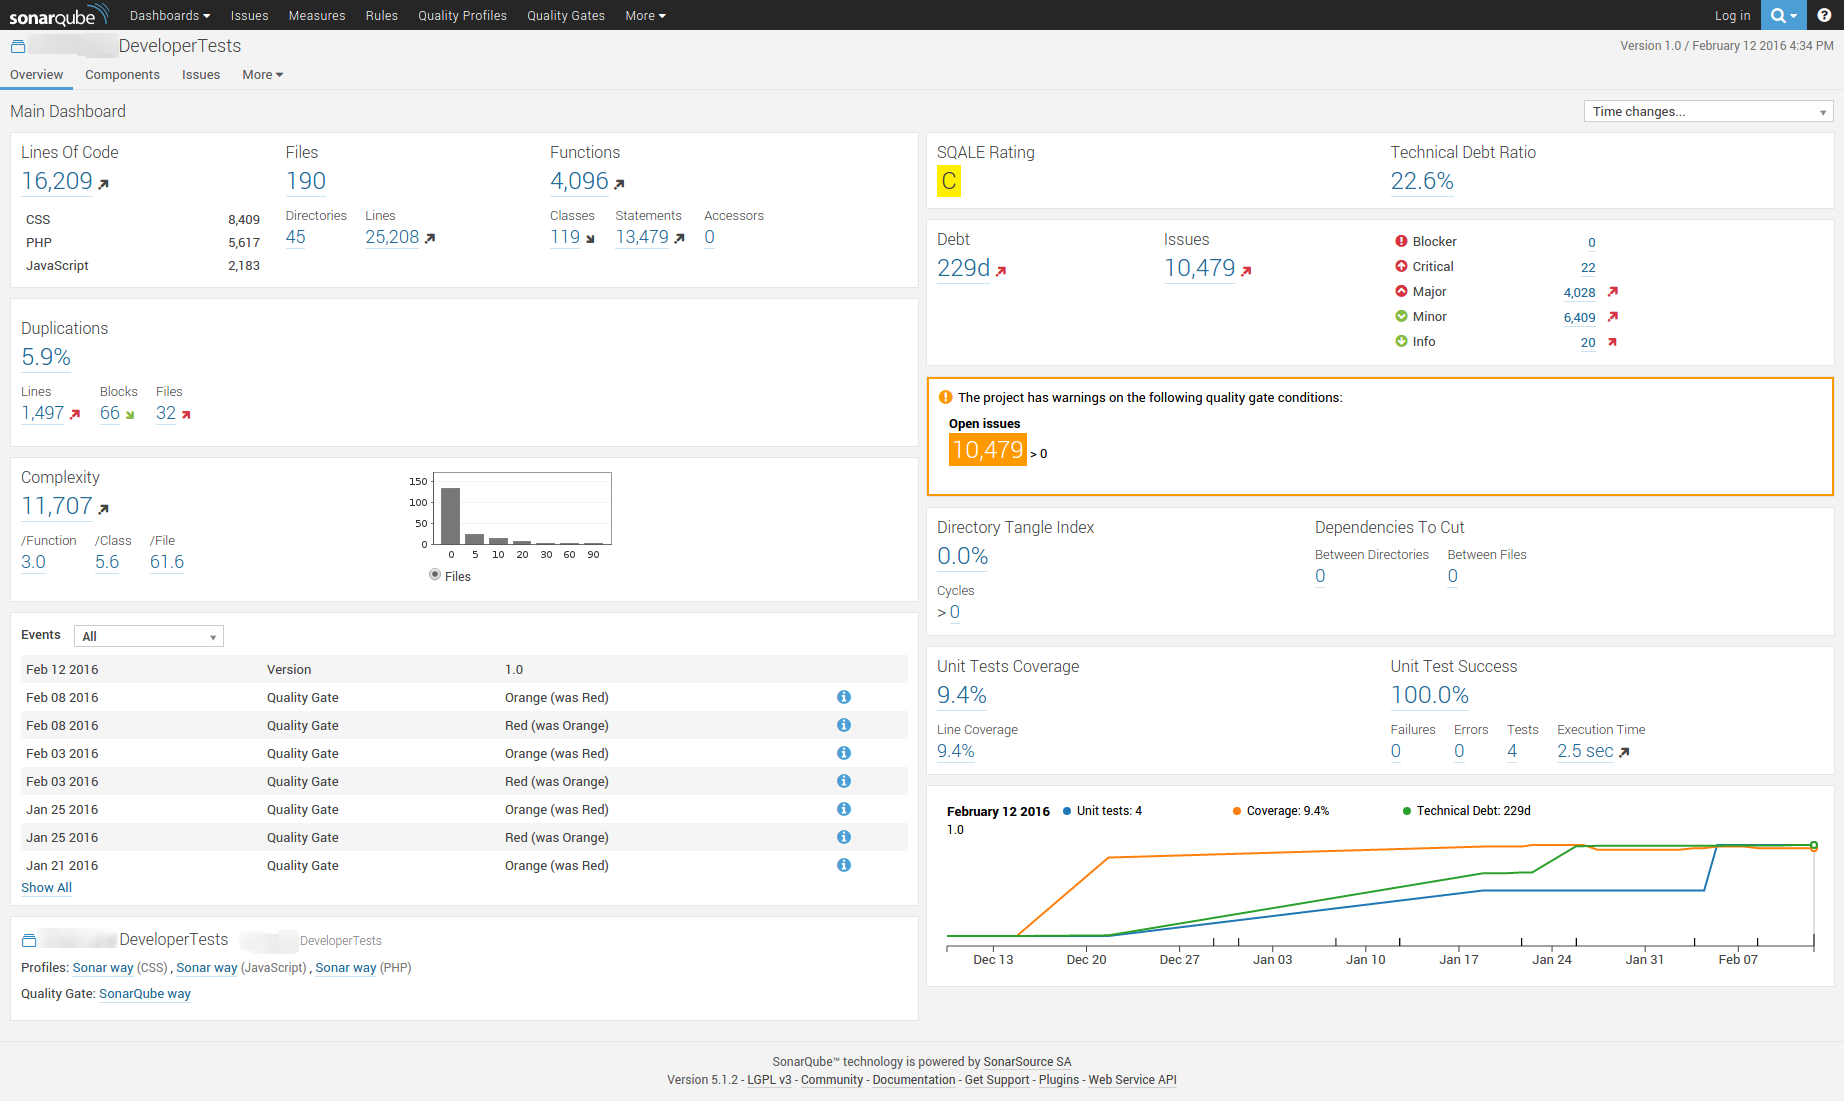
We had almost all of the metrics that we are interested in, and so we wanted to push these metrics into SonarQube, our metrics dashboard included in SecureCITM. For this, I was able to successfully use the new SonarQube gradle plugin. I initially needed to declare the required plugin, and then apply it.
plugins {
  id "org.sonarqube" version "1.1"
}
apply plugin: "org.sonarqube"
Because I wanted to keep this SonarQube task generic, I decided the SonarQube project and key should be dependent on the Jenkins job running it. I created some variables in gradle to get the Jenkins job name, and default to something if this task wasn’t being run on Jenkins. This also would keep our metric history safe, incase someone tried to push in metrics locally.
def jenkinsJob = System.getenv("JOB_NAME") ?: "Default"
Luckily, SonarQube by default can handle multilanguage project, SonarQube just needs the plugins to be able to analyze the code. I installed the PHP, Javascript, and CSS plugins from this site, and we were finally ready to push our metrics into SonarQube. Our SonarQube task looked like this:
sonarqube {
  properties {
    property "sonar.projectKey", jenkinsJob
    property "sonar.projectName", jenkinsJob
    property "sonar.projectVersion", "1.0"
    property "sonar.projectBaseDir", "./"
    property "sonar.sources", "./"
    property "sonar.exclusions", "build/**, logs/**, public/lib/**, public/js/**, public/css/**, scripts/**, tests/**, vendor/**, node_modules/**"
    property "sonar.tests", "tests/phpunit"
    property "sonar.php.coverage.reportPath", "logs/clover.xml"
    property "sonar.php.tests.reportPath", "logs/unitreport.xml"
  }
}
These are pretty strait forward settings/variables for SonatrQube, pushing all of the desired code into the dashboard.
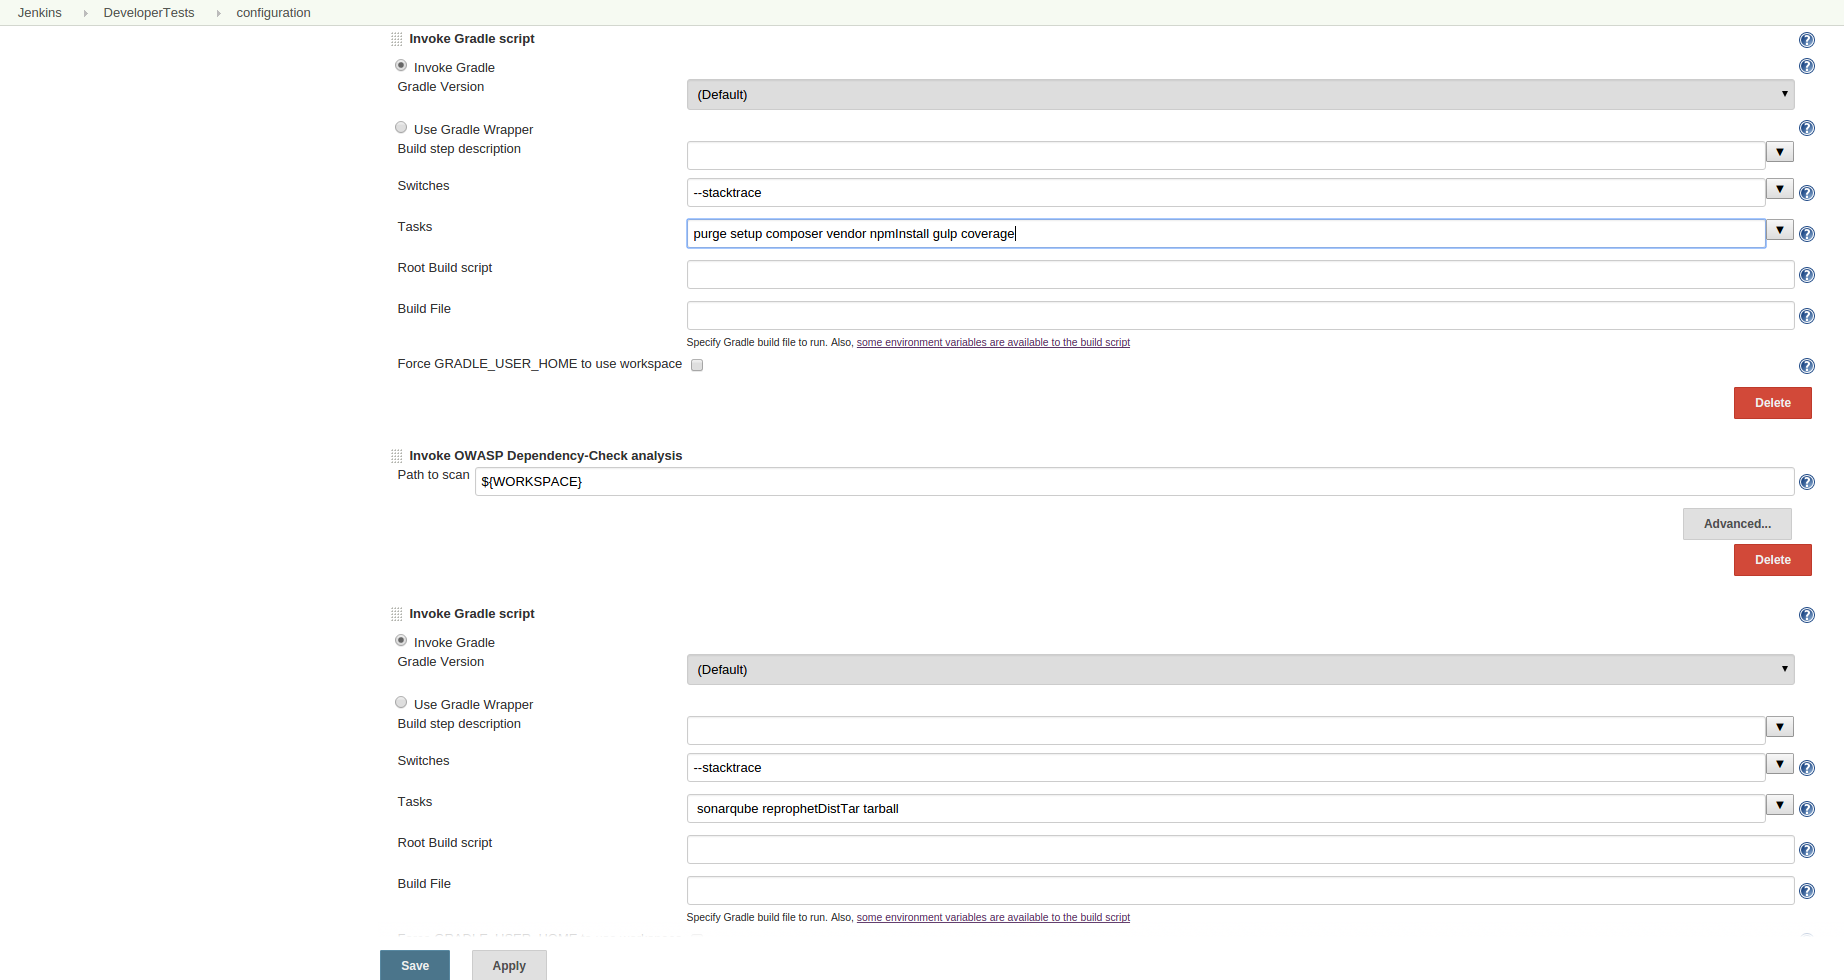
Because we were using all of these third party libraries, I wanted to perform a dependency check of these libraries, and look at any open SVEs or SWEs. I decided to use OWASP’s Dependency Checher, which has a wonderful Jenkins plugin. So, instead of using gradle, I simple installed this plugin, and pointed it to the current workspace. In under 30 seconds, it examined ALL of the third party tools downloaded via NPM and Composer, looked at their versions, and displayed any known vulnerabilities.
Assuming all of our tests passed, and we were happy with our third party tools, lastly we wanted to package our application. For this, I decided to use another gradle plugin called distribution.
apply plugin: "distribution"
I wanted to make these packages traceable to our Jenkins builds, so I made the version numbers tied to the build
def majorVersion = System.getenv("MAJOR_VERSION") ?: "1"
def minorVersion = System.getenv("MINOR_VERSION") ?: "0"
def jenkinsBuild = System.getenv("BUILD_NUMBER") ?: "0"
version = majorVersion + "." + minorVersion + "." + jenkinsBuild
I simply needed to point out which files were needed for install, and the plugin would automatically create a zip and tar package for us. My distribution block looked like this:
distributions {
  application {
    baseName = 'application'
    contents {
      from ('app') { into 'app' }
      from ('bootstrap') { into 'bootstrap' }
      from ('config') { into 'config' }
      from ('database') { into 'database' }
      from ('nbproject') { into 'nbproject' }
      from ('public') { into 'public' }
      from ('resources') { into 'resources' }
      from ('storage') {
        into 'storage'
        dirMode 0775
      }
      from ('vendor') { into 'vendor' }
      from { 'server.php' }
    }
  }
}
Finally, I wanted a tgz file, something a bit more compressed, so I wrote a custom task to create this:
def tarfile = "build/distributions/application-" + version
task tarball(type:Exec) {
  //println 'Compressing tar'
  executable 'sh'
  args '-c', "gzip -f < " + tarfile + ".tar > " + tarfile + ".tgz"
}
And that was it for getting everything executed on Jenkins for the build process. My Jenkins job looked like this for steps execution:
There were still a few more steps I needed to complete for archival and metrics purposes. I wanted all of the dependencies listed on the main job page, so for one post-build action, I published that report. I also wanted the unit test results displayed, so I installed the xunit plugin and pointed it towards the unit test report. Because I also wanted to coverage, I installed the clover plugin (Clover was the tool were using for code coverage), and pointed that to the coverage reports. Finally, I wanted to archive the tgz file produced, so that the next stages of our pipeline would have an application to test over. The next post will discuss archiving the artifact in Nexus (an artifact repository system), but I didn’t want to do that yet. As this application hasn’t yet made it through the DevInt testing, I didn’t want to make this application version available to anyone officially, so Jenkins archival seemed like the best bet.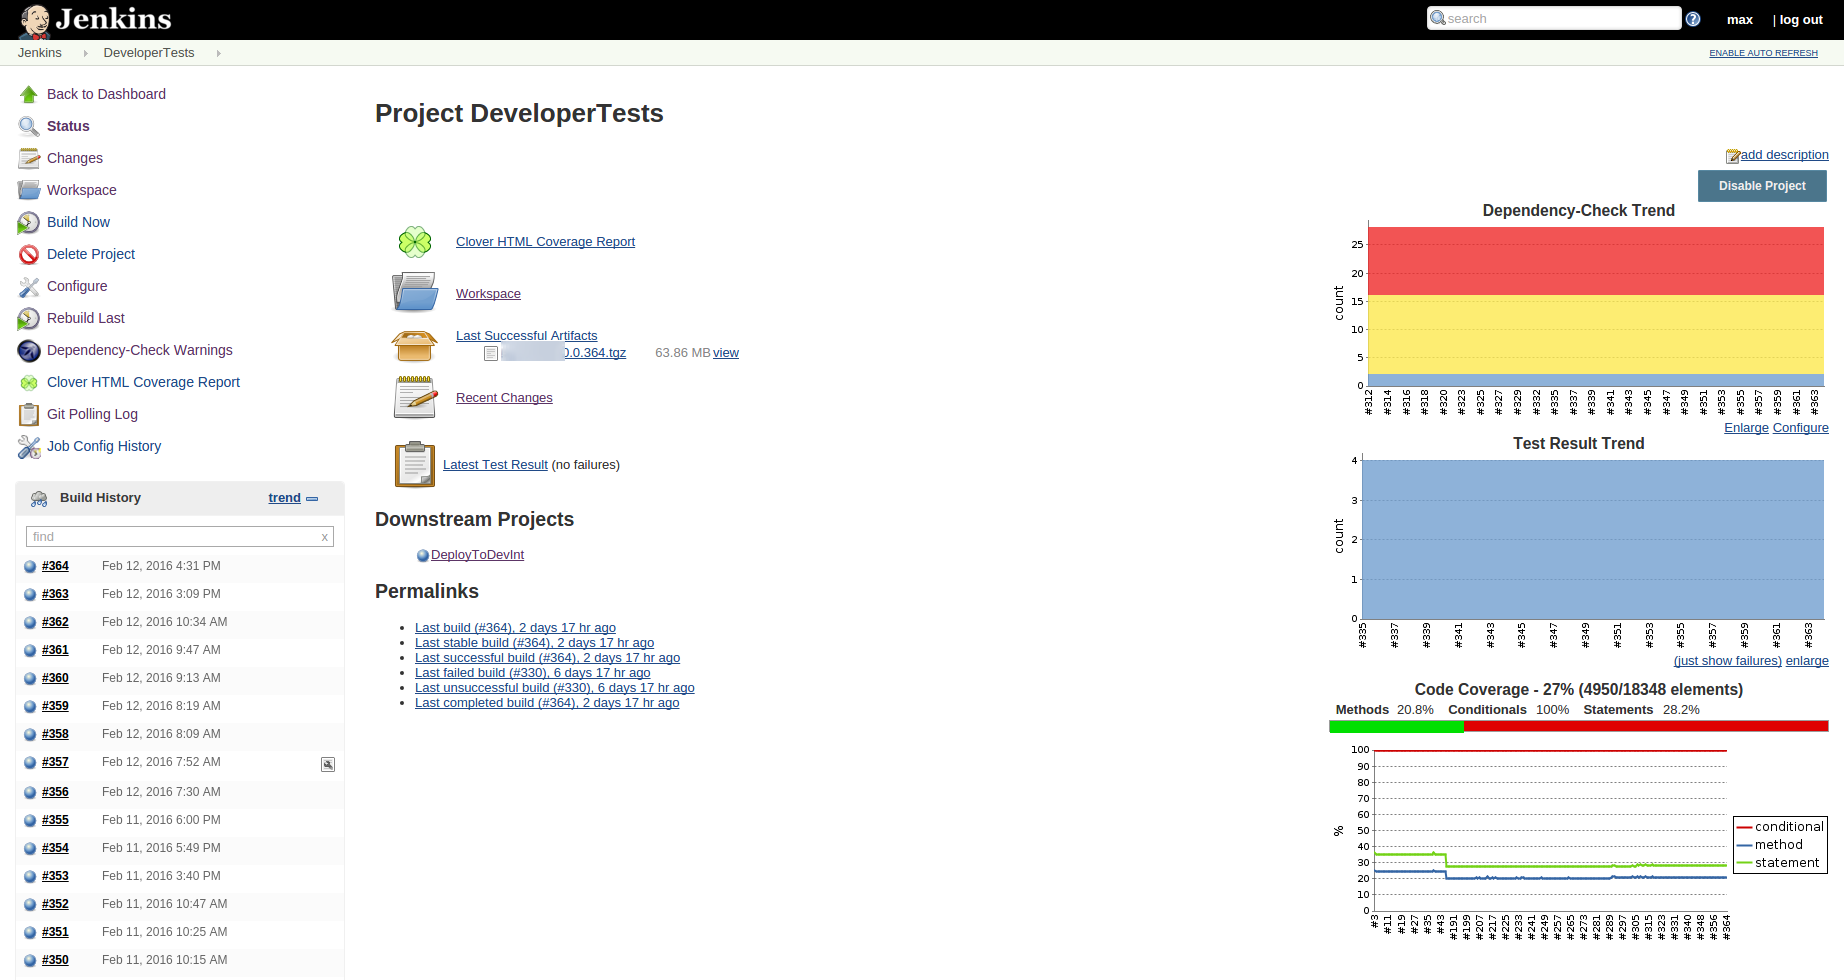
And that wraps it up for our Developer Tests section of the CI pipeline. Come back to read my next post on completing the CI pipeline, including spinning up a DevInt environment, executing smoke and acceptance tests, running a quick security scan, and finally marking the application as a potential release candidate, and storing it in Nexus.
