
Introduction
The new release of SecureCI™ comes bundled with a custom developed testing framework. I wrote this framework to build upon Selenium’s tools, specifically to provide more error handling capabilities and custom output reporting. While the SecureCI Testing Framework is both designed and optimized for Selenium Webdriver, it can be run for any type of tests, including used for unit tests. An entire testing framework, including custom reporting metrics, is built on top of the basic TestNG framework. All of the Selenium functionality is wrapped, providing fallback capabilities, so that if an element is missing, or a check is performed that fails, the test do not crash, they continue forward, logging the error. All Selenium calls are automatically documented, and screenshots are taken anytime an action or check is performed. Setup was designed to be simple and quick, allowing more concentration on creating tests, and less worry about configuring. By simply not including the setup for Selenium Tests, a browser will not be launched, and any Java code can be executed within a Unit Framework.
Obtaining the Framework
The SecureCI Testing Framework is included in the latest SecureCI™ release at /usr/java/secureci-testing-framework-XXX/. A zipped package can also be downloaded here. This folder has three directories with a fresh install. The first is the src folder, which will contain all tests. The second is the doc folder which contains all generated javadocs. Within SecureCI™ these can be browsed from within the web interface. The last is the lib folder. This contains the 5 jar files needed to execute the written tests. These include Selenium functionalities, the custom SecureCI Selenium wrapper, and a TestNG jar, which is being used as the base for our custom framework and for expanded upon for reporting.
Writing Tests
Create A New Test Suite
Tests should be organized into suites. To create a new test suite, simply create a folder, or nested set of folders within the src directory. Within each folder, then create one or more Java classes. Name the class something descriptive following the test suites purposes.
Structuring the Test Suite
Have each class extend the SeleniumTestBase class which is contained within the WebDriverWrapper.jar. Each suite can optionally contain a method setting up some details to be used in each test. The URL the selenium tests should connect to, the author of the tests, and the version of tests or software under test. See below for an example:
	@BeforeClass (alwaysRun = true)
	public void beforeClass() throws Exception {
		//set the base URL for the tests here
		testSite = "http://www.google.com/";
		//set the author of the tests here
		author = "Max Saperstone\n<br />[email protected]";
		//set the version of the tests or of the software, possibly with a dynamic check
		version = "0.0.0";
	}
Each suite should also contain a method to setup each test. This method will just call the super method of startTest and initialize everything needed. If we need a Selenium driver, the last value passed into startTest should be set to true, and false otherwise. See below for an example:
	@BeforeMethod (alwaysRun = true)
	protected void startTest(Object[] dataProvider, Method method, ITestContext test) throws Exception {
		super.startTest(dataProvider, method, test, true);
	}
With this in mind, it may be helpful to structure tests based on functionality and attributes under test. If a suite has multiple tests that will be running using similar tests, consider setting up some suite specific methods to run these tests. This will reduce the amount of code being written, and make updates quicker and cleaner.
Write the Tests
Adding a new test, is simply adding a new method to an existing test suite (class). Each method should be named something descriptive following the tests functionality. Each method should have a public modifier and have a void return type. They should always contain the below parameters:
- Object[] dataProvider
- Method method
- ITestContext test
Additionally, each method should be prepared to catch a general exception, resulting from either an assert at the end of each test, or from other errors arising during runtime. Each method should have an annotation before it. Putting in the below information in each annotation will ensure that the data is available in the custom test reporting.
- a group based on the test suite and the extended test suite
- a description something useful/descriptive to be displayed on the results and test detailed results
- a dependency (optional) based on either another group or test, or multiples
- a data provider (optional) – if this test takes multiple inputs, allowing the test to run multiple times
The method body should start with three to four lines, in order to obtain the passed in Method and ITestContext. The below three lines should start each test, to ensure the custom test report is properly generated
	String testName = getTestName( method, dataProvider );
	TestOutput output = (TestOutput) test.getAttribute( testName + "Output" );
	int errors = (Integer) test.getAttribute( testName + "Errors" );
If any Selenium commands will be run, you’ll want to pull the SeleniumHelper object as well
SeleniumHelper selHelper = (SeleniumHelper) test.getAttribute( testName + "SelHelper" );
All Selenium commands to be executed can be found within the selHelper class. Functionality from clicking and typing, to hovering and changing orientation are all contained within this class. Using Eclipse will help you auto-complete desired commands, and the JavaDocs provided will outline each piece of functionality. For performing checks and verifications, the output class should be used. Functionality from confirming an alert and element are present, to checking the css and page source are all contained within this class. Tests can be build directly from combining these method calls into a test, or alternatively to create an overall stronger set of tests, a separate class or classes can be created to form workflows using these actions. Test steps can then reference calls to workflows, instead of direct actions.
Finally, in order to track errors within the tests, the last step of each test is comparing the value within errors to the number 0. This will then throw an error if any issues occurred during the test. All previous errors are caught and handled, to allow the test to run to completion if possible. This last line should read as follow:
genFun.stopTest( output, errors );
If a class has multiple tests that are similar, but simply require one or two different inputs, a dataProvider should be used. Instead of writing multiple tests, one test can be written instead. This will reduce the amount of code being written, and make updates quicker and cleaner. A full example test can be seen in the included SampleTests.java class in the framework.
Update testng.xml
When tests are executed via Ant, the build file testng.xml dictates which tests to execute. When a new package, class or method is added to the test suite, they need to be included in the XML file if you want them to run. More details on how to update this file can be found on the TestNG Documentation site.
Running Tests
Parameters
The testing framework take two optional input parameters.
Browser
If unspecified the tests will default to run within WebDriver’s HTMLUnit. Supported browsers for testing are Firefox, Chrome, Internet Explorer, Android, Ipad (only locally – not on grid), Iphone (only locally, not on grid), Opera, and Safari. To run other browsers additional drivers may need to be added to the browser install directory. Multiple drivers can be found in the ‘lib’ directory. A follow-up post will outline installing/running other browsers within SecureCI™, but are not included as default, because running tests on a Unix environment doesn’t provide as much benefit as running tests through the grid over a windows machine.
Hub Address
If unspecified the tests will run in standalone mode. If a hub address is specified, then tests will run via Selenium Grid on the specified grid address. Just list the IP or DNS, not ports, or protocol should be provided.
Eclipse
When writing tests within an IDE, it’s nice to be able to execute and debug tests within the IDE as well. See below for some tips in executing and debugging within Eclipse.
TestNG
Open up the Eclipse IDE. Expand the project in the left side navigational panel. Right-click on the Java file containing the tests (for our example it is SampleTests.java) and select the Run As menu item, and click on the TestNG Test sub-item. This will launch the tests. Once the tests have completed running, TestNG results will be displayed under the TestNG tab at the lower section of the screen. If you want to provide inputs to the tests being run, when right clicking on the Java file containing test, select the Run Configurations… sub-item. On the option screen, select the Arguments tab on the upper left of the screen. In the Program arguments input area, enter in the desired input details to be tested as below:
-Dbrowser=Chrome -DhubAddress=localhost
Ant
Open up the Eclipse IDE. Expand the project in the left side navigational panel. Right-click on the build.xml file and select the Run As menu item, and click on the Ant-Build sub-item. This will launch the tests. If you want to provide inputs to the tests being run, when right clicking on the build.xml file select the Ant Build… sub-item. On the option screen, select the Main tab on the upper left of the screen. In the Arguments input area, enter in the feature file to be tested as below:
-Dbrowser=Chrome -DhubAddress=localhost
Debugging
Open up the Eclipse IDE. Expand the project in the left side navigational panel. Open the Java class associated with desired test to debug. Opening each class with display all methods (i.e. tests) associated to that suite. Set your break points by right clicking on the left hand bar and choose set breakpoint. These break points can be set anywhere, in the test steps, or even in the before methods. Once done, right click on the method name of the desired test to debug. Go to Debug -> As TestNG. These tests will then run, and will stop at the breakpoints set. You can then step through the code, up or down, and view all set variables. Once the desired section is done debugging, click the Play button. Once the test has completed it will not be archived off, but left in the folder target under your project directory in the workspace. To view these results open the file index.html in that folder.
Visual Command Line
Ant
Open up the command prompt. Navigate to the folder where the Test Automation project is checked out using the cd command. Once at the folder, if these tests have been before, its best to clean out the results folder. Run the command:
ant clean
Once that completes, run the following command to execute the tests:
ant
All test results will be stored in the target-output folder. If you want to provide inputs to the tests being run, run the below command:
ant -Dbrowser=Chrome -DhubAddress=localhost
Within SecureCI™ (or any headless environment)
These test steps will work both from the command line, or from within Jenkins. To run from within Jenkins, simply create a job, and select Execute shell steps. Then run the below commands there instead.
First we need to navigate to our testing framework. The default location for these tests within SecureCI™ is /usr/java/secureci-testing-framework-XXX, where XXX is the version.
cd /usr/java/secureci-testing-framework-1.1.0
Next we need to set the correct Java version. SecureCI™ comes with three different JDKs, and the testing framework was built using JDK 1.7. Knowing this we’ll set JAVA_HOME to our OpenJDK 1.7. Alternatively, if using Jenkins to execute the tests, we could choose Java 1.7 for the build option.
export JAVA_HOME=/usr/lib/jvm/java-1.7.0-openjdk
Now we need to setup our virtual display. Since we are running on a headless display, we need to launch our virtual framebuffer, and then push our DISPLAY variable to this virtual screen.
	Xvfb :99 -ac 2>/dev/null 1>&2 &
	export DISPLAY=:99
Finally we can execute our tests. We will kick them off the same way we did from a machine with an actual display.
	ant clean
	ant
If running in Jenkins, it might be nice to setup some initial options, and pass in those variables. SecureCI™ comes preloaded with Firefox and Chrome, both of which are configured to run properly with this framework. Having a drop down option to select a browser and then passing in the browser chosen would improve the usability of the tests.
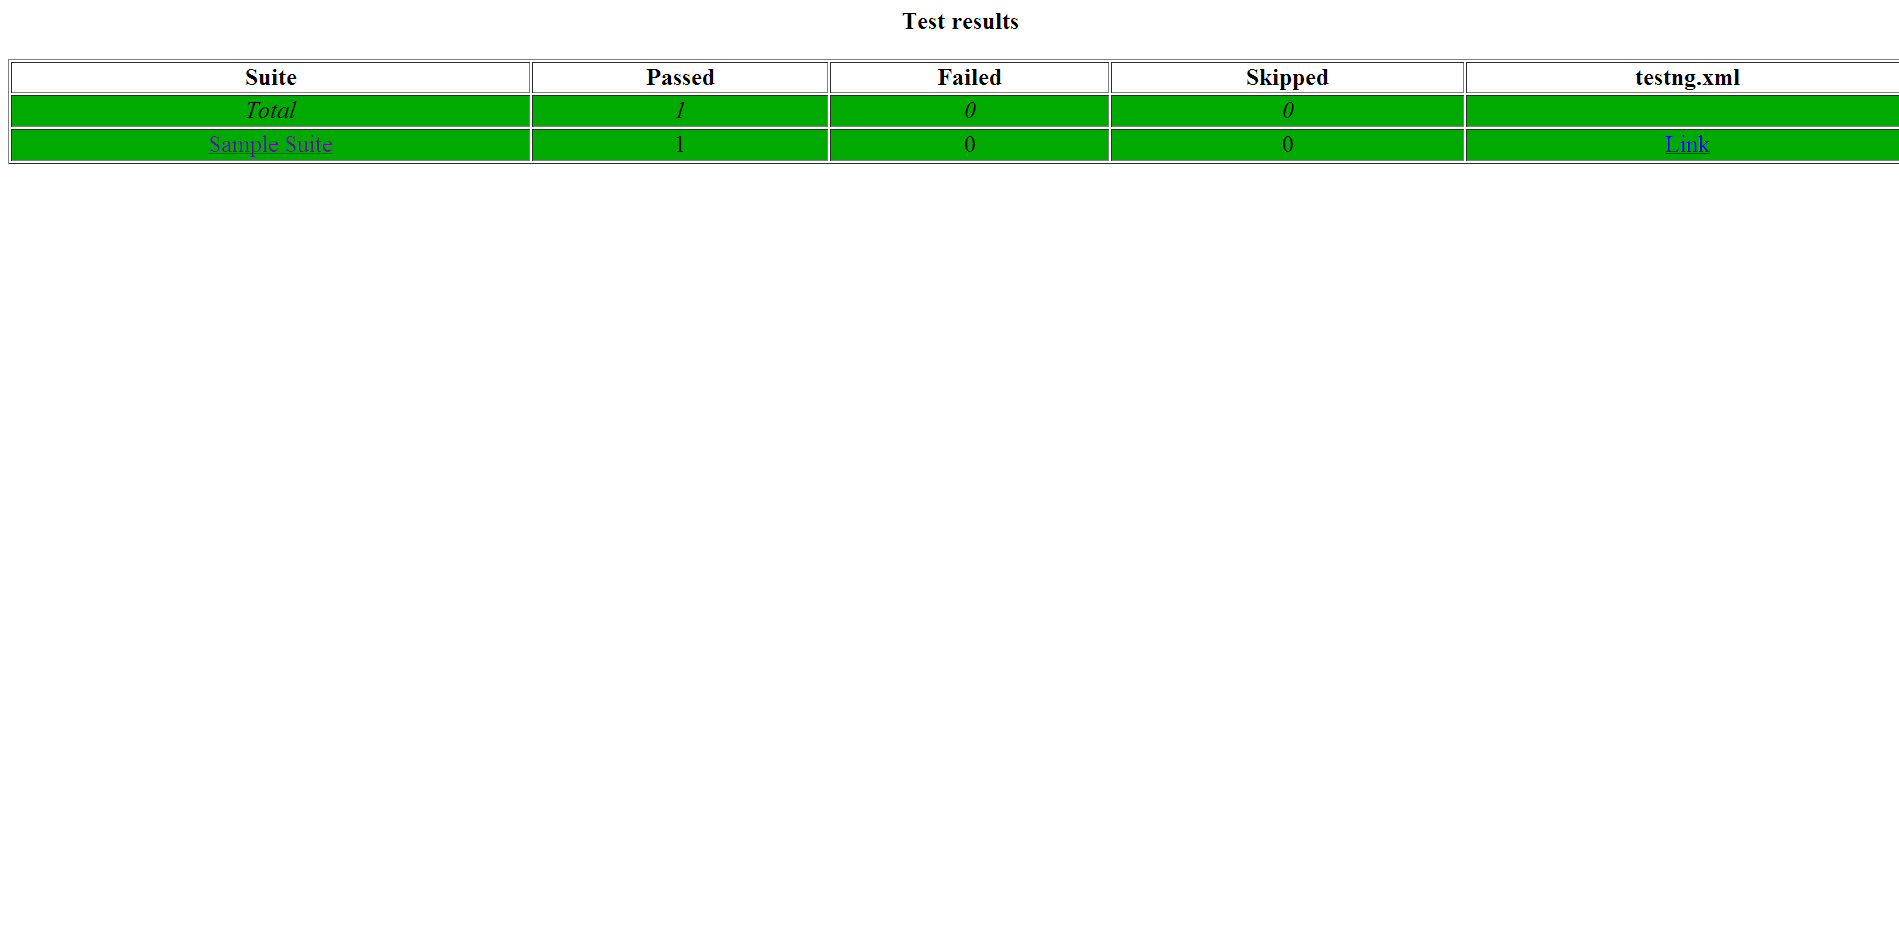
Viewing Results
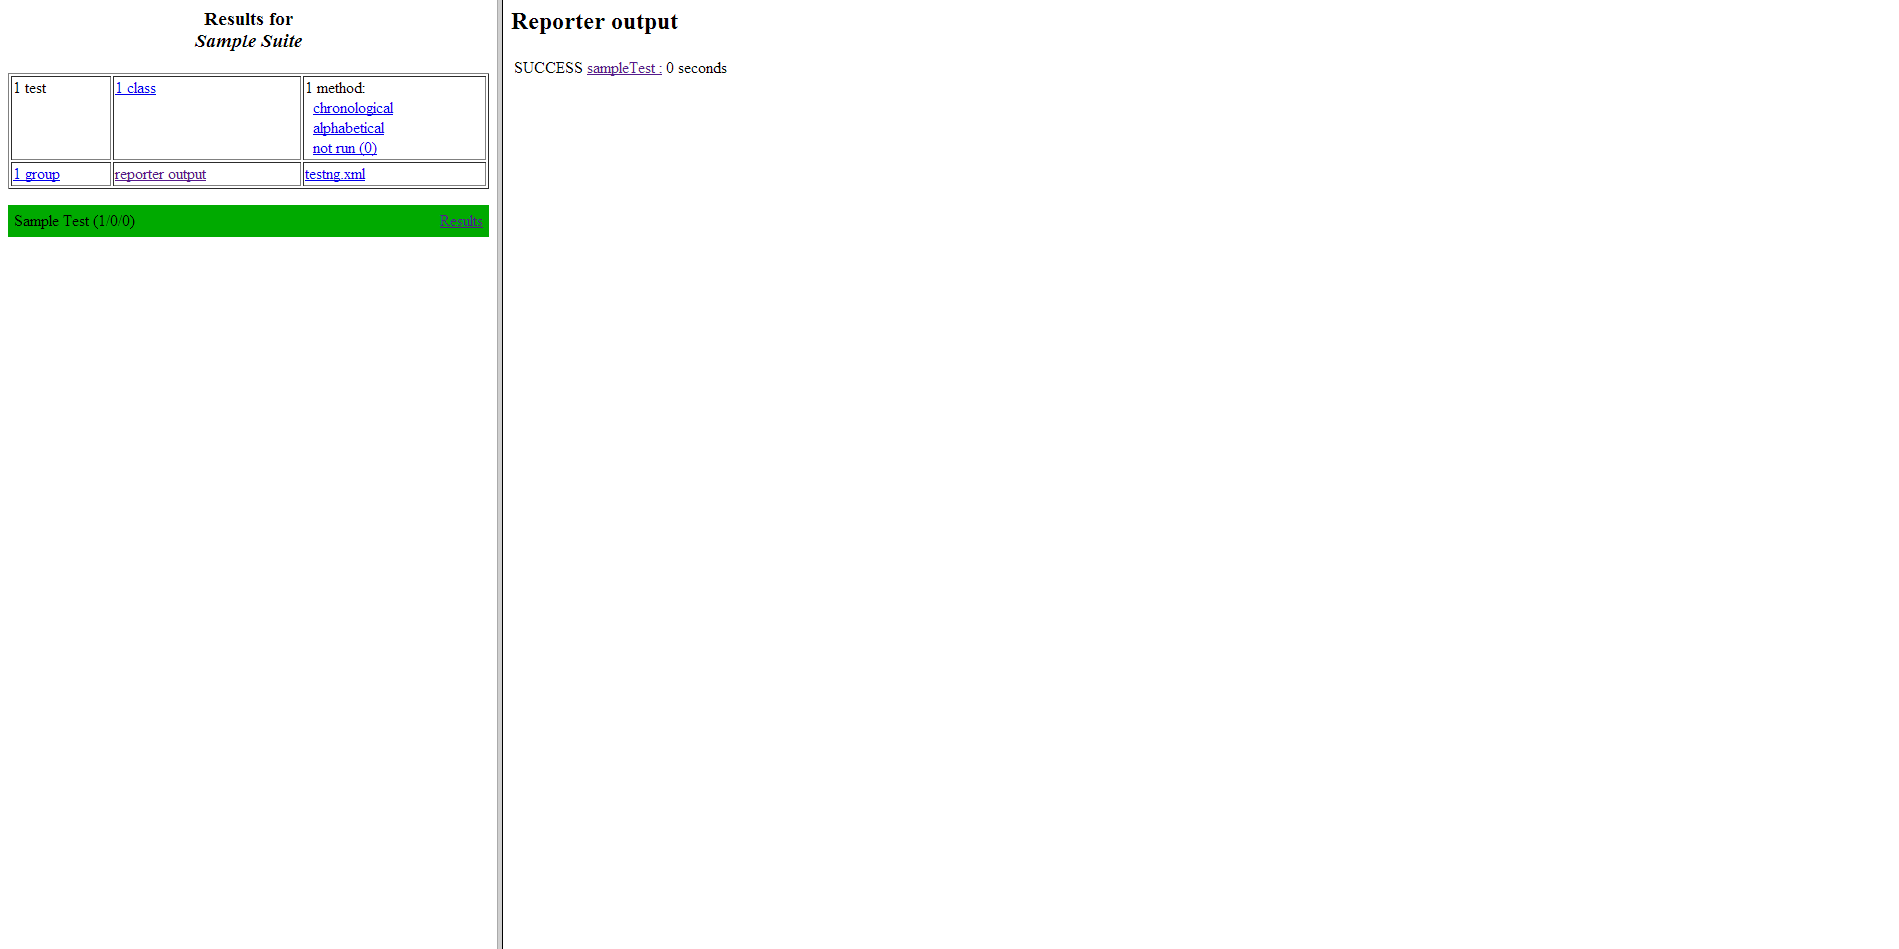
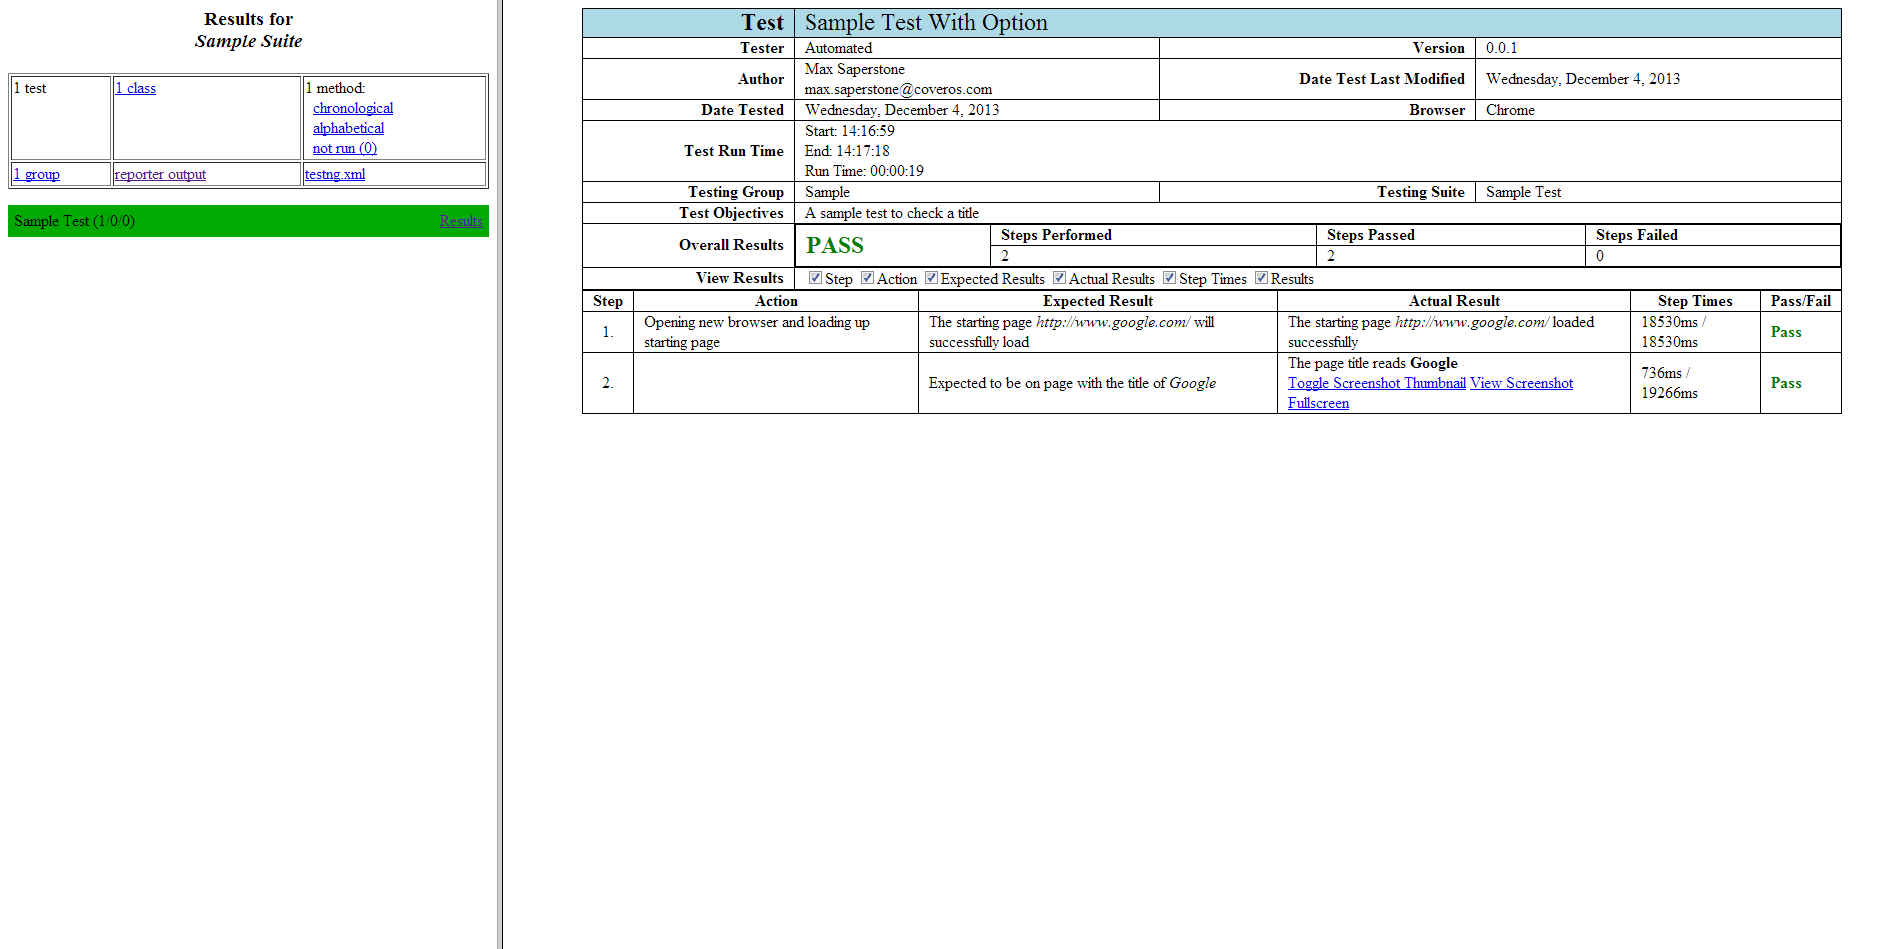
To view test results, navigate to the newly created target-output folder within the framework directory. Within SecureCI™ you can view these results through the browser. Open the index.html file: this is a file generated by TestNG, and will list all of the test suites run. Each test suite will contain a link on the left side of the table. Clicking each of these links will bring up a page showing the individual suite listed on a framed page. Click the results link. The right frame will then show each test run within the suite. Red highlights indicate failure, yellow a skip, and green a pass. Each test will have a description and other information about the test run. Along with the general results listed under the suite, navigating to the ”reporter output link” will provide links to detailed results for each test run. Clicking on each of these links will display a step by step procedure about what was run, in addition to details about the test. These steps and information are also very useful for debugging. They will alert if elements are missing, locators are bad, or anything else. Both locators and associated IDs are listed to make fixing tests or the app easier.
If running within SecureCI™ and Jenkins, TestNG produces a JUnit XML results file. This is great for storing results/metrics within Jenkins, and tracking trends. Additionally, consider archiving testing results to go along with these trending results.

Future Work
This framework is still being built out and perfected. Is there something you would like to see included in the next release, or have you found some bugs. Contact me or post a comment below.


3 thoughts to “SecureCI™ Testing Framework”
Pingback: Running Selenium Tests with Maven - Coveros
Pingback: Running Selenium Tests Through ZAP
Pingback: New Testing Framework Release - Coveros