
After much work, I have finally gotten a new release out of the STF. Now we’re up to version 1.4.0. The full project is now available on github, but if you are just looking to update your jar from the previous version, you can find that here. The file structure has changed some to better align with a java project, and lots of new features have been added. The README on github has the basic information for using the application, but for those interested in getting started, I wanted to outline how to go about that process.
Getting Started
Let’s say you have a java project for a web application. Your basic project structure probably looks something like this (from Apache Maven)
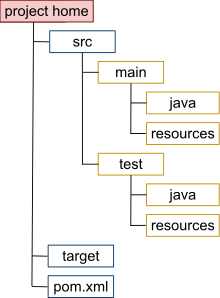
The structure that I have setup fits into that perfectly. If you download the zip from github, and extract it into your src directory, it will complement this setup. This is a change from how the folder structure previously existed, to allow it fit in with mvn or gradle projects with ease (Thanks Brian for pointing this out).
This project is setup to use ant as the build tool, but this ant build.xml file could simply be converted to a maven pom.xml, gradle build.gradle or anything else. The lib directory contains all of the needed third party tools to run the tests, already downloaded and compiled. If so desired, that lib folder could be excluded, and your build tool could instead be used to download the jars as dependencies on demand. Note, however, that I prefer an older version of TestNG for it’s output format, and as this is typically packaged with the selenium-server-standalone jar (I removed it for this package), getting these dependencies from the web (or even upgrading them), may cause things to look different (and possibly even behave differently).
Knowing all of that is all you need to start working. Downloaded with that structure is a sample test suite (a class). This test suite contains 2 test cases, one standalone test, and one with a data provider (allows you to re-run the same test with different inputs.
To execute these sample tests, you simply need to invoke ant and the configuration in the build script will do the rest. At simplest, just enter the below command.
ant -Dtest-suite=sample.xml
The test-suite input tells you what tests to run. This sample.xml file is included in the zip you downloaded, and uses the TestNG format to identify which test cases to run. More information can be found here better expressed than I can. You won’t see the browsers launch or the tests run, as by default HTMLUnit is the driver used to execute the tests. You will see a bunch of output displayed to the screen, and finally, you will see a Test Complete statement. Going through the results hasn’t changed any, and you can find more details on the github page, or on my previous post.
Those two locations explain the basic structure that the tests should follow, how to create a test case, whether that test case uses a data provider or not. When getting into a new language or framework, I prefer to copy something that works, makes some changes, and see what happens. So in that spirit, here is some good code for you to start off with. To write a simple test start with this:
@Test( groups = { "sample" }, description = "A sample test to check a title" )
public void sampleTest(Object[] dataProvider, Method method, ITestContext test) throws Exception {
        String testName = getTestName( method, dataProvider );
        TestOutput output = (TestOutput) test.getAttribute( testName + "Output" );
        SeleniumHelper selHelper = (SeleniumHelper) test.getAttribute( testName + "SelHelper" );
        int errors = (Integer) test.getAttribute( testName + "Errors" );
        // perform some actions
        //PUT YOUR TEST STEPS HERE
        // finalize our tests
        genFun.stopTest( output, errors );
}
The above example does not use a data provider. If it did, lines 2 and 3 would need to change, instead of referencing dataProvider they should reference a comma separate list of the objects in the dataProvider. For example:
public void sampleTest(String searchElement, int result, Method method, ITestContext test) throws Exception {
        String testName = getTestName( method, searchElement, result );
And that is it for setting up your tests. Obviously you would want to replace line 8 with steps that you would want to perform.
As for writing your tests, the java docs are provided, I would suggest looking through those to get comfortable with the commands. Commands from the framework are obtained from two different classes:
SeleniumHelper
This will have all of the ‘actions’ you would expect to perform, such as click, hover, type, etc. In order to reference elements on the page, you will want to use the included Locators enumeration to determine the locator type, and then specify the locator. Each SeleniumHelper method requires the LocatorType and the Locator. For example:
selenium.click( Locators.id, "some-id" );                            //in SE terms will click on id=some-id
selenium.clear( Locators.name, "some-name" );                        //in SE terms will clear all input from name=some-name
selenium.type( Locators.xpath, "some-xpath", "text to type" );       //in SE terms will type "text to type" in xpath=some-xpath
selenium.blur( Locators.classname, "some-class" );                   //in SE terms will unfocus or blur from the element class=some-class
There are a few more locators, and tons more methods for the SeleniumHelper class, so definitely spend some time looking through the java docs. Alternatively (but truthfully should be in addition), using a nice IDE like Eclipse, will give you auto-complete capabilities for these classes. This means if you type selenium. then click alt + space a list of the available options will display.
Not all actions require a locator, some are more generic for the page. For example:
selenium.acceptConfirmation();
selenium.typeIntoPrompt( "some text" );
selenium.getCookieExpiration( "cookieName" );                       //will return the expiration of cookie named "cookieName"
TestOutput
This will have all of the checks you should be performing. Basically, instead of doing generic asserts, this class gives you these smarter asserts utilizing the benefits of the framework. Some of these actions will be for specific elements on the page (i.e. will need the locator type and locator), and some just look at elements. For example:
output.checkConfirmationPresent()                                         //just returns a boolean on whether or not a confirmation exists on the page
output.checkCookie( "cookieName", "expectedValue" );                      //returns a boolean on whether the "cookieName" cookie value matches "expectedValue"
output.checkElementDisplayed( Locators.classname, "some-class" );         //in SE terms will return a boolean on whether element class=some-class is visible on the page
As with the SeleniumHelper class, there are LOTS of options, so review the java docs, and get some help from a nice IDE.
My best practice for writing tests says you should run no more than 5 Selenium steps (or workflows if you are advanced enough to abstract those out), and the only one check per test. By continually using the error integer (see examples/explanation on github), you can keep track of any Selenium errors, and they will help determine the result of your test, without having to quit out early. By keeping the tests minimal, and only doing one actual check per test ensures that if a test fails, you know why, and tracking down the issue becomes simple. I like to think of it like testing a ‘unit of functionality.’
New Features
One of the biggest changes to the testing framework, are the input parameters that it can take. I mentioned above that the ant script must now specify the TestNG style xml which will indicate the tests to run. There are three additional inputs that could be provided: Application URL, Proxy Server, and Proxy Port. Like previous version, Browser and Hub Address can also be passed in.
Application URL
This is the default URL that all tests should run against. This value can be overridden in each test, class, or even suite. This becomes very useful if you have multiple environments to test against, or just run things in a cloud where the machine to test might change it’s address (see my posts on building a DevOps Pipeline).
If you want to throw in some additional security scans, or even just want to record traffic, running your tests through a proxy can be extremely useful (think OWASP ZAP or JMeter).
Proxy Server
If this is specified AND the proxy port is specified, then the tests will be run through a proxy server at the specified address.
Proxy Port
If this is specified AND the proxy server is specified, then the tests will be run through a proxy server on the specified port.
Some of the Selenium functionality was not 100% completed in the SeleniumHelper class in the 1.3 release. Not only have these functions been completed, but many more Selenium actions have been added. Things like page scrolling, dealing with alerts, prompts, confirmations, managing cookies, determining attributes of elements, and many more have been added. Similarly, the TestOutput class has added functions for checking and comparing these new elements and objects. Again, the best place to find out more about these are from the java docs.
For those of you using tools like Jenkins, they play much nicer with JUnit style reports instead of TestNG for quick dashboarding of metrics. I wrote an additional ant task to convert the reports to JUnit. If you want that done at the end of your tests, simply include the additional task. Similar to any other task run after the tests, be sure to include the -k option, as if tests fail, we still want our report converted.
ant clean test junit-report -k -Dtest-suite=sample.xml
What’s Next
That is really a little bit up in the air. The next thing I plan to tackle is getting this framework working with some additional tooling. The first thing I have my eyes on is Sauce Labs. I’d like to be able to point these tests to their infrastructure, instead of needing all of the browsers to be setup locally.
Leave me some comments about what you’d like to see added into this framework. Are there pieces of selenium functionality left out? Do you want this integrated tightly with Appium? Are there some other tools you’re using that don’t play nicely with this framework or the reports? Let me know!


2 thoughts to “New Testing Framework Release”
Pingback: Testing Web Services Using STF - Coveros
Pingback: Test Planning - Coveros