
With large complex software applications, builds can often be split into different steps and tasks creating a series of jobs for our build pipeline. On my current project we are utilizing Jenkins to implement Continuous Integration/Continuous Deliver (CI/CD) and between the jobs for compilation, smoke tests, acceptance tests and deployment across environments in several different VLANs, we had to have a way to orchestrate a series of jobs. During our build process we often run into a situation where we only want a job to run when more than on job have successfully run before it.
The Join plugin enables us to run two express things like “run job 3 after jobs 1 and 2 are finished.” Let’s take a look at how we’d set up and use the plugin.
Installation
Installation is fairly simple using Jenkin’s Plugin Manager.
- Login to Jenkins
- Click Manage Jenkins
- Click Manage Plugins
- Select the Available Tab
- Find the Join Plugin and select the check box next to the plugin
- Click the Download now and install after restart button at the bottom of the screen

- Jenkins Plugin Manager
After the application has restarted, you’re ready to use the application.
Using the Join Plugin
Let us suppose we have a very simple build process for build a web app. In this example there are four major jobs: A build job, a job to perform service testing, a job to perform UI testing and a Deployment to a Higher Environment.
Without a plugin we might try to accomplish this by using Downstream Build Jobs, however the only concern being we must run all jobs in a row which will take a long amount of time or arbitrarily assign the deployment job to one of the testing jobs. This would mean we would have a deployment if one of them failed which wasn’t Deployment’s upstream job. Both of these are not ideal.
What we really hope from the pipeline is something like this, where testing gets run in parallel and both must pass before deployment takes place:
-
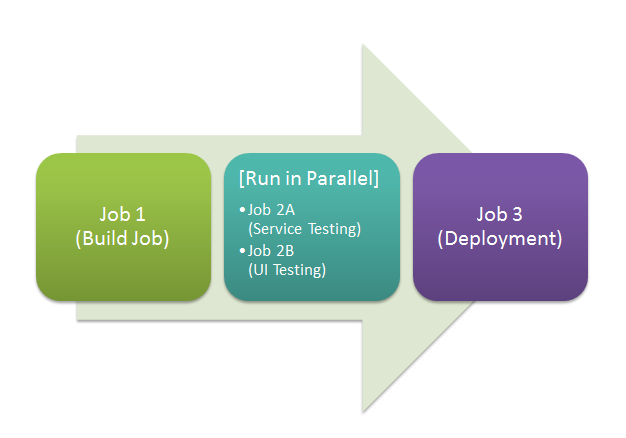
a Example Build Flow – Join Plugin
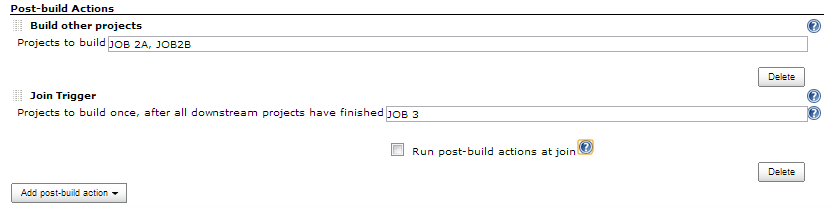
In order to achieve our ideal scenario, we need to access the post build actions of Job 1. It’s here that we will create our downstream links to Job 2A and Job 2B. These jobs should run in parallel (as long as there are available executors) after Job 1 has run. We then create a Join Trigger in Job 1, that triggers after all the downstream jobs (Job 2A and Job 2B), and populate it with Job 3.
There you have it! Time to save and execute our job and watch the process flow..
Note: By default, parameters of the current build will not be passed to the join project. If you want to do this, choose “Post-Join Action” then “Trigger parameterized build on other project” and then choose “Current Build Parameters” (or other parameters you want to use).
Note: Some utilize the Build Pipeline job to display upstream and downstream jobs in a graphical interface. It’s been observered that the Join Plugin doesn’t play well with it. So if you’re planning on still using the Build Pipeline plugin to display your jobs, be aware it may not look accurate.
Conclusion
The Join plugin is pretty powerful and can be a good alternative to something like the Build Flow Plugin. In addition, it provides some parallelism to help you get your CI done more effectively.

