
Coveros has been offering downloadable copies of our integrated SecureCI™ platform as a VMware™ virtual machine image for quite a while now. SecureCI is an integrated stack of tools that provides version control, wiki, project/issue management, and code analysis to enable the development of high quality, secure applications. For more information about the history of SecureCI, read Gene Gotimer’s original SecureCI post about the rationale behind creating the integrated platform.
Unfortunately, not everyone always has a hearty machine readily available where they can plop a VM in their local environment. Furthermore, even fewer have direct access to larger, generally available VMware server infrastructure that can be used to host a shared VM for more than their own local use. The wide breadth of inexpensive, publicly available cloud computing infrastructure becomes a great solution to this problem. Amazon Web Services’ Elastic Compute Cloud (EC2) is a perfect example of this. Even better: Amazon has an ongoing deal (Amazon Free Usage Tier) that allocates one free “micro” instance of a full-time running server for 12 months along with 10GB of disk space and an adequate amount of network bandwidth.
To that end, I invested some time a while back and created an Amazon Machine Image (AMI) version of our SecureCI platform that can run in the cloud. I and a few of our Coveros clients have been running these VMs for well over a year with great success. Below are instructions on how you can get started with SecureCI and boot up your own copy of SecureCI in the EC2 cloud.
2-Minute Quick Start
For the impatient among you who are already familiar with AWS and running EC2 instances. Here’s what you need to know:
- Create an AWS user account by starting on the AWS Free Tier page
- Create an instance based on the latest AMI listed on our Coveros SecureCI Page (please fill out the registration)
- Start it as a t1.micro instance
- Enable SSH and HTTPS in the Security Group firewall
- Connect with SSH and your PEM key as user “ubuntu”
- Step through the first-run configuration steps when prompted
- Reboot the VM instance
- Visit https://{Public DNS} with your favorite browser and start playing with SecureCI. You’ll eventually need the SVN/Trac user name you created during the initial configuration.
Create an Account for AWS
First, create an Amazon Web Services account. Start on the AWS Free Tier page and select the “Sign Up Now” button. Follow the instructions to provide an email address (your login), a credit card (for charges above your free allocation limits), and a phone number. The system will use your phone number for a call back to verify your humanness before activating your account. I used “rich.mills+[email protected]” as my email address and “Rich Mills (FreeSCI)” as my name to separate the account from other emails and accounts I use at Coveros.
Next, visit the AWS Management Console to start working with EC2 images. If not already logged in, you will be asked to do so. Go to the EC2 panel and use the Launch Instance button to begin the process of creating an running SecureCI instance.
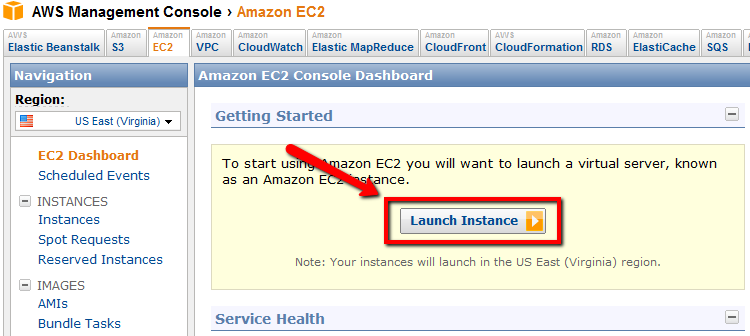
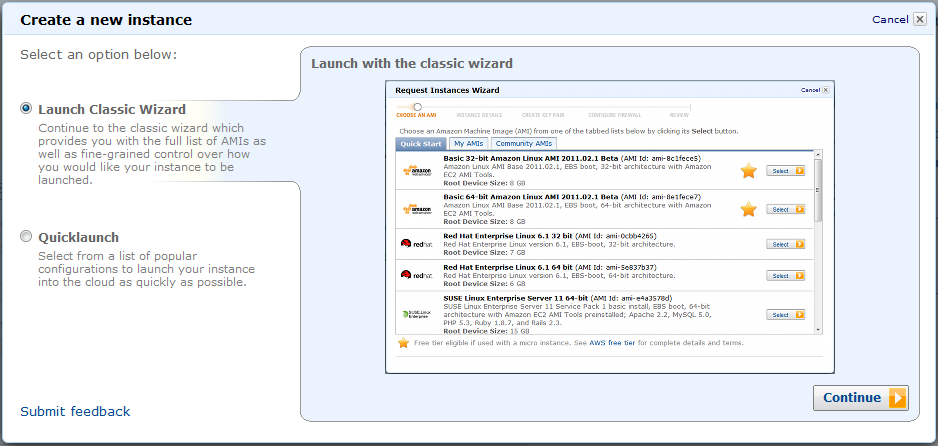
This starts the AWS launch wizard. You will want to use the “Classic” wizard for the remainder of the process.
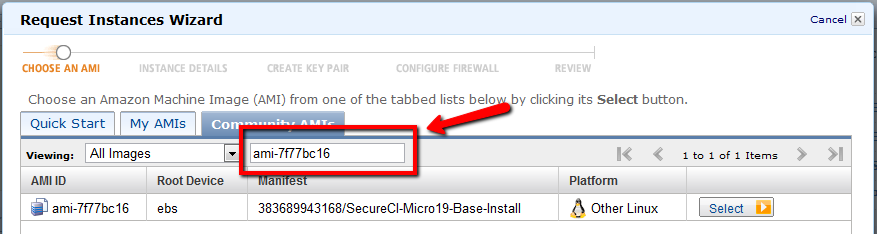
In a separate browser, lookup our latest SecureCI Instance AMI ID by visiting Coveros SecureCI Page and clicking through the registration. Follow the “Get Started with SecureCI™ Today!” link, complete the registration, and finally the “Get started with SecureCI™ Amazon EC2 instance” link at the bottom. You should see a table that has the latest AMI ID similar to the following:

The ID will be of the form “ami-1234abcd.” Back on the original “Request Instances Wizard Page,” select the “Community AMIs” tab, enter the AMI ID listed on the SecureCI page, and wait for it to search for and locate the proper image. Click the “Select” button on the right side to begin the process of booting an image.
Continue through the next dialog box with the defaults:
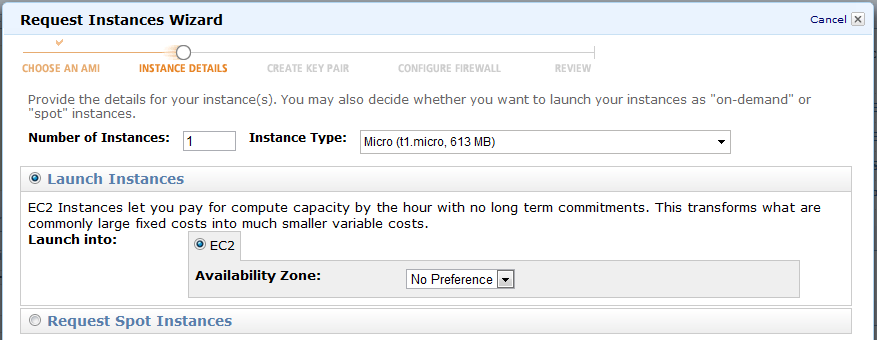
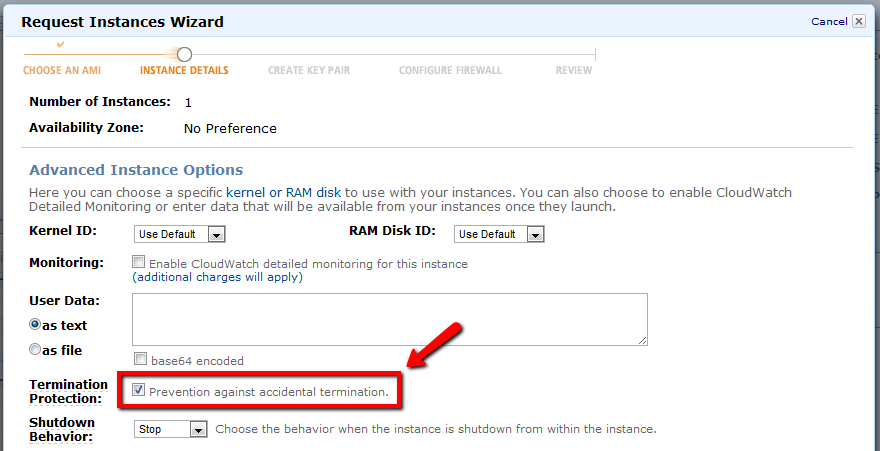
More defaults in the next battery of launch details dialog questions, however I always select the “Prevention against accidental termination” check box. (Basically, there are two behaviors when you shut down a VM: “Stop” to power off the VM, and “Terminate” to destroy and delete the VM. You almost always want “Stop” and not “Terminate.”)
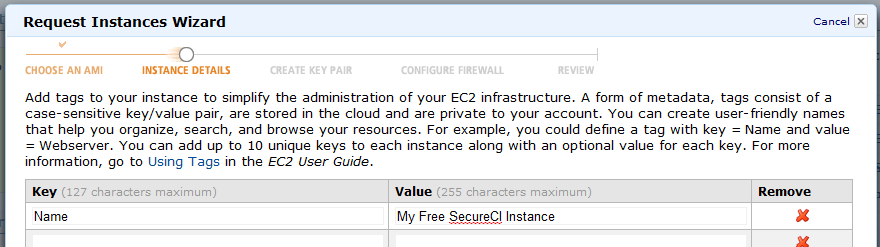
On the next panel, assign a recognizable “Name” tag to your new instance. I used “My Free SecureCI Instance.” The name isn’t super-important now, but may become so if you ever start creating multiple instances of running machines. (You will.) I warn you: the ease of creating AWS virtual machines is like crack for computer geeks.
Now, for the important part. You need to create a set of security keys that you will use for connecting to and administering your machine. Without your keys, you will not be able to access your newly created VM. On the key page, enter a short name for a key that you will create (I used “free-secureci-key”) then click the “Create & Download you Key Pair” link.
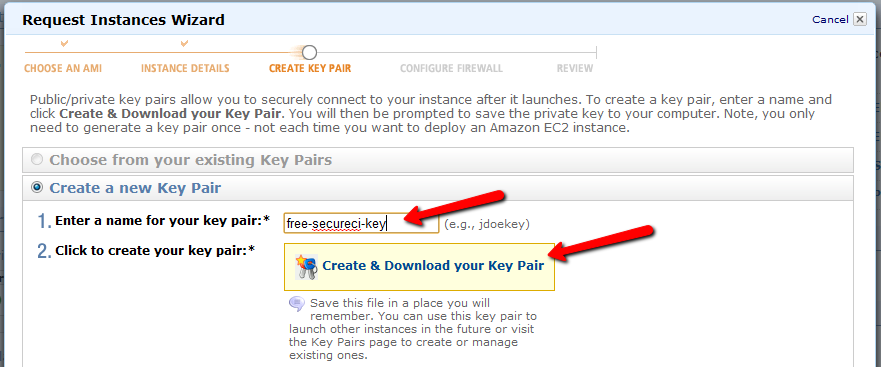
Very, VERY, VERY important: Download the “free-secureci-key.pem” file and store it in a safe place where you will not lose it.
- If you lose it, you will not be able to log into your VM any more.
- If someone else gets it, they will be able to have complete and open access to your VM.

Enter a name for your security group (“secureci-web”) and a brief description for your benefit. Then use the “Create a new rule” drop down box and the “Add Rule” button to add HTTPS (SSL port 443) and SSH (port 22) to your rule set. Continue on to the final summary page.
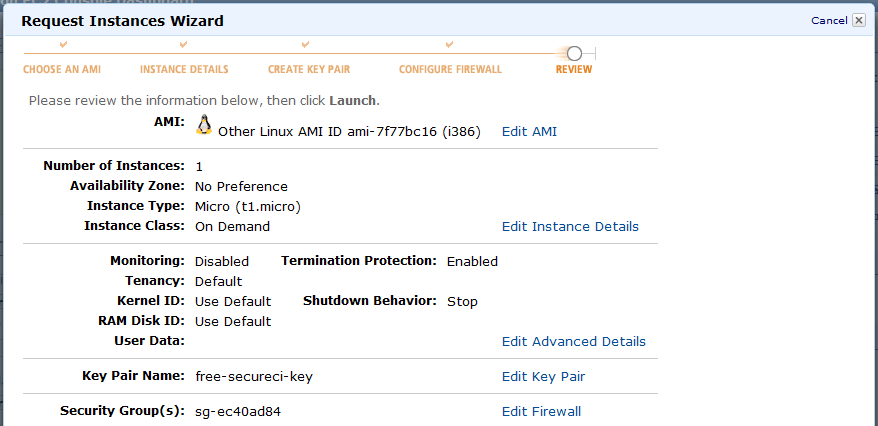
Clicking “Continue” will pass you on to the confirmation dialog telling you that your instance is being launched. You can follow the “View instances…” link to drop you back to the EC2 > Instances control panel and watch the progress of your new VM as it boots.
The “State” will go through a status of “pending” or “booting” until it reaches a state of “running.” At that point, you are ready to connect to your image. Click anywhere on the line and the bottom panel will populate with information about your instance. You are looking for the “Public DNS” name that you will use for connecting to your new VM.
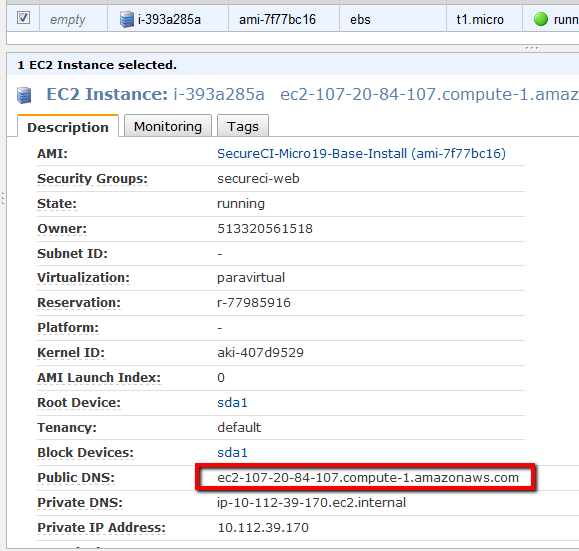
NOTE: This DNS name will change (almost) every time you reboot your machine. For information on setting up a fixed (non-changing) IP address, Google around and read about using an “Elastic IP” address that you can bind to your instance. Elastic IP’s are free except when you are NOT using them. (“WTF?!” you say. Believe it or not, it actually makes sense.)
Next step: connect to your new VM so we can begin configuring SecureCI.
Connecting to Your Instance
The next step is to connect to the SecureCI unix host with SSH with your PEM key pair. I’m going to walk through using PuTTY to do this from a Windows box. If you have another SSH client, that should work in a similar manner to my PuTTY instructions. If you are using SSH from another Unix client, I’m making the assumption that you are savvy enough to figure out how to use the PEM private key. The only clue you should need is to use “ubuntu” as your user name when you connect.
Learning to use PuTTY is slightly out of scope for this post, but I’ll include the short steps here. Refer to the PuTTY site for more detailed information (PuTTY Html Docs). If you don’t understand PuTTY, SSH, and at least a working knowledge of Unix, you’re eventually going to run into some difficulties managing your SecureCI unix host, but you can at least get started before you needs some assistance from your resident geek friend(s).
- Download and install PuTTY from here
- Run “PuttyGen.exe” to generate a PuTTY-compatible private key. Use the Conversions > Import key menu entry to open the PEM file you download and saved in a safe, easy-to-remember place earlier. Change the “Key comment” to match your Key name (e.g., “free-secureci-key”), then use “Save private key” to save the file as a PPK file that PuTTY will use in the future. Consider adding a passphrase to your PPK file to further protect your private key file. Remember, anyone with this file will be able to connect to your server. If you add a passphrase, PuTTY will encrypt the PPK key file such that you need to enter a password each time you make use of the key.
- Run “PuTTY.exe” to connect to your server.
- Enter “Host Name” as the Public DNS name for your instance.
- Use Connection > SSH > Auth dialog to select the “Private key file for authentication” as the PPK file you saved in PuttyGen.
- Use Session > Save button (and a name in “Saved Sessions”) to save this entry for reuse later
- Use “Open” to connect to your host
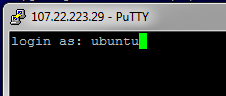
Upon connection, you will probably get a dialog box or prompt with a warning about “unknown host key.” This happens the first time you connect to any host. Go ahead and accept the host key and allow SSH to enter it into your “known hosts” list.
At this point, you will log into your new SecureCI VM instance and begin the “firstrun” configuration process.
Configuring Your New SecureCI Instance
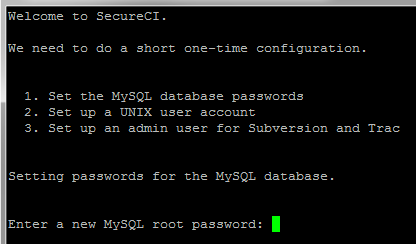
Upon connecting to your new instance as user “ubuntu”, the “firstrun.sh” script will run from your home directory. The script is responsible for configuring various server components of SecureCI including MySql, Trac, Subversion, and creating an additional unix user account. When it complete’s successfully, the firstrun.sh script will be removed from your home directory. If, for some reason, you need to run it again in the future, you can run it from /etc/init.d/firstrun.sh.
The first step is to create a MySQL root password. Pick something and write it down in a secure location in case you ever need it again. (If you’re like me, you’ve got hundreds of passwords and can’t keep track. I recommend using ‘keypass’ as an encrypted password database.)
Next, create a Unix user that can be used for other logins and general maintenance of the system.
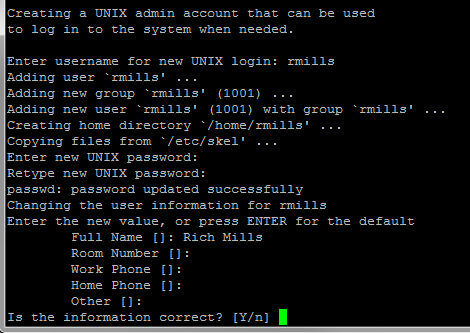
Pick a user name and password and write them down in a secure location. The user will be created with ‘sudo’ privileges to administer the system, similar to the ubuntu generic user. NOTE: In order to actually connect to this new account from a remote location, you will need to put your public key in ~/.ssh/authorized_keys, but that’s out of scope for this post.
The final step of SecureCI configuration is to create an administrative user for Trac and Subversion. I commonly use “svntrac” but you could just as easily use “admin” or anything else. I like to keep “svntrac” user separate as an admin user, then create other normal user accounts (e.g., “rich.mills” or “rmills”) to use on a daily basis when actually using the system. (Google for the “principle of least privilege” for a quick lesson on why.)
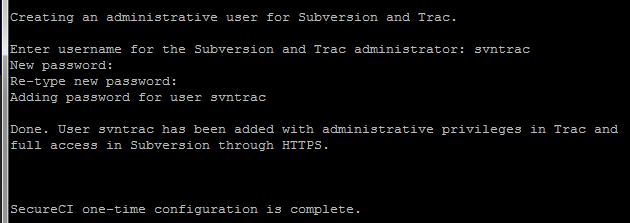
Once again, write this account down in a secure location. This is the account you are likely to use the most when using SecureCI.
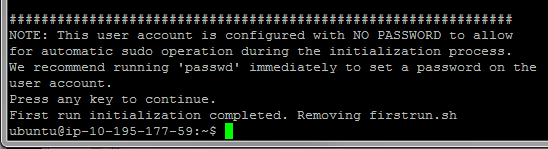
The final warning you receive when configuring SecureCI is that the ‘ubuntu’ user is configured with no account password to enable initial configuration. For security sake, I recommend running ‘passwd’ immediately to set a new password. This adds an additional level of authentication in case someone ever happens to steal your private key and tries to gain access to your box. (Google for the principle of “defense in depth” and “multi-factor authentication.”)
POST RELEASE UPDATE: The system comes pre-configured with ‘sudo’ set to not require a password for executing commands as root. After initial configuration, I recommend editing the /etc/sudoers file (‘sudo vi /etc/sudoers’) and removing the “NOPASSWD:” from the ubuntu line.
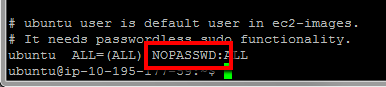
The line should say “ALL=(ALL) ALL” similar to other lines you will see in the file. NOTE: MAKE SURE YOU DO THIS AFTER YOU SET THE PASSWD FOR THE UBUNTU ACCOUNT. Otherwise, you will not be able to run sudo any more and will need to ‘su – rmills’ to whatever other Unix account you created in order to run sudo as that account to fix your password for ‘ubuntu’ user.
Finally, reboot your machine to restart all the new services that you’ve configured and you should have a
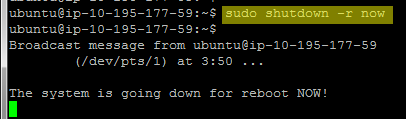
NOTE: It’s possible that your instance will latch onto a new Public DNS name
What’s Next?
At this point, you should have a completely functional, free version of SecureCI to provide version control, continuous integration, software analysis, project/issue management, and wiki for your projects! Connect to your new SecureCI Instance via SSL connection in your favorite browser. Remember, use the Public DNS name of your running instance.

NOTE: You may get warnings about the site’s security certificate not being trusted. This is because Coveros uses a self-signed certificate. The certificate should indicate that it was issued to secureci by secureci. It is safe to proceed, but one of the things you may consider doing is replacing the certificate with one of your own.
At this point, you’re ready to start using your SecureCI system. I recommend browsing around and looking at the various tools listed on the main Wiki page to see what’s available and just play with them.
One of the first things to consider is configuring security to lock down your new system. You’ll notice that SecureCI comes configured wide open to the world for browsing and reading through Trac, Sonar, Hudson, etc. You can use this page (http://www.coveros.com…/readme.html) as some guidance for configuring Sonar and Nexus admin passwords. Visit the Wiki “Howto…” sections and other documentation for the various systems within SecureCI to learn about administering them properly. Hint: the simplest way to lock down the entire system is to configure Apache HTTPD authentication to use the same password database as Trac and Subversion, then require authentication for the entire site. This will require everyone to authenticate before touching anything in the system.
Stay tuned for more upcoming blog posts on using SecureCI and Amazon EC2 instances, in general. Some initial topics I have on deck are configuring security for SecureCI, adding additional storage space to yourEC2 SecureCI instance, and using Hudson to set up disaster recovery for regular backups of your Amazon instances.
Enjoy using your SecureCI system and feel free to contact myself our any of us here at Coveros ([email protected]) with questions and suggestions. We’d love to hear from you.

