
Introduction
This is the third part in a series of tutorials focused on the process of creating, deploying, and consuming a Node.js REST microservices.
In part one, I walked through the initial creation process and laid out the path forward.
In part two, I connected the Node.js app to a database, and updated the routes to have full-persistent CRUD functionality. Further, I demonstrated how to leverage environment variables to configure the application. This aligned with the tenants of the Twelve-Factor app, which I will reference as appropriate throughout this blog series.
In this part, I will turn the application into a self-contained Docker image. I will then connect it to the database as a Docker stack. This will be a simple task, since the database created in part two is already running as a Docker container.
The code used in this post is available here: https://github.com/justin-coveros/node-ms-part-three
Creating the Image
Overview of a Dockerfile
A Dockerfile provides the instructions used to build a Docker image. There are a number of different types of commands you can use. These include copying files, setting environment variables, and executing system commands. The Dockerfile reference page goes into detail on each type of command including when and how to use them.
Explaining the Dockerfile
In order to build the microservice Docker image, you will need to create a Dockerfile with the following contents:
FROM node:10.16-alpine

WORKDIR /usr/src/server

COPY package*.json ./

RUN npm ci --quiet --only=production

COPY . .

EXPOSE 8080
CMD [ "npm", "start" ]
The FROM command defines the base image. Because the microservice is a Node.js application, using the node:10.16-alpine Docker image is appropriate. This image includes the node and npm binaries, and other supporting build tools.
The package.json and package-lock.json files — that define the service’s dependencies — are copied into the image being built. These dependencies are downloaded by running npm ci, which is used instead of npm install to ensure the same dependencies used locally are downloaded as part of the image. The npm documentation goes into further detail on the specific differences between npm install and npm ci. All devDependencies are excluded from the Docker image with the --only=production argument value.
Once the dependencies have been downloaded, the remaining service files are copied into the Docker image. The next section explains how to limit the files copied into the image.
Finally, the default command is defined. Assuming this is not overwritten at run time with a command-line argument, the node application will start when the Docker image is run.
Ignoring with .dockerignore
The .dockerignore file is used to exclude specific paths from the Docker image. Files and directories matching the paths listed in the .dockerignore file will be excluded from any COPY operations run during the docker build.
.*
node_modules
README.md
docker-compose.yml
Building the Image
Now that the Dockerfile and .dockerignore files have been created, the image is ready to be built. Run the following command to create the task-service:1.0 Docker image.
docker build -t task-service:1.0 .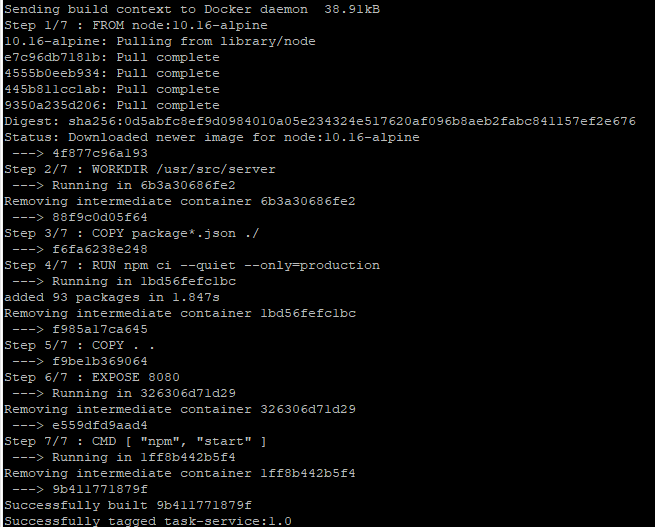
The Docker Build reference page goes into much further detail on all its available options.
Running the Container
A Docker container is a running instance of a Docker image. The docker run command is used to launch a container.
If the database created in part two isn’t running, start it now. The task-service container will fail to respond to events if it cannot connect to a database.
docker run -d -p 27017:27017 -v dbdata:/data/db mongo:4.0Once the database container is running, start a task-service container. Setting the network mode to host will allow the service to connect to the database via localhost.
docker run -d --network=host task-service:1.0By default, the task-service attempts to connect to a local database listening on port 27017. Therefore, the connection is made without having to modify the configuration via environment variables. However, if you wanted to specify the database port in which to connect, you can define it as a command-line argument.
docker run -d -p 25000:27017 -v dbdata:/data/db mongo:4.0
docker run -d -e "DB_PORT=25000" --network=host task-service:1.0
This defines an environment variable — DB_PORT — in the running task-service container, which is then loaded by the node application using dotenv as described in part two. It works the same way as using a .env file.
Creating the Stack
Running the docker containers individually via command-line arguments may work as a proof of concept, but it is better to define the configuration as a single Docker stack. Doing this enables the coordination and orchestration of the entire application in a single file. There are a number of benefits gained by doing this: it allows for the configuration to be versioned, it makes it trivial to define networking between the containers, it facilitates restart policies, and much more.
The Docker stack is defined in a docker-compose.yml file, and placed in an accessible location on the file system. Below is a basic docker-compose.yml file for this stack.
version: "3.7"
services:
  taskService:
    image: task-service:1.0
    environment:
      DB_HOST: taskdb
      DB_PORT: 27017
    ports:
      - "8080:8080"
  taskdb:
    image: mongo:4.0
    volumes:
      - dbdata:/data/db
volumes:
  dbdata:
    external: true
This configuration defines two services, matching the two containers manually started in the prior steps. The first — taskService — uses the task-service:1.0 image, mapping the container port 8080 to the host port 8080. It also sets the DB_HOST and DB_PORT environment variables, configuring the service connection to the database.
The second service — taskdb — uses the mongo:4.0 image, persisting its data in a docker volume. That docker volume — dbdata — is specified as externally created, causing it to use the same volume that was previously created in part two, and reused in the prior section. To create a new stack-specific docker volume, simply remove the external: true option from the dbdata volume configuration.
Place the docker-compose.yml in an accessible location — such as /opt/task-service/docker-compose.yml — and deploy the stack.
docker stack deploy -c /opt/task-service/docker-compose.yml task-service**If Docker complains that there is no swarm available, execute docker swarm init as instructed.
Testing the Stack
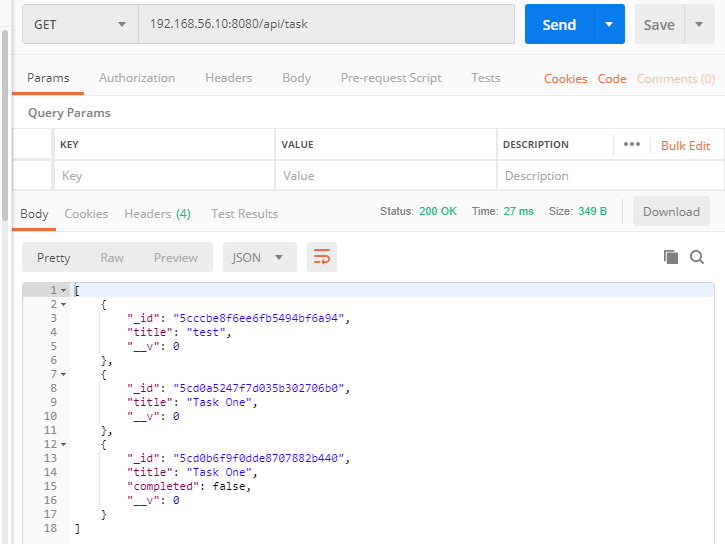
With the stack started, and the task service port mapped to your host’s 8080 port, requests can now be made to the task-service container, using the host’s IP and port 8080.
With the microservice running as a Docker container, there is no longer a need to have Node.js or npm installed directly on the host. All of its dependencies are bundled into the image. Also, by bundling the service into a Docker image, you can now easily version and distribute it from a Docker registry.
The task-service image isn’t limited to use in a Docker stack. The same image can be stood up in a Kubernetes cluster or Amazon ECS or any other Docker-capable container orchestration system.
Next Steps
In subsequent blog posts, I will demonstrate:
- Adding in testing to ensure correct and high quality code
- Leveraging various security modules such are cors, csrf, and helmet
- Using websockets for push-based communication with the front-end UI
- Using ZeroMQ for simple message-based communication between microservices
- Creating a Node.js-based API gateway for simple proxying between layers
- Adding in RBAC checks to the routes
- Converting to Typescript
- Using Jenkins for continuous integration
- And more

