
Another quarter done. Another Selenified release in the books. We didn’t add too many new features this release, mainly focusing on usability and tightening up existing functionality. But beware, we bumped the minor version because this release isn’t backward compatible.
Properties File
Instead of needing to provide all properties directly from the command line (or VM if in your IDE), you can now set default properties in a properties file. Each parameter can now be passed in either via command line (through System Properties), or they can be set in a properties file. The Selenified framework looks for a properties file named selenified.properties in the src/test/resources directory. Your file might look something like:
# browser
browser=chrome
headless=true
# logging
defaultWait=10
generatePDF=true
If a property is set in both properties file and passed in via command line, the command line properties will override anything set in the properties file.
Two additional properties were also added, defaultWait, and defaultPoll. Instead of having to continuously change these values system wide, you can easily set an overall system wait. These values can still be overridden at a class, test, or call level, but provides more overall flexibility.
API Changes
The API calls (using Response class) was updated to match the new assert/verify pattern that was implemented on the web-side in the 3.1.0 release. As a recap, an assert failing meant your test fails and stops immediately. If you want to perform a check of the system, but continue even if there is an error, instead, a verify should be used, instead of an assert. Unlike the web-side, no waits are present, as all API calls are synchronous. Please note, this is a breaking change, and code using these methods will need to be updated.
More logging was also added into API calls. The request header and payload are now written out to the detailed report. Additionally, the response header, response code, and payload are recorded to provide easier debugging and traceability.
Custom Reporter
A new customized Selenified reporter is now generated once tests complete, replacing the old/generic TestNG reporter. The added benefit is now this report exists whether you run from the IDE or from the command line.
To view the test results, navigate to the newly created output folder within the framework directory. This will be either target if run with Gradle or Maven, target-output if run through an IDE, or a custom directory if run with Ant. Navigate to the folder of the runner used to execute the tests, and locate the reports.html file. Open this file in a browser.
This will give an overview of the tests run, showing the number of tests executed, passed, skipped and failed. Additionally, each test is listed in a table, with high-level information about it. Links to detailed reports are provided, for more information on each step run.
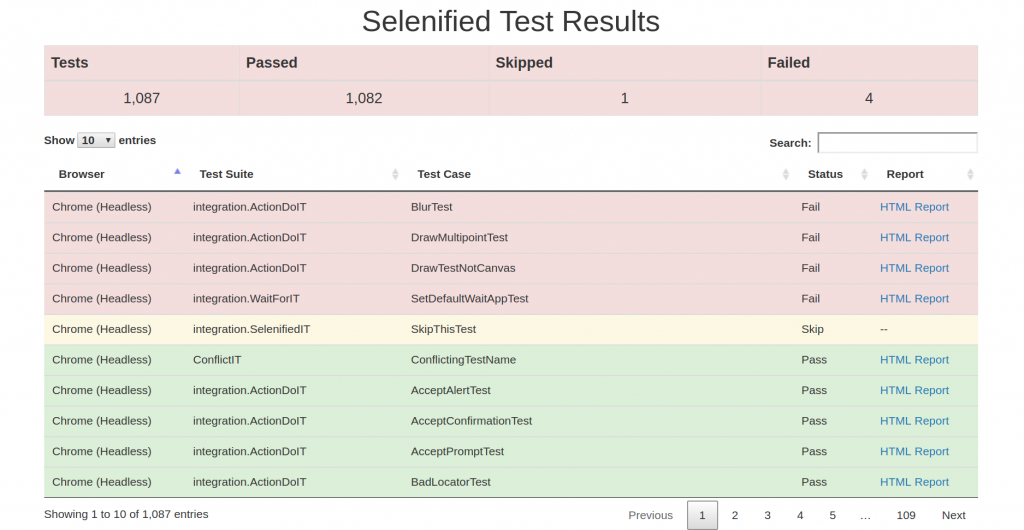
As before, clicking on each of these links will display a step-by-step procedure about what was run, in addition to details about the test. These steps and information are also very useful for debugging. They will alert if elements are missing, locators are bad, or anything else. Both locators and associated IDs are listed to make fixing tests or the app easier.
Simplified Reporting
For those of you who have gotten into some customization of Selenified, you might have used the TestOutput object directly. We’ve made some slight changes to simplify this process, including renaming TestOutput class to Reporter. Instead of using the record calls, you should now use simplified pass, fail, or check.
Reporter reporter = app.getReporter();
reporter.pass(action, expectedResult, actualResult);
reporter.check(action, expectedResult, actualResult);
reporter.fail(action, expectedResult, actualResult);
Please note: this is a breaking change, and code using these methods will need to be updated.
Other Updates
A few other small updates were made to this release.
The code responsible for setting up the proxy was simplified and aligned to the newer java Proxy class. As a note, this will pass both browser and web services traffic through an HTTP proxy. If you are passing web services traffic through this proxy, and testing with SSL (over HTTPS), ensure your proxy’s certificate is added to your java keystore.
Some bugs were found in the API calls for form-data requests, but we found and fixed them. If you were experiencing odd behavior with dropped payload variables, this should now be resolved.
Finally, some realignment of variable naming was performed. URLs within the framework were referred to as both testSite and appURL. All instances of testSite were renamed to appURL. Please note, this is a breaking change, and code using these methods will need to be updated, specifically in setting up new test suites.
Get Testing
So, are you ready to upgrade? Simply modify your pom or build files to point to version 3.2.0! Or just download the jar directly! Starting fresh? Checkout some quick start instructions.
As always, leave your thoughts below, and happy testing!

