This is the first in a series of posts I plan to do as an introduction to the basics of Appium.
In this post I will walk through how to use tools that come with Appium to record the basic steps of a functional test for a sample iOS application and then how to clean that code up and translate it into a JUnit test that can be run as part of an automated test suite. Future posts will demonstrate how to record similar tests with an Android app and then how to leverage Appium in the cloud to run tests across multiple devices and OS versions.
In my mobile application testing training classes we do a demonstration of how to record Selenium tests using Firefox SeleniumIDE. This is a great mechanism for getting a base functional test recorded for a web application or mobile web application. However, it doesn't do much good for native mobile applications. So I wanted to get a very simple example built for doing exactly that.
First, a few pre-requisites:
- The Apple XCode iOS Simulator is required to create the recording so a Mac running the latest version of XCode will be needed.
- This should go without saying, but you will need to have Appium installed locally. Get it here: http://appium.io/
- The app I am using for this example is the UICatalog app used in many other Appium examples on the web. However, feel free to use your own app or any other one you have available.
Configuring and Starting Appium
In order to record a test we need to configure Appium to run the iOS Simulator and launch the UICatalog app. To do this
- Launch Appium
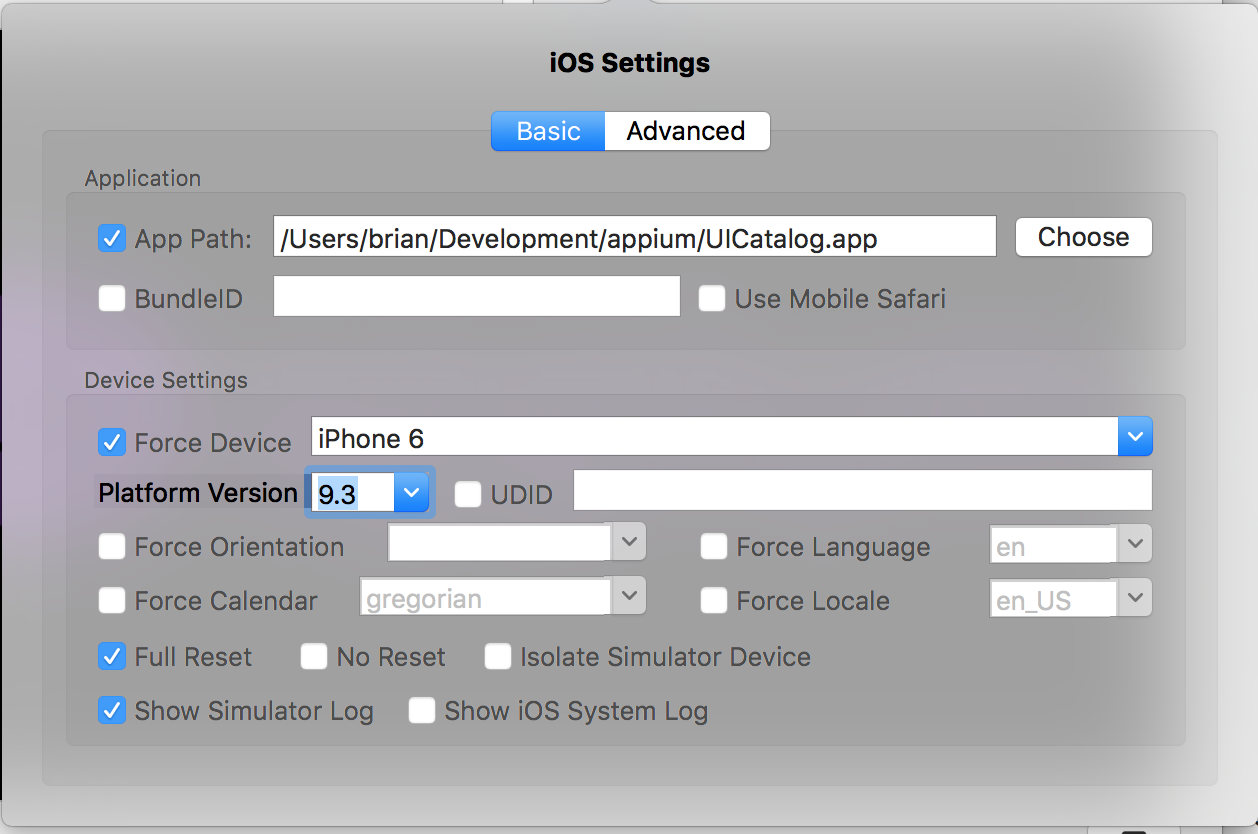
- Click the Apple button to configure the iOS Simulator.
- Edit the properties to use appropriate iOS versions and launch the UICatalog app. Make sure to check "Full Reset". This is necessary to ensure that the app environment is cleaned up prior to running the Simulator. If unchecked, Appium will do this by starting and killing the Simulator once prior to starting it again and launching the app. This is fine but will cause your tests to take a lot longer to run (since the Simulator is booted twice).
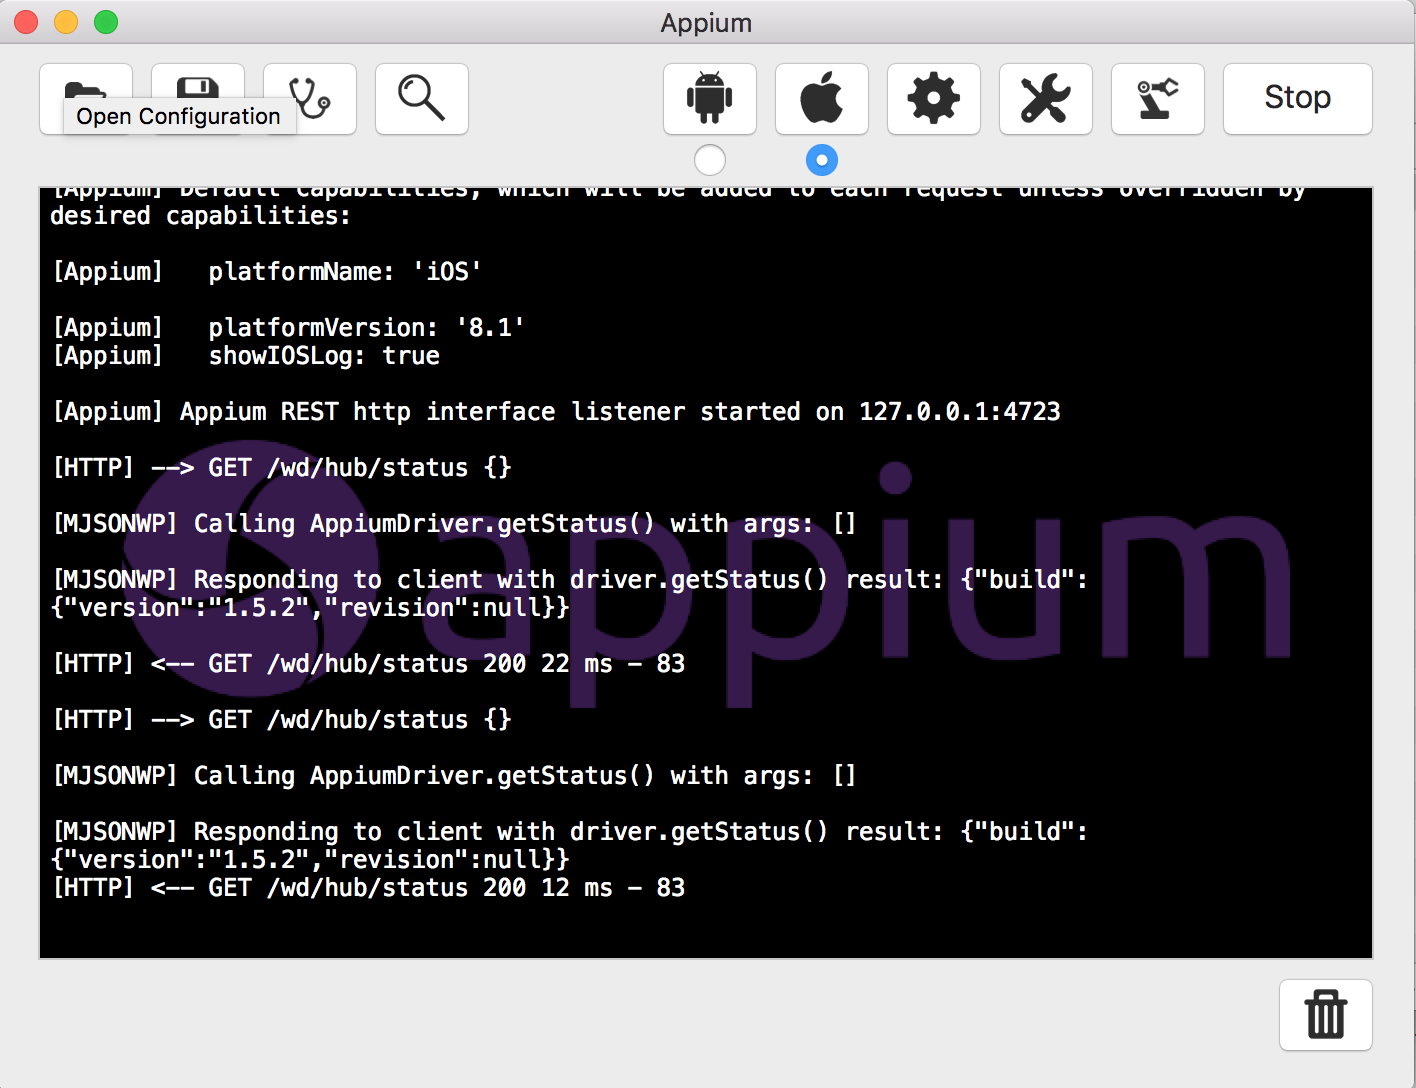
- Launch the Appium server for iOS by selecting the "Apple" and clicking "Launch". If everything launches properly, the Appium window should look something like this
- Next open the Inspector by clicking the magnifying glass Icon in the Appium server. This will start the iOS Simulator, load the UICatalog app, and launch the inspector.
- The Inspector is the mechanism we will use to determine locators for elements in the UI and to record the test.
The Appium Inspector
Prior to recording a test it is a good idea to get familiar with the Appium Inspector interface. There are three important areas of the Inspector.
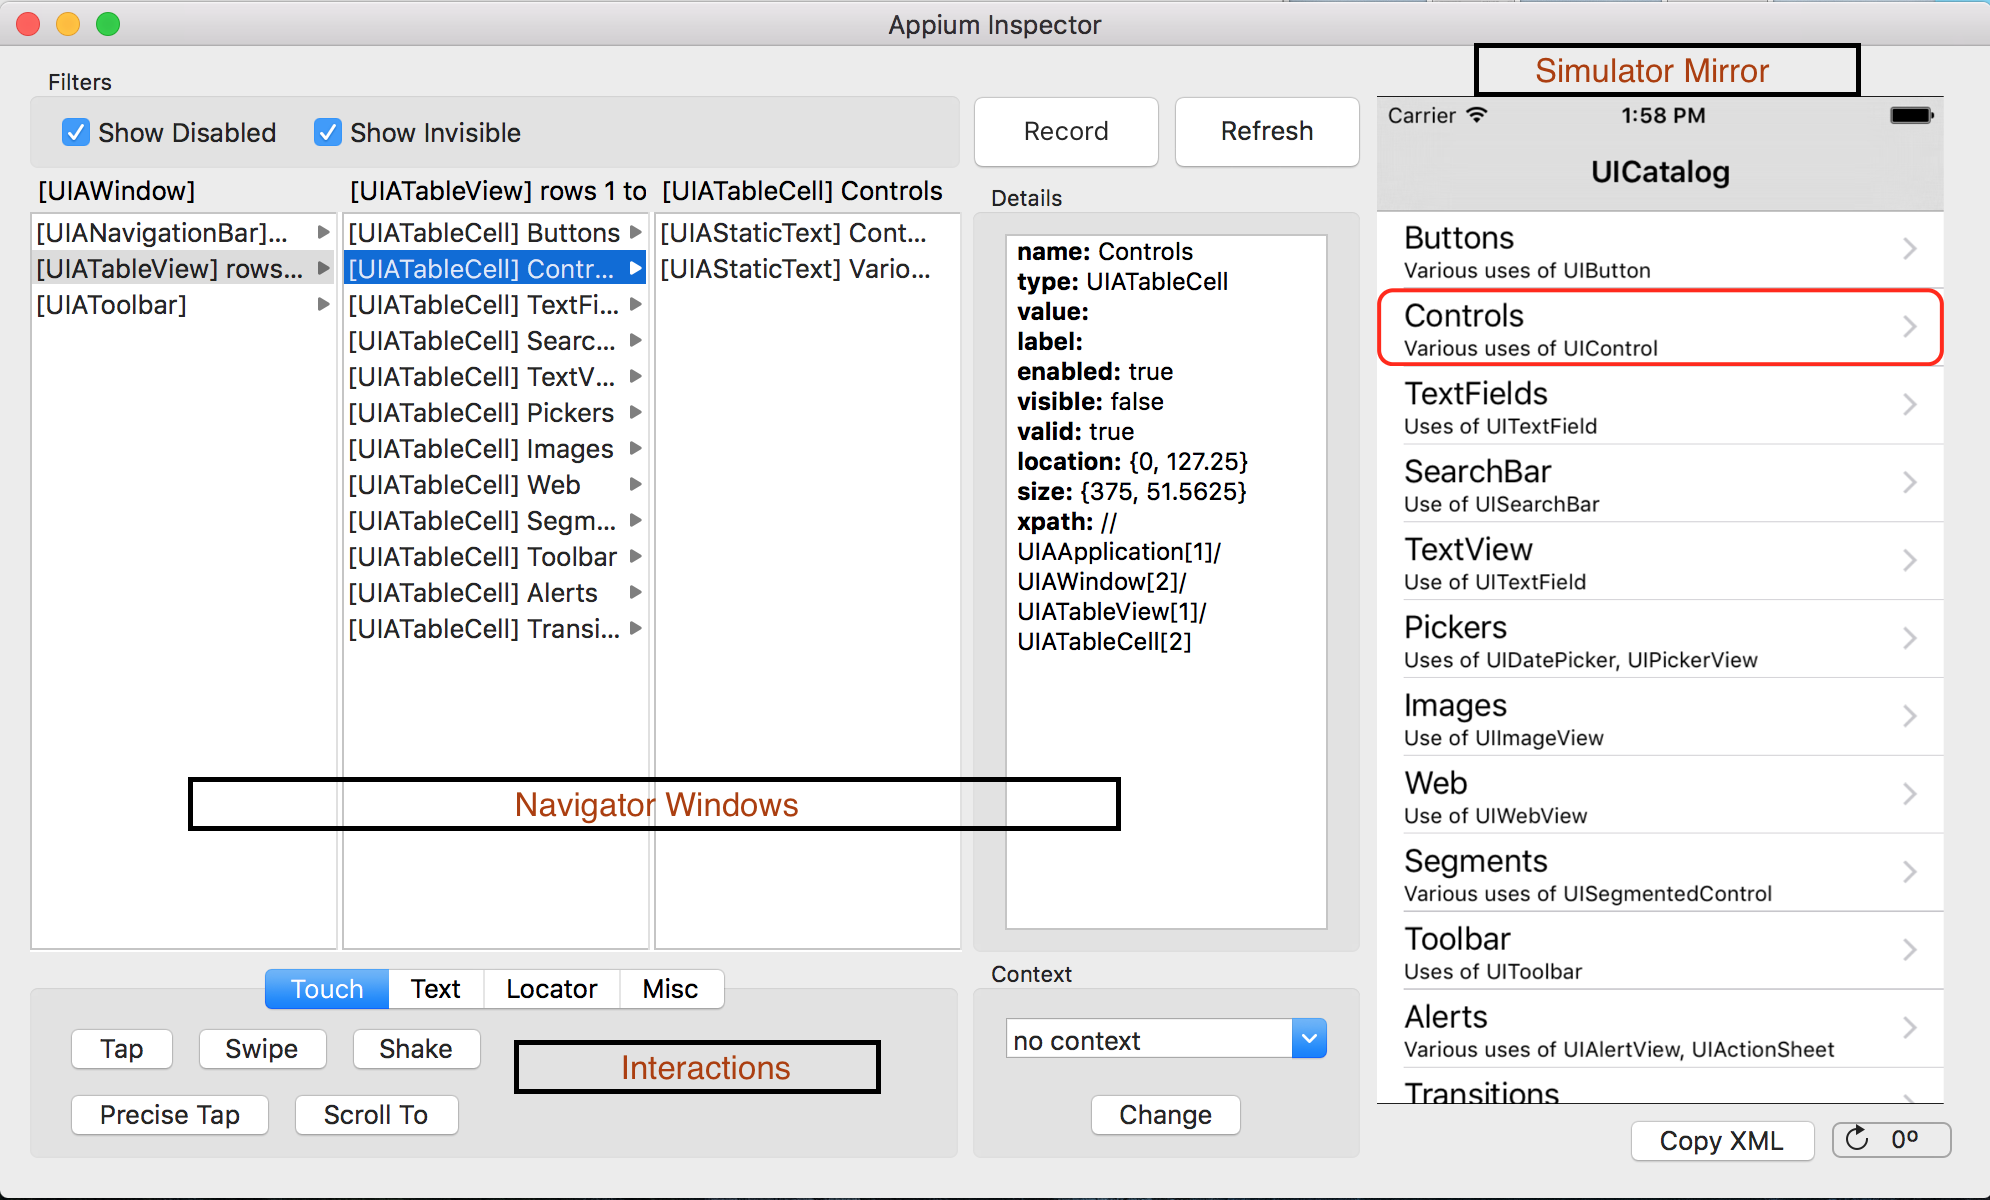
On the left side is a series of vertical boxes. These are the navigators that show the path through the current UI to a particular element (very similar in concept to the OS X Finder interface). The right-most vertical box contains the details of the element being selected. This contains the information needed to locate the element. We will use this later when we write our test case code.
On the far right is a window that mirrors the current screen being displayed in the iOS Simulator. Selecting an element here will highlight it and show the navigator path to get to it as well as the details of the element. Two important things to note:
- Clicking on the element does not interact with it (i.e. this does not send a "click" or "tap" to the iOS Simulator), it simply highlights the element and shows its details. How to interact with elements will be explained in more detail below and when we actually record the test.
- In certain cases elements are nested and are not directly selectable. In this case it may be necessary to click on the parent element and use the navigator to get to the desired element
On the bottom left are a set of buttons used to interact with the elements of the elements. There are several tabs that perform different interactions:
- Touch - contains controls that allow physical input via touch interface (tap, swipe, etc),
- Text - contains controls that allow text to be entered into forms
- Locator - allows for searching the UI to find an element by a particular locator
- Misc - allows interactions with alert windows.
This is a good time to take a minute to get familiar with the interface. Note that whenever an element is clicked it will take several seconds for the mirror window to refresh. Be patient and wait for it, and for the navigator windows, to refresh between taps or other interactions. Also note that the window will not automatically refresh if you interact with the iOS Simulator directly. Clicking the "Refresh" button will refresh the inspector with the current screen displayed on the Simulator.
Recording a Test Case
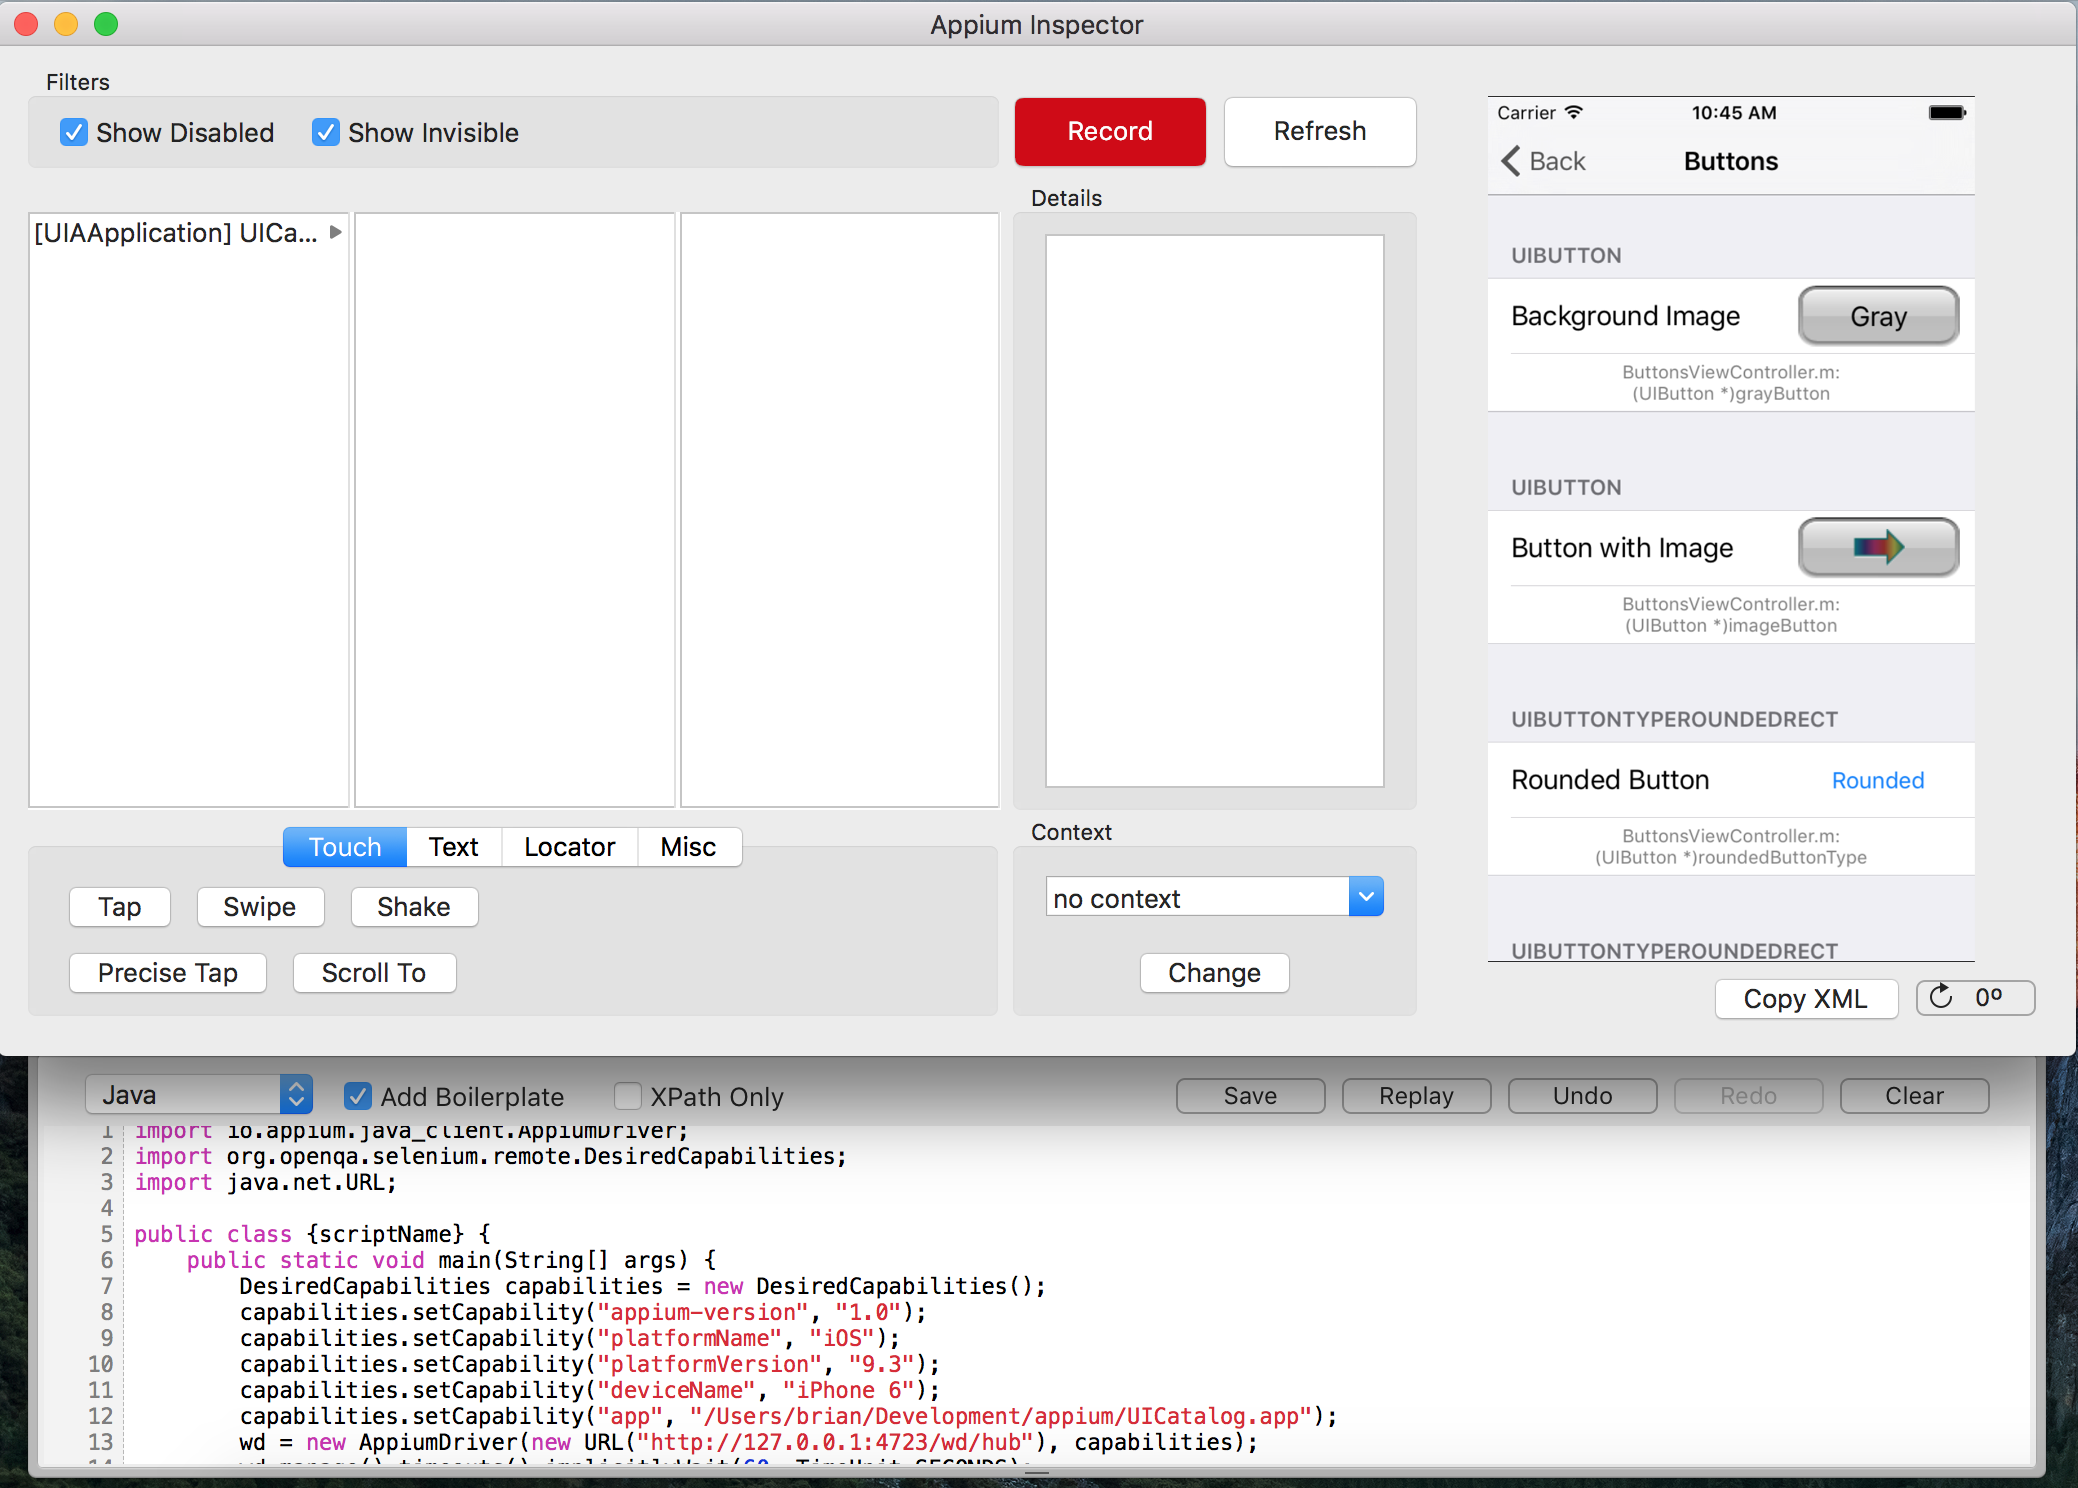
Now that we have Appium up and running and are familiar with the Inspector interface, it is time to do something interesting and actually record a test. The following steps refer to the figure below.
- To get started, make sure the app is on the main start page and click on the "Record" button. It will turn red to indicate recording is on. Also, another window will drop from the bottom of the Inspector. This is where the code generated by the recorder will appear.
- For those familiar with Firefox IDE, this recorder is very similar in concept but has one significant difference. Instead of recording into Selenese and then requiring you to export into anther language, it records directly into the language of choice. In my case, I chose Java.
- Note also the "Add Boilerplate" check box. When checked this includes boilerplate setup code. For Java, this means that appropriate library imports are included as well as a skeleton class definition, and a default DesiredCapabilities object definition based on the settings we configured earlier. I'm going to leave this checked.
- Now simply use the interaction controls to navigate through the application. For example, select elements in the mirror window or use the navigator to find them and then click the "Tap" button. Code will start to appear in the proper place in the window below the Inspector
- When finished, click "Save" to save the code to a file.
The generated code can now be used as the basis for an automated WebDriver test in JUnit. As an example I clicked around through a couple menus and this was the code that was generated. In the next section we will clean this up so it will actually run.
import io.appium.java_client.AppiumDriver;
import org.openqa.selenium.remote.DesiredCapabilities;
import java.net.URL;

public class {scriptName} {

  public static void main(String[] args) {
    DesiredCapabilities capabilities = new DesiredCapabilities();
    capabilities.setCapability("appium-version", "1.0");
    capabilities.setCapability("platformName", "iOS");
    capabilities.setCapability("platformVersion", "9.2");
    capabilities.setCapability("deviceName", "iPhone 6");

    wd = new AppiumDriver(new URL("http://127.0.0.1:4723/wd/hub"), capabilities);
    wd.manage().timeouts().implicitlyWait(60, TimeUnit.SECONDS);

    wd.findElement(By.xpath("//UIAApplication[1]/UIAWindow[2]/UIATableView[1]/UIATableCell[1]")).click();
    wd.findElement(By.name("Gray")).click();
    wd.findElement(By.xpath("//UIAApplication[1]/UIAWindow[2]/UIANavigationBar[1]/UIAButton[1]")).click();
    wd.findElement(By.xpath("//UIAApplication[1]/UIAWindow[2]/UIATableView[1]/UIATableCell[8]")).click();
    wd.findElement(By.xpath("//UIAApplication[1]/UIAWindow[2]/UIANavigationBar[1]/UIAButton[1]")).click();
    wd.findElement(By.xpath("//UIAApplication[1]/UIAWindow[2]/UIATableView[1]/UIATableCell[6]")).click();

    wd.close();
  }
}

Cleaning up the Test
Now that the basic test steps have been recorded into a skeleton Java class we want to do three things:

Clean up the code so that it will actually run
Translate the code into a JUnit test
Add in an assertion so that we have a proper test case

In order to get the code to run, we need to do a few things:

Add a package statement and any appropriate imports (a good IDE like Eclipse can help out alot with this)
Replace {scriptName} with the name of the class. In Java this should be the same as the filename.
Add a private static field named wd of type AppiumDriver.
Change the statement on line 14 to instantiate IOSDriver instead of AppiumDriver. AppiumDriver is actually an abstract class and can't be instantiated directly. IOSDriver is a concrete subclass of AppiumDriver appropriate for this iOS test case.
Surround line 14 with a try/catch block to catch the potential MalformedUrlException that could be thrown
Change wd.close() on line 24 to wd.quit() because wd.close() is not supported by the IOSDriver.

The resulting code should look something like this. To try it out, ensure that the inspector is not running, nor is the iOS Simulator. Also, it is probably a good idea to just stop and restart the iOS Appium server. Then just run this class.
package com.coveros.training.map.appium;

import java.net.MalformedURLException;
import java.net.URL;
import java.util.concurrent.TimeUnit;
import org.openqa.selenium.By;
import org.openqa.selenium.remote.DesiredCapabilities;
import io.appium.java_client.AppiumDriver;
import io.appium.java_client.ios.IOSDriver;
import io.appium.java_client.ios.IOSElement;

public class CodeMakerTest{

  private static AppiumDriver<IOSElement> wd;

  public static void main(String[] args) {
    DesiredCapabilities capabilities = new DesiredCapabilities();
    capabilities.setCapability("appium-version", "1.0");
    capabilities.setCapability("platformName", "iOS");
    capabilities.setCapability("platformVersion", "9.2");
    capabilities.setCapability("deviceName", "iPhone 6");

    try {
      wd = new IOSDriver<>(new URL("http://127.0.0.1:4723/wd/hub"), capabilities);
    } catch (MalformedURLException e) {
      e.printStackTrace();
    }

    wd.manage().timeouts().implicitlyWait(60, TimeUnit.SECONDS);
    wd.findElement(By.xpath("//UIAApplication[1]/UIAWindow[2]/UIATableView[1]/UIATableCell[1]")).click();
    wd.findElement(By.xpath("//UIAApplication[1]/UIAWindow[2]/UIANavigationBar[1]/UIAButton[1]")).click();
    wd.findElement(By.xpath("//UIAApplication[1]/UIAWindow[2]/UIATableView[1]/UIATableCell[8]")).click();
    wd.findElement(By.xpath("//UIAApplication[1]/UIAWindow[2]/UIANavigationBar[1]/UIAButton[1]")).click();
    wd.findElement(By.xpath("//UIAApplication[1]/UIAWindow[2]/UIATableView[1]/UIATableCell[6]")).click();
    wd.quit();
  }
}

The next step is to make this a true JUnit test. In order to do this we want to make sure and follow a good setup-execute-tear down pattern. This means we need to get rid of the static main method and break the test into three parts

setup - define desired capabilities, instantiate the driver and connect to the Appium Server
execute - locate elements, interact with them and assert that the results are what we expect
teardown - close the app and shut down the iOS Simulator

The biggest thing that is missing here is the assertion. The inspector does not have a mechanism for recording asserts directly so we will have to write this code ourselves. For my simple example I navigated to the "Pickers" menu and assert that the text displayed for the middle picker button on the bottom of the screen is "UIDatePicker". To find an appropriate identifier, use the inspector and look at the details for the appropriate element. The code to click on the picker menu and assert the button text looks like this:
  wd.findElement(By.xpath("//UIAApplication[1]/UIAWindow[2]/UIATableView[1]/UIATableCell[6]")).click();
  assertEquals("UIDatePicker", wd.findElement(By.xpath("//UIAApplication[1]/UIAWindow[2]/UIAToolbar[1]/UIASegmentedControl[1]/UIAButton[2]")).getText());

 The next step is to write the new setup method. This is essentially the same code that we used previously to set up the DesiredCapabilities object and the AppiumDriver with a few changes:

Refactored into a class method with the @Before JUnit tag
Added the "app" capability to explicitly declare the app to be loaded. This will allow us to remove the App Path from the iOS Settings in the Appium server and use the server to run tests against more than one app.

The updated code is as follows
private AppiumDriver<IOSElement> wd;
@Before
public void setup() {
  File classpathRoot = new File(System.getenv("HOME"));
  File appDir = new File(classpathRoot, "Development/appium");
  File app = new File(appDir, "UICatalog.app");

  DesiredCapabilities capabilities = DesiredCapabilities.iphone();
  capabilities.setCapability("appium-version", "1.5.2");
  capabilities.setCapability("platformName", "iOS");
  capabilities.setCapability("platformVersion", "9.2");
  capabilities.setCapability("deviceName", "iPhone 6");
  capabilities.setCapability("app", app.getAbsolutePath());
  // Don't need a browser for a native app test
  capabilities.setBrowserName("");
  try {
    wd = new IOSDriver<>(new URL("http://127.0.0.1:4723/wd/hub"), capabilities);
    wd.manage().timeouts().implicitlyWait(60, TimeUnit.SECONDS);
    wd.launchApp();
  } catch (MalformedURLException e) {
    e.printStackTrace();
    fail();
  }
}

The final step is to write the test execution method and the teardown method. The code for these is essentially unchanged. It has just been moved into two properly annotated methods as follows:
@Test
public void testSampleIOSApp() {
  wd.findElement(By.xpath("//UIAApplication[1]/UIAWindow[2]/UIATableView[1]/UIATableCell[1]")).click();
  wd.findElement(By.xpath("//UIAApplication[1]/UIAWindow[2]/UIANavigationBar[1]/UIAButton[1]")).click();
  wd.findElement(By.xpath("//UIAApplication[1]/UIAWindow[2]/UIATableView[1]/UIATableCell[8]")).click();
  wd.findElement(By.xpath("//UIAApplication[1]/UIAWindow[2]/UIANavigationBar[1]/UIAButton[1]")).click();
  wd.findElement(By.xpath("//UIAApplication[1]/UIAWindow[2]/UIATableView[1]/UIATableCell[6]")).click();
  assertEquals("UIDatePicker", wd.findElement(By.xpath("//UIAApplication[1]/UIAWindow[2]/UIAToolbar[1]/UIASegmentedControl[1]/UIAButton[2]")).getText());
}

@After
public void tearDown() {
  wd.closeApp();
  wd.quit();
}

Hopefully this helped to get a first unit test written using Appium. Check back here soon for more information on how to improve your Appium tests and how to move them up into the cloud.
