
This is a two part post where I will show you how to setup development environment locally. We will start with Vagrant and Virtual Box and their initial setup. Then we will jump into multi-machine setup and provisioning using Puppet. You will also see how Database and WebApp VMs can work together.
Vagrant and Virtual Box (Part 1)
First, we will talk about how to build your local development environment. There are lots of open-source tools out there that can help you setup an environment. I chose Vagrant as it is very easy to install and use. It also works well with any Virtualization Services like Virtual Box, VMware, AWS, and configuration management tools like Puppet and Chef. You can run Vagrant on Windows, Linux, or Mac so let’s get started.
We will start by downloading Vagrant from its website. Choose the appropriate package for your operating system and architecture and download it. Once its downloaded you can run the installer and setup window will show up. When finished with Vagrant installation we will need to download a virtualization tool. Since Vagrant is just a tool to automate build process of your environment we will need to download VirtualBox. It is open source and built-in to Vagrant. Please click https://www.virtualbox.org/wiki/Downloads and choose the appropriate package for your operating system. Now that you have everything we need we can go ahead and start setting up your environment.
Open Command Line and create a new folder with a project specific name and navigate to it. This would be the root directory of your project where many of the configuration options of Vagrant will be stored. We will use Vagrant’s built-in command to initialize a directory for usage.
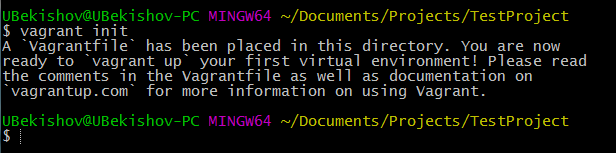
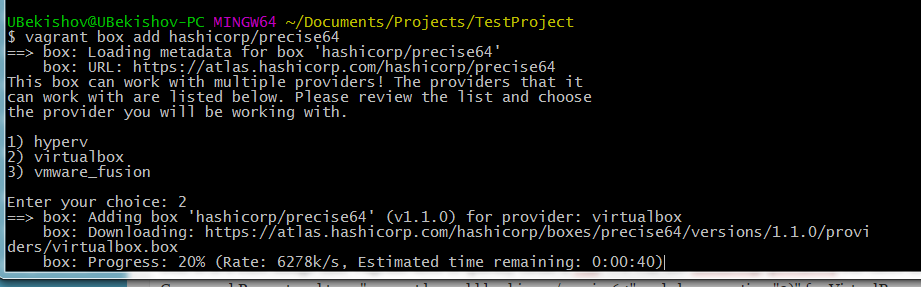
Once you have successfully initialized Vagrant, it will place “Vagrantfile” into that directory. We will use this file to configure and provision our VMs. Before we do that we need to install a Vagrant box. It is a base image that Vagrant uses to quickly clone a VM. We will use hashicorp/precise64 but there are other boxes available to you (https://atlas.hashicorp.com/boxes/search). Open your Command Prompt and type “vagrant box add hashicorp/precise64” and choose option “2)” for VirtualBox.
After the box is added we need to modify Vagrantfile that is in the root of our project. Open Vagrantfile in an editor, Notepad++ will work great. Change the line config.vm.box = “base” to config.vm.box = “hashicorp/precise64” and hit save. Now we can bring our VM up by using command “vagrant up” in the Command Line and in just matter of few minutes we have a standard 64-bit Ubuntu instance running. The great thing about this is you have to go through the setup only once and you can reuse this “image” and/or add on top of it to provision more VM instances. You can spawn them up and down as you need them and it will always be the same box with the same configuration. Now turning on and shutting down your VMs has never been easier and will take only couple of minutes.
In the next topic I will talk about how to setup Database and WebApp VMs and show you how WebApp VM interfaces with a table within Mysql database. Stay tuned!

