
Introduction
This is the second part of a two-part blog series describing one method to display Fortify scan results in SonarQube. This blog describes the process to convert the Fortify scan results and display them in SonarQube. For an overview of the entire process, and a detailed description of generating the Fortify SCA results, see the first part: https://www.coveros.com/fortify-to-sonarqube-part-one/
The reference pipeline for this blog series is available here: https://github.com/justin-coveros/fortify-sonar-translate
Source code for the coveros/fortify-to-sonarqube Docker image is available here: https://github.com/Coveros/fortify-to-sonarqube
The completed Docker image is published on Docker Hub — https://hub.docker.com/r/coveros/fortify-to-sonarqube — and can be pulled with docker pull coveros/fortify-to-sonarqube.
Pipeline Revisited
Part one explained the Fortify Scan stage. This blog will focus on the remaining two stages, Translate Results and SonarQube Analysis.
node {
  stage('Checkout Code') {
    checkout scm
  }
  stage('Fortify Scan') {
    fortifyScan()
  }
  stage('Translate Results') {
    translateResults()
  }
  stage('SonarQube Analysis') {
    sonarqubeScan()
  }
}
Translate Results Stage
In order to submit the Fortify scan results to SonarQube, the report must first be converted from a CSV file to the SonarQube Generic Issue Data JSON format. To perform this translation, we will use a custom Node.js application running as a Docker container as part of the Jenkins pipeline.
The application will accept the Fortify CSV file as input, extract the required data, and output a JSON file in the format described on this page: https://docs.sonarqube.org/latest/analysis/generic-issue/. This JSON file will then be submitted as an external issue report during the SonarQube scan.
Creating the Application
At a high level, it is a Node.js Typescript application that accepts two command-line arguments: the path to the CSV input (--input or -i) and the path to the created JSON ouput file (--output or -o). It uses the npm module commander to access the command line options and to start the transformation process.
import * as program from 'commander';
import {CsvIssue} from "./interfaces";
import {outputJson, parseCsv, transformIssue} from "./lib";

program
  .option('-i, --input [path]', 'Fortify CSV file: [path]')
  .option('-o, --output [path]', 'Outputted JSON file: [path]')
  .parse(process.argv);

if (!program.input) {
  console.error('Input file required');
  process.exitCode = 1;
} else if (!program.output) {
  console.error('Output file required');
  process.exitCode = 1;
} else {
  main(program.input, program.output)
    .then(() => console.log(`Transformation complete, file located at ${program.output}`))
    .catch(console.error)
}
The main function executes the parseCsv function to extract the findings from the CSV input file, the transformIssue function to convert the extracted data to the required JSON format, and then the outputJson function to write the transformed data to a file.
async function main(inputPath: string, outputPath: string) {
  let csvIssues: CsvIssue[];

  try {
    csvIssues = await parseCsv(inputPath);
  } catch (err) {
    console.error('Error parsing csv: ', csv);
    throw err;
  }
  const issues = csvIssues.map(transformIssue);
  try {
    await outputJson(issues, outputPath);
  } catch (err) {
    console.error('Failed to output json file: ', err);
    throw err;
  }
}
The csv package is used to parse the CSV input file. Once complete, the resulting CsvIssue object array is returned.
import * as csvParse from "csv-parse";
import * as fs from "fs";

import {CsvIssue} from "../interfaces";

export async function parseCsv(path: string): Promise<CsvIssue[]> {
  const parser = csvParse({ columns: true, from_line: 2, trim: true });

  fs.createReadStream(path).pipe(parser);

  return new Promise((resolve, reject) => {
    const output: CsvIssue[] = [];

    parser.on('readable', () => {
      let record = parser.read();
      while((record != null)) {
        output.push(record);
        record = parser.read();
      }
    });

    parser.on('error', reject);

    parser.on('end', () => {
      resolve(output);
    });
  });
}
The CsvIssue array must then be converted to the format required by SonarQube. The transformIssue function makes that translation. This is a simple example of how to make the conversion, later enhancements can be added to this function to add additional context. For example, all findings are currently marked as info-level vulnerabilities.
import {CsvIssue, Issue, Severity, Type} from "../interfaces";

export function transformIssue(csvIssue: CsvIssue): Issue {
  const [filePath = "", lineNumber = "0"] = csvIssue.path.split(":");

  return {
    effortMinutes: 0,
    engineId: "fortify",
    primaryLocation: {
      filePath,
      message: csvIssue.category,
      textRange: {
        startLine: parseInt(lineNumber, 10),
      },
    },
    ruleId: csvIssue.IID,
    severity: Severity.INFO,
    type: Type.VULNERABILITY,
  };
}
Once the CSV data has been converted to the required JSON format, it is then output to the file specified during execution.
import * as fs from "fs";
import {Issue} from "../interfaces";

export async function outputJson(issues: Issue[], outputPath: string): Promise<void> {
  const issueString = JSON.stringify({ issues }, null, 2);
  const writeStream = fs.createWriteStream(outputPath);

  return new Promise(((resolve, reject) => {
    writeStream.write(issueString, "UTF8");
    writeStream.end();
    writeStream.on("finish", resolve);
    writeStream.on("error", reject);
  }));
}
Now that the application is complete, the next step is to build a Docker image to run it as a Jenkins pipeline step.
Building the Image
The multistage Dockerfile first builds the application, and then makes it executable as the transform command. This command is used to generate the SonarQube-formatted JSON file in the Jenkins pipeline. This is built in multiple stages to limit the size of the final image.
FROM node:12.13 as build

WORKDIR /src

COPY package*.json ./
RUN npm ci --quiet

COPY . .

RUN npm run tsc \
  && npm prune --production

FROM node:12.13-alpine

WORKDIR /app

COPY --from=build /src/dist /app
COPY --from=build /src/node_modules /app/node_modules

RUN chmod u+x /app/index.js \
  && ln -s /app/index.js /usr/local/bin/transform

VOLUME /app/data

CMD ["transform", "-i", "/app/data/input.csv", "-o", "/app/data/output.json"]
Use docker build to create the coveros/fortify-to-sonarqube image.
$ docker build -t coveros/fortify-to-sonarqube .Using the Image
The first blog post detailed the preceding Fortify Scan stage, ending with generating the target/fortify/fprcsv.csv file in the build workspace. Use the newly created image to execute the transform command, saving the output as the target/fortify/fprresults.json file in the build workspace.
def translateResults() {
  docker.image('coveros/fortify-to-sonarqube').inside() {
    sh 'transform --input target/fortify/fprcsv.csv --output target/fortify/fprresults.json'
  }
}
Example Transformation
The Fortify CSV input target/fortify/fprcsv.csv
sep=,
IID, category, path, analyzer
1, Dead Code: Unused Field, src/main/java/com/api/helloWorld/HelloWorld.java:41, structural
The SonarQube Generic Issue JSON target/fortify/fprresults.json
{
  "issues": [
    {
      "engineId": "fortify",
      "ruleId": "1",
      "primaryLocation": {
        "message": "Dead Code: Unused Field",
        "filePath": "src/main/java/com/api/helloWorld/HelloWorld.java",
        "textRange": {
          "startLine": 41
        }
      },
      "type": "VULNERABILITY",
      "severity": "INFO",
      "effortMinutes": 0
    }
  ]
}
SonarQube Analysis Stage
Submitting Report
The sonarqubeScan method — called as part of the SonarQube Analysis stage in the Jenkins pipeline — both performs and submits the configured SonarQube analysis, and submits the generic Fortify issue report generated in the preceding stage. The outputted JSON file is submitted using the sonar.externalIssuesReportPaths analysis parameter.
def sonarqubeScan() {
  withEnv(['MAVEN_HOME=/usr/share/maven', 'JAVA_HOME=/usr/local/openjdk-8']) {
    docker.image('maven:3.6.2-jdk-8').inside() {
      withSonarQubeEnv('sonarqube') {
        sh "mvn -B sonar:sonar -Duser.home=/home/jenkins -Dsonar.externalIssuesReportPaths=target/fortify/fprresults.json"
      }
    }
  }
}
Reviewing Results
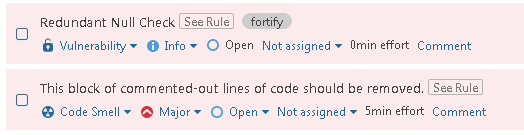
With the Fortify scan result submitted alongside the other SonarQube scan results, the SonarQube project becomes the centralized dashboard for all static analysis findings. When reviewing a project’s issues, the Fortify findings — tagged as fortify — are listed alongside the other reported issues. The fortify tag is the engineId value configured in the transformed JSON report.
Conclusion
With this MVP implementation, finding details are somewhat sparse. It is currently limited to the rule title, and the location in the source code which triggered the finding. Detailed explanations can be found on the official Fortify website. For example, this page has the detailed explanation of the Redundant Null Check vulnerability: https://vulncat.fortify.com/en/detail?id=desc.controlflow.cpp.redundant_null_check#Java%2fJSP
While initially limited, this method removes the requirement for an additional application — Fortify SSC — and centralizes all static analysis reports to a single dashboard.

