
Docker Inside Your Pipeline
Docker has many applications in a modern CI/CD pipeline that make it a natural fit. In particular I use it for build containers and integrations testing. With docker you open up several capabilities that are not normally available to you with CI. First off, you can change your build environment without restarting and the changes can be limited to one job. Next, developers can contribute to the build environment in a controlled traceable manner. Changes to containers can be rolled back almost instantly, so you can remedy bad changes almost instantly. Lastly, a light weight integration testing environment can be set up quickly for more in-depth testing in the pipeline with minimal cost. The more I worked with containers the more I realized I needed more than just the local registry to be effective.
Working with Docker
When working with one container the temptation is to make all your changes to the container, commit them, and viola you are done. It did not take me long to realize this was a bad idea, the first set of OS updates I had to make to the container made me realize I was doing something wrong. The container size was ballooning and the maintenance on the containers was unwieldy. I soon realized I needed to use Dockerfiles. Since most of the work taking place inside our virtual environment, I also realized a private docker registry was in order. Once my use of docker expanded, space became an issue as well. Lastly, since I am now build more and more containers regularly fast IO became necessary as well.
Why Dockerfile?
One of the most difficult issues with maintaining an operating system is the constant stream of updates for security and functionality. At a minimum, to keep my docker images up to date, I would need to open up my image, do package updates, and push a new image at least once a day. This is the only way to satisfy some very demanding developers and security specialists. Enter the Dockerfile, I can describe my change set in the Dockerfile and allow the base container to be managed by the upstream organization (CENTOS, RHEL, Ubuntu). This has two advantages, the upstream maintainers will create minimal images that take up little space and add necessary hooks and packages so that the underlying platform works reliably with docker. The Dockerfile enables you to inherit the hard work of other organizations and focus on only your changes. I can use the following to create my build container.
FROM centos:latest

RUN yum -y install uuid openssh-server openssh-clients passwd initscripts wget unzip git ca-certificatesn openssl sudo; yum clean all
RUN useradd jenkins
RUN mkdir -p /root/.ssh
RUN mkdir -p /home/jenkins/.ssh
RUN rm -f /etc/ssh/sshd_config
ADD ./sshd_config /etc/ssh/sshd_config
ADD ./jdk-8u112-linux-x64.rpm /jdk-8u112-linux-x64.rpm
ADD ./rootpass.sh /rootpass.sh
ADD ./jenkinspass.sh /jenkinspass.sh
ADD ./start.sh /start.sh
ADD ./authorized_keys /root/.ssh/authorized_keys
ADD ./authorized_keys /home/jenkins/.ssh/authorized_keys
ADD ./gradle-env.sh /etc/profile.d/
RUN ssh-keygen -t rsa -f /etc/ssh/ssh_host_rsa_key -N ''
RUN wget https://services.gradle.org/distributions/gradle-3.3-bin.zip
RUN unzip -d /opt/ gradle-3.3-bin.zip
RUN rm -f gradle-3.3-bin.zip
RUN ln -s /opt/gradle-3.3 /opt/gradle
RUN cp /opt/gradle/bin/gradle /opt/gradle/bin/gradle.bin
ADD ./gradlewrapper.sh /opt/gradle/bin/gradle
RUN chmod 755 /opt/gradle/bin/gradle
RUN ln -s /opt/gradle/bin/gradle /usr/bin/gradle

ENTRYPOINT ["/bin/bash"]
This will set up ssh, install java, install gradle, and set up the ssh jenkins user so all the UIDs match up during a build. With docker I can focus only on my java and gradle versions. I can leave all the work of OS updates to the CENTOS people using the from statement. Because the changes to each image are actually quite small, I can now reasonably maintain several dozen images and only focus on changes that are relevant to my project needs. By changing the latest keyword after centos in the from statement I can even isolate the image to a particular sub-release like 7.0, 7.1, 7.2.
CI Setup
When my use of docker expanded beyond one image, I realized I needed infrastructure to maintain them all. I needed powerful automation tools to keep my images in sync and up to date, I needed caching, and I needed a way to organize and trim old containers and images centrally. In order to keep everything up to date you need to continually build your image for distribution internally. I realized this is a solved problem and I can use my handy Jenkins server to crank out my updates automatically. The next problem I needed to solve was distribution of the images. A sufficiently complicated CI/CD pipeline has many different build slaves and moving parts. With a large enough application you will have many machines wanting the images you are creating everyday, and the local docker registry is sufficient. For distribution and maintenance I found two tools that I liked above the rest, the Amazon EC2 Container registry and Sonatype Nexus 3 repository manager. Since we do a significant amount of work in the Amazon cloud, both solutions help keep network traffic within our VPC greatly decreasing docker build latency. Overall though I find myself favoring Nexus 3 repository manager for ease of image maintance and pruning. I find the UI helps me keep things cleaner and more manageable.
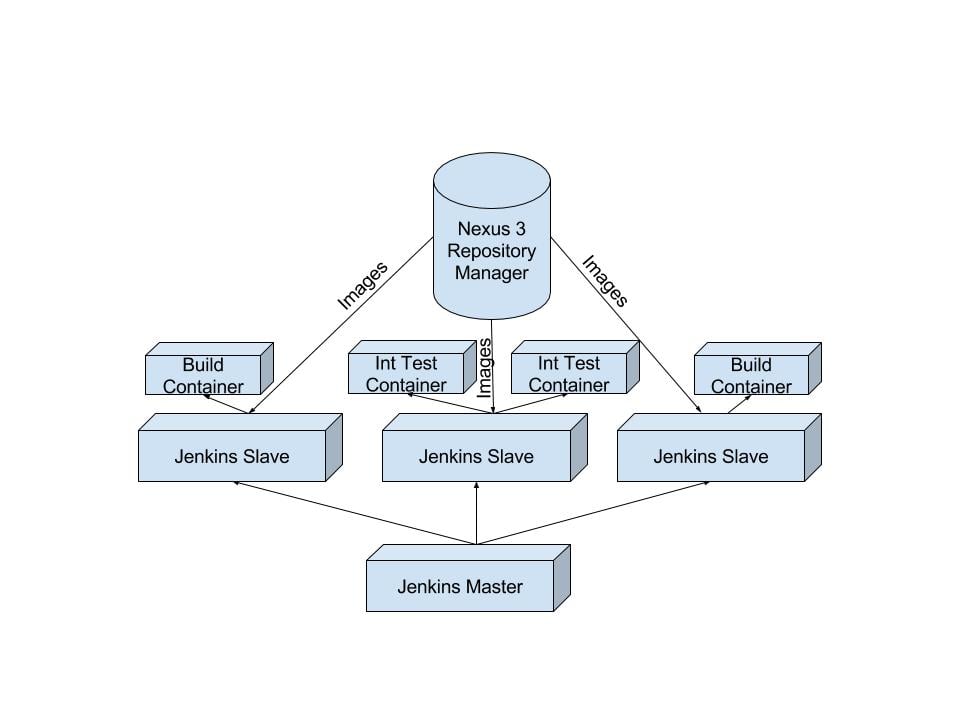
The above architecture allows a small cycle time in testing container changes, a reasonable footprint for an integration testing environment, and very fast container build times.
Hardware Setup Recommendations
With the maintaining of multiple images two things became apparent, I/O is a huge factor in build time and you need space to put all this stuff. When I am designing and building containers I actually do a majority of the work on my home equipment. The reason for this is simple, my jenkins slave that builds my container images is a 4 core Skylake CPU with an M.2 SSD hard drive. I keep the local docker registry and the jenkins workspace on the fast storage. This had the dramatic effect of dropping container build times from 5 minutes to 45 seconds after the first docker pull. The reduced cycle time allows me to make and test changes extremely quickly for increased productivity. The second thing you need is space. Once the container image is created I push it to a local Nexus 3 instance which is backed by a high capacity NAS. The NAS storage is much slower than the M.2 hardrive by a large margin, however I can keep a full history of almost every version of every image I’ve created. The high capacity storage allows me to prune the local docker registry on the fast storage frequently while not sacrificing the record of what I have done. Once I settle on a final docker image in my home lab, I can then push the image to our Amazon environment for broader use.
Conclusion
With the promise of reduced risk for pipeline changes, higher pipeline uptime, and putting more control in the developers hands docker is clearly going to be more prevalent in the coming months and years. Your docker development should take advantage of the same automated testing and tooling that your code enjoys. Docker builds can require more disk I/O than a typically Java or C++ compile so it is important to marshal you fast storage effectively. With some careful configuration of your existing CI infrastructure you can be churning out containers faster than ever so you can support more in depth testing and create higher quality code with every run through your pipeline.

