
In the last project I was involved in I needed to establish a connection between a Windows Server 2012 instance in Amazon Web Services (AWS) and a physical Synology network-attached storage (NAS). The challenge was that the NAS was located at a remote site and was behind a router. I needed to do this in order to automate file transfer between the server and the NAS over FTP with TLS. To accomplish this task we used WinSCP Client on the Windows Instance and configured the Synology NAS as an FTP server. Let’s take a closer look at the network configurations and settings that we had to change to accomplish this. The basic steps involved were:
- Configure the Windows Server
- Configure the router to which the NAS was attached
- Configure the NAS itself
The following sections detail how these steps were accomplished:
Windows Server Configuration
The first thing we had to do was to check whether our Windows instance had outbound access on any ports. If it did not then we would add custom TCP rules to open outbound ports (port 21 in our case) in our Security Group that was associated with our Instance in AWS. A security group that I used was already setup for outbound traffic. All ports were open so we did not need to make any changes there. This allowed us to communicate to the Synology NAS over port 21. However, we did have to make a change to inbound traffic and open ports 55536-55543 for Passive FTP data channel.
Remote Router Configuration
The next step was to configure the router that the Synology NAS was hiding behind. To do this, we added some custom rules to the router’s routing table. For a home setup navigate to your router’s IP address (the default is usually 192.168.1.1 or 10.0.1.1) and login to change Firewall/Security settings. For offices, take the crossover cable and connect to the router from your computer. Once you establish ssh connection with the router you can configure the routing table.
The following rules needed to be changed:
- Route all command traffic from port 21 to Synology NAS.
- The other rule was for the data channel to ports 55536-55543 for Passive FTP on Synology NAS.
Synology NAS Configuration
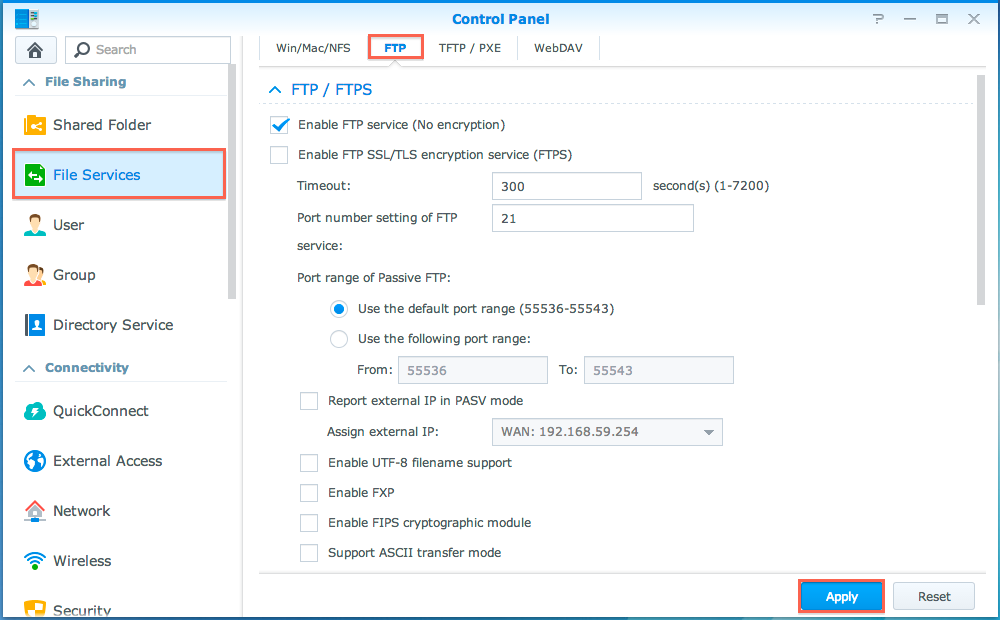
Finally, the Synology NAS itself needed to be configured. It has a great web interface (pictured below, please note that the picture below does not represent the accurate configuration) that can be accessed from default port 5000 (ex. 192.168.1.100:5000). From the Synology interface open the “Control Panel” and navigate to the “File Services” section on the left. An “FTP” tab on the right hand side then appears with the FTP server configuration settings. To Enable FTP over TLS we checked the “Enable FTP SSL/TLS encryption service (FTPS)” checkbox. We did this because it is more secure than regular FTP. We also disabled anonymous login under the “Shared Folder” section and in the Advanced FTP settings to ensure that only authenticated users had access. Finally, we had to let the client know the external IP of the server for passive FTP by checking “Report External IP in PASV mode” box.
At this point, all the networking setup is complete. Prior to connecting with your client make sure that you have users, passwords, and permissions setup properly for each share that you want to be accessed over FTP. This is generally done within “Shared Folder” section of the “Control Panel”. Select the volume you want to edit and change permissions under “Permissions” tab. You can also automate the FTP process utilizing applications like WinSCP and some Windows Batch file scripting. I plan to write another blog with an example of this and will post a link to that once it is available.

