
Managing your code in Chef is just as important as managing your application’s source code. Improper management of your cookbooks will almost guarantee mistakes, frustration and even failure. For the sake of this post, I will assume that you will be able to use git as your SCM. So first, we will set up an empty git repository. The simplest way is to create a new repository in your git services UI, clone the repository, then follow the next steps to create your chef repository in the newly cloned repository.
Setting up a repository for your chef code is a very simple and important step. The Chef repository is a place where all chef code lives. This includes, but is not limited to the cookbooks, data bags, environment, and roles. The most basic and common set up for a Chef repo is:
chef_repository

--cookbooks/

--data_bags/

--environments/

--roles/

--README.md
You can either set this up manually on the file system, or you can have the Chef Development Kit create the repository for you like this:
chef generate repo REPO_NAME.
Now that we have our chef code in a git repository (and in our chef server) it is possible that the two code bases can drift and cause major problems down the line. For example, if you upload a cookbook straight to the chef server without committing and pushing your changes to git, your changes are very likely to be overwritten. Vice versa if git is updated, but not the chef server, the updated version of the cookbook will not be available to use. Both of these problems can be solved by syncing the chef git repository and the chef server in an automated fashion. For my example, I will assume that the git repository is the source of truth. That means I will always take what is in my local git repo and push that to the Chef server git repo.
There are many ways a user could choose to run this script; I am choosing to have our Jenkins server run the script on every commit to the master branch. The scripts are very simple, they simply take in a text file then line by line upload the cookbook/environment/role to the chef server using their specific syntax:
upload.sh
while IFS='' read -r line || [[ -n "$line" ]]; do
    knife cookbook upload -o ${WORKSPACE}/chef/cookbooks/ $line
done < "$1"
uploadRole.sh
while IFS='' read -r line || [[ -n "$line" ]]; do
    knife role from file ${WORKSPACE}/chef/roles/$line
done < "$1"
uploadEnvironment.sh
while IFS='' read -r line || [[ -n "$line" ]]; do
    knife environment from file ${WORKSPACE}/chef/environments/$line
done < "$1"
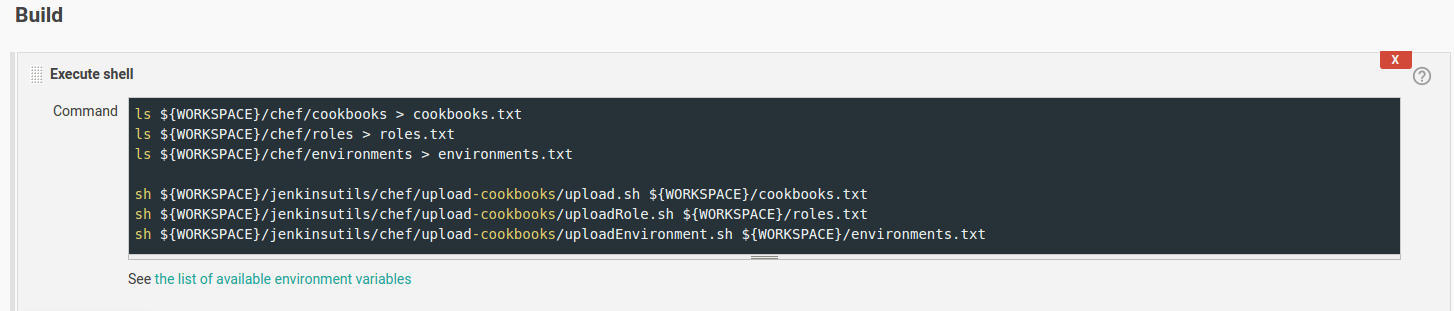
The final step in this process is to create the Jenkins job. The first thing the Jenkins job will do is clone the chef repository, then generate the lists of cookbooks, roles, and environments. Finally, the script will pass the lists of files to their respective upload scripts:
Now, code drift is a thing of the past.

