
Introduction
This is the second part of a series of tutorials focused on the process of creating, deploying, and consuming a Node.js REST microservice.
In part one of this series, I walked through the initial creation process. I demonstrated how to leverage Node.js and just a few modules to create a functioning REST microservice. While at the end of part one, there were multiple routes listening and responding to requests, they didn’t actually do much of anything.
As previously mentioned, I will keep in consideration the tenants of a Twelve-Factor app. As appropriate, I will point out how the chosen design decisions conform to the various factors.
In this part, I will explain how to setup a database and connect it to the REST service. I will then update the routes to have full persistent CRUD functionality. In addition, I will discuss how to store and load configuration in a twelve-factor app.
I will be running the database as a docker container. Therefore, if following along with these instructions, Docker CE will need to be installed. Installation instructions for various operating systems can be found here.
The code used in this post is available here: https://github.com/justin-coveros/node-ms-part-two
Store the Data
Using the code from the previous part as the starting point, the first thing I will add is a database. MongoDB is the database that will be used for the rest of this series. As mentioned in the introduction, I will run the database as a docker container.
MongoDB is one of the most popular and prevalent NoSQL databases. In-depth discussion of the differences between SQL and NoSQL is beyond the scope of this blog series. Suffice it to say MongoDB stores data as semi-structured collections of JSON documents, and uses JSON as its query language.
The official Mongo Docker Hub page describes the image to be used. It details the many configuration options that may be set. For the purposes of this blog, the default setup is sufficient. The database and collection will be automatically created when data is first inserted and does not need to be setup when the container is launched.
docker run -d -p 27017:27017 -v dbdata:/data/db mongo:4.0The above command will start the container, map the host port 27017 to the container port 27017, and map the host docker volume dbdata to the container path /data/db. Doing this will persist the data even if the docker container is stopped or restarted.
Configuration
Factor III of the Twelve-Factor app explains how to store configuration. It stresses storing configuration in environment variables and not in code. Further, each environment should separately maintain its full set of configuration. Every environment is unique and should be treated as such.
Install Dotenv
The node module dotenv will be used to load environment variables from a configuration file and make them available to the service. Use npm to install this module.
npm install dotenvConfigure Variables
Create a .envfile in the root directory with the following environment variables (the values will vary depending on how you started the database container).
DB_PORT=27017
DB_HOST=127.0.0.1
DB_DATABASE=task
PORT=8080
The example above presumes that the database container is running on the same host as your service under development. The first three environment variables configure the connection to the database, while the PORT variable configures the service port.
Load Variables
Load the configuration by placing the below line at the top of the main server.js script.
require('dotenv').config();This assigns all the variables in the .env file to process.env. For example, to access the value of PORT in server.js, you would include the below line.
const PORT = process.env.PORT || 8080;Finally, .env needs to be added to the .gitignore file so that it does not inadvertently get pushed to the remote repository. This final step guarantees adherance to Factor III. Every developer should locally maintain their own copy of .env.
Below is my current .gitignore file. This file prevents the node_modules dependency folder, the IDE-specific .idea folder, and the .env file from being committed to the git repository.
node_modules
.idea
.env
Make the Connection
Now that the database is running, it is time to create the service’s object data modeling layer. Mongoose handles both the connection to the database as well as the data modeling and manipulation. Install mongoose the same way as other node modules.
npm install mongooseConnecting
Create a new file lib/connect-to-db.js to establish the database connection.
const mongoose = require('mongoose');

mongoose.Promise = global.Promise;

module.exports = async (dbOptions = {}) => {
  const {
    host = 'localhost',
    port = '27017',
    database = 'task'
  } = dbOptions;

  const options = {
    useNewUrlParser: true,
    useFindAndModify: false,
    useCreateIndex: true
  };

  const uri = `mongodb://${host}:${port}/${database}`;

  try {
    await mongoose.connect(uri, options);
    console.log('Connected to database');
  } catch (err) {
    console.error('Database connection failed: ', String(err));
  }
};
This function accepts an object with the database host, port and name values, forms the URI connection string, defines a number of options, and then attempts to connect to the database. Based on the outcome of the connection attempt, the function will output either a success or failure message.
Reading the Configuration
Update server.js to load the database configuration from .env and call the function created in the previous step. Below is the updated server.js file.
require('dotenv').config();

const Koa = require('koa');
const routes = require('./lib/routes');
const connectToDb = require('./lib/connect-to-db');

const app = new Koa();

connectToDb({
  host: process.env.DB_HOST,
  port: process.env.DB_PORT,
  database: process.env.DB_DATABASE
});

const PORT = process.env.PORT || 8080;

// Load the routes
app.use(routes());

// Start the server
const server = app.listen(PORT, () => {
  console.log(`Listening on ${PORT}`);
});
Modeling the Data
Create a new file lib/Task.js to define the task schema and export the model. This initial version of the task schema is very simple and only defines two basic fields. The title field is defined as a required string attribute. Mongoose will throw a validation error if an attempt is made to insert a task document without a title. The completed attribute is a Boolean intended to track whether a task has been completed or not. There are many other configuration options described in the mongoose schema documentation.
const mongoose = require('mongoose');
const Schema = mongoose.Schema;

const schema = new Schema({
  title: { type: String, required: true },
  completed: Boolean
});

module.exports = mongoose.model('Task', schema);
Update the Endpoints
Create Controller
Create a new file lib/controller.js to define the functionality executed in response to service requests. The controller handles the interaction between the service routes and the data store. The Task model is imported into the controller and used to perform CRUD operations against the database. This file makes use of a number of Mongoose model functions, described in detail here.
const Task = require('./Task');

exports.getTasks = async ctx => {
  ctx.body = await Task.find();
};

exports.getOneTask = async ctx => {
  const id = ctx.params.id;
  const task = await Task.findById(id);

  if (!task) {
    ctx.throw(404, 'Task not found');
  }
  ctx.body = task;
};

exports.createTask = async ctx => {
  let values = ctx.request.body;
  let newTask = await Task.create(values);

  if (!newTask || !newTask._id) {
    ctx.throw(500, 'Error creating task');
  }
  ctx.body = newTask;
};

exports.updateTask = async ctx => {
  const id = ctx.params.id;
  const values = ctx.request.body;

  let foundTask = await Task.findById(id);

  if (!foundTask || !foundTask._id) {
    ctx.throw(404, 'Task not found');
  }

  let updated = await Task.findByIdAndUpdate(id, values, { new: true });

  if (!updated || !updated._id) {
    ctx.throw(500, 'Error updating item');
  }

  ctx.body = updated;
};

exports.deleteTask = async ctx => {
  const id = ctx.params.id;

  const task = await Task.findById(id);
  if (!task) {
    ctx.throw(404, 'Task Class not found');
  }

  let deletedTask = await Task.findByIdAndRemove(id);

  if (!deletedTask) {
    ctx.throw(500, 'Error deleting task');
  }

  ctx.body = deletedTask;
};
Update Routes
Update lib/routes.js to remove the middleware function definitions from the routes. By placing the functionality into lib/controller.js, and exporting them into this file, the route definitions are simplified, and the separation of concerns enhanced.
const koaBody = require('koa-body');
const Router = require('koa-better-router');

const controller = require('./controller');

module.exports = () => {
  let router = Router({prefix: '/api'}).loadMethods();
  router.get('/task/:id', controller.getOneTask);
  router.get('/task', controller.getTasks);
  router.post('/task', koaBody(), controller.createTask);
  router.put('/task/:id', koaBody(), controller.updateTask);
  router.delete('/task/:id', controller.deleteTask);
  return router.middleware();
};
Test the Routes
To start the updated service, run npm start. I will use my IDE to test the endpoints, but any number of other testing methods can be used. There are five endpoints currently defined, I will demonstrate two of them.
First, I will create a task by sending a POST request to /api/task. This route is defined in lib/routes.js to call the createTask controller function in lib/controller.js.
router.post('/task', koaBody(), controller.createTask);That function pulls the values from the request body and inserts a new task document into the database. If successful, the created task is returned as the response.
exports.createTask = async ctx => {
  let values = ctx.request.body;
  let newTask = await Task.create(values);

  if (!newTask || !newTask._id) {
    ctx.throw(500, 'Error creating task');
  }
  ctx.body = newTask;
};
The below image shows a task successfully being created and returned in response to this request.

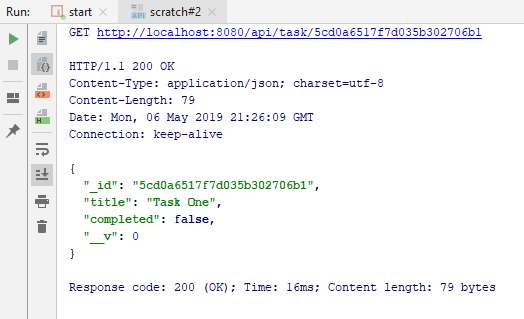
Now that the task has been created, it can be retrieved using a GET request and its _id value. This route is defined in lib/routes.js to call the getOneTask controller function in lib/controller.js.
router.get('/task/:id', controller.getOneTask);That function pulls the id parameter from the request URL and uses the Task model to query the database. If the task is found, it is returned as the response. Otherwise, a 404 error is returned.
exports.getOneTask = async ctx => {
  const id = ctx.params.id;
  const task = await Task.findById(id);

  if (!task) {
    ctx.throw(404, 'Task not found');
  }
  ctx.body = task;
};
The below image shows the task successfully being retrieved from the database and returned in response to this request.
Next Steps
In subsequent blog posts, I will demonstrate:
- Adding in testing to ensure correct and high quality code
- Converting the application into a docker image
- Leveraging various security modules such are cors, csrf, and helmet
- Using websockets for push-based communication with the front-end UI
- Using ZeroMQ for simple message-based communication between microservices
- Creating a Node.js-based API gateway for simple proxying between layers
- Adding in RBAC checks to the routes
- Converting to Typescript
- Using Jenkins for continuous integration
- And more

